Points Menu
6.09 Point Manager (PM)
FUNCTION: The Point Manager is a powerful tool used for selecting points, editing points, and defining data sets as point groups. It may also be used for simple coordinate translation and group editing of descriptions, symbols, and layers.
Activate the Point Manager routine by picking from the Points menu; by left-clicking the [Pts] button (whenever available) at any point number prompt, pressing [Alt][P], [M] or by typing PM at any data entry prompt. You also have the option of opening the Point Manager window immediately after opening a job file or importing points.
The Point Manager window is a primary focus window. In other words, when the Point Manager window is open you cannot switch to any other “Sight” Survey window simply by clicking on it. You must close the Point Manager window first before “Sight” Survey will allow you to change focus to another window.
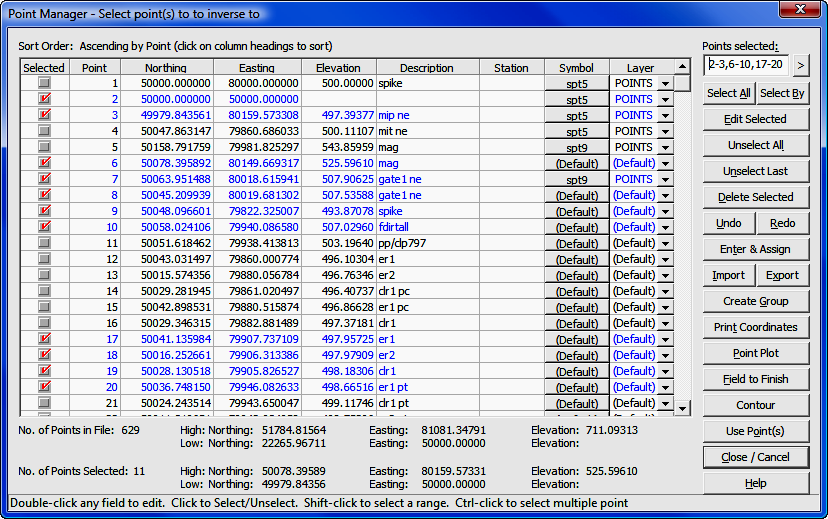
The Point Manager window has several obvious features. First and foremost, is a point table containing all the information for each point in memory. Below the table you will see a summary of the file and also the set of selected points. This information shows the number of points (total and selected) along with then high and low values of the positional coordinates and the elevations.
Resizing Columns: You can click, hold and drag a column border to resize the column width.
Editing Data in a Cell: You can directly edit data in any cell by double-clicking on the cell. If you make an error while typing data but have not yet pressed [Enter], press the [Esc] key on your keyboard and the original data will replace your typo. If you have already pressed [Enter], then use the Undo/Redo functions described later in this section.
Sorting Data in the Table: By default, data is sorted by ascending point numbers, but you can sort data by any column parameter by left-clicking on a column heading. Data will be sorted in ascending order. Click the heading again to sort data in a descending order.
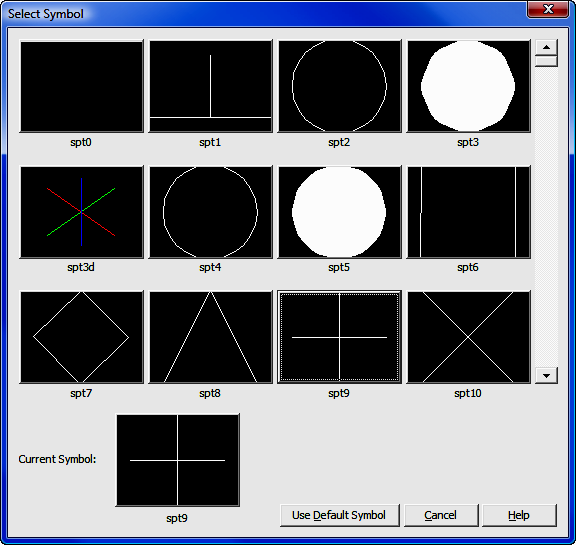
Symbols: To assign or change the symbol associated with a point, click the button in the Symbol column for the Select Symbol dialog. To select a symbol, use the slider bar on the right side of the Select Symbol dialog until the desired symbol is visible, then left-click on the symbol.
Layers: To change the layer assigned to the point, click the [q] arrow and select from a layer list. If you want to use a layer that is not on the list (currently in the drawing) simply enter the name of the layer. When the point is drawn, the layer will be created.
|
|
SYMBOLS, LAYERS & POINT CONFIGURATION NOTES:
|
Selecting Points: To select points, click the checkbox in the Selected column, or type points into the Points Selected field as described below. The Selected column acts as a toggle and once selected, points will remain selected until they are unselected, again by clicking in the Selected column or by clicking the [Unselect Last] or [Unselect All] buttons. All selections are cleared when the Point Manager is closed.
Points Selected: The Points Selected field is a dual purpose data entry field. As you click in the table to select points the chosen points are shown as a string of data in the Points Selected field. You may also select points by typing point numbers and ranges directly into the Points Selected field. You may also mix your entry by clicking on some points and directly entering others. When entering points directly into this field, you need to press [Enter] or click [>] to the right of the field to complete the point entry. Only when the points actually show in the spreadsheet as "selected" are the points tagged for selection.
[Select All]: Quickly select all the points in the table by clicking this button or by pressing [Alt][A].
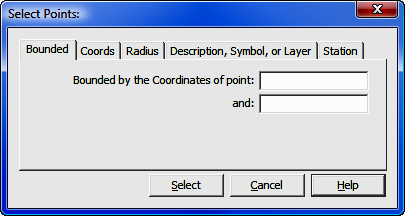
[Select By]: Click this button or press [Alt][B] to quickly select groups of points by various parameters. Select By presents several options in a single, tabbed window. Click on tabs to access these options:
Bounded: This option allows you to identify two points and have “Sight” Survey select all the points that lie in the region bounded by the coordinates of those points. Enter the point numbers as prompted and click [Select] or press [Enter] or [Alt][S].
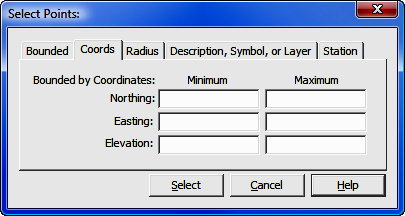
Coords: This option allows you to identify the selection region by coordinate values and “Sight” Survey select all the points that lie in the rectangular region bounded by those points. This option has the added advantage of allowing you to select points by using a single coordinate parameter. In other words, you can select points lying in a Northing range, irrespective of the Eastings and vice-versa. Or you can ignore the Northings and Eastings altogether and select points lying within a range of elevations. Enter the coordinate values as prompted and click [Select] or press [Enter] or [Alt][S]. To ignore a particular field, simply leave the field blank.
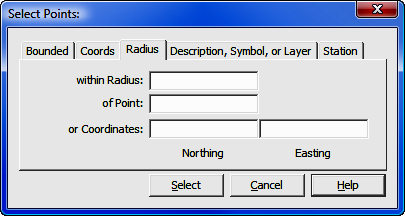
Radius: This option allows you to select all points within a radius distance of a known point or coordinates. Enter the radius values and either a point number or coordinates as prompted and click [Select] or press [Enter] or [Alt][S]. You cannot enter both a point number and coordinate values as an entry into either field will disable the other option.
Description, Symbol, or Layer: Use this option to define a selection set by any single parameter, or any combination of parameters.
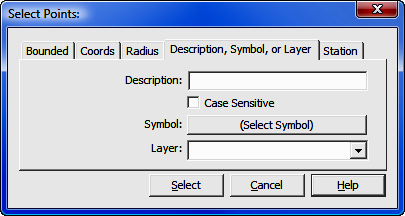
When searching for a description, you can use a wildcard character ( * ) to indicate partial matches. For example, an entry of “*sidewalk” would seek out all points where the description ended with the word “sidewalk.” Similarly, “sidewalk*” would find points that begin with “sidewalk,” and “*sidewalk*” would find all points having a description containing the word “sidewalk.” Descriptions may be case sensitive.
To choose a Symbol click the [Select Symbol] button and select a symbol from the graphical interface that appears.
To choose a Layer, click [q] and pick from the drop down selection box or type in a value. After entering the values as prompted click [Select] or press [Enter] or [Alt][S].
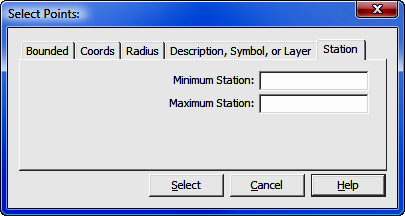
Station: Enter a minimum and maximum station value and “Sight” Survey will find all stationed points within the specified range. You do not need to enter the + key when entering stations. For example, enter station 12+25.3 simply as 1225.3. After entering the stations as prompted click [Select] or press [Enter] or [Alt][S].
[Edit Selected]: Click this button or press [Alt][E] to edit certain aspects of the point selection set.
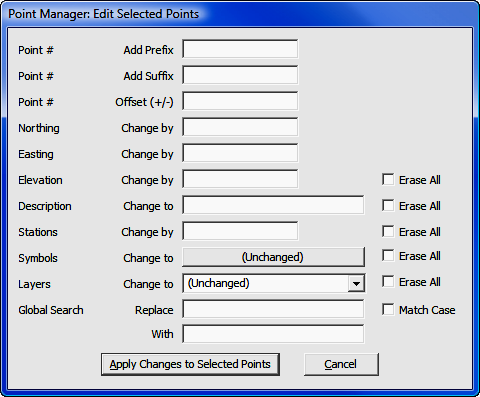
Using the Edit Selected function you can: perform simple coordinate translations; set elevations to null; change or clear point descriptions, stations, symbols, layers, and field codes; or use a global search and replace function to edit portions of descriptions.
When translating coordinates, the value in the Change by field may be either positive or negative. The value will be applied to all the coordinates in the selection set.
Once you have made your changes, click [Apply Changes to Selected Points] or press [Alt][A].
[Unselect All]: Click this button or press [Alt][L] to quickly unselect all selected points.
[Unselect Last]: Click this button or press [Alt][N] to unselect the last selected point(s). Continually using this function unselects points in the reverse order that they were selected.
[Delete Selected]: Click this button or press [Alt][D] to quickly delete all information from the selected points. You will be asked to confirm your intention to delete the points before they are actually deleted. You can recover deleted points by immediately clicking the Undo key or by pressing [Alt][U].
[Undo & Redo]: Click this button or press [Alt][U] to undo or roll-back previous operations, such as point deletion or edits. If you find you want to redo and undone action, click Redo or press [Alt][R].
[Enter and Assign]: Click this button or press [Alt][T] to enter a new point into the file. When you click this button, a blank line is added to the table of data and you can add point number, coordinates, descriptions, etc. to the line. Simply press [Tab] or [Enter] to move between fields.
[Import]: Click this button or press [Alt][I] to import point data from another file. Follow the instructions contained in File > Import ASCII Files (see Section 3.08).
[Export]: Click this button or press [Alt][X] to export point data to another file. Follow the instructions contained in File > Export ASCII File (see Section 3.10).
[Create Group]: Click this button or press [Alt][G] to create a point group. A point group (or Defined Figure) is a list of random and/or sequential point numbers which you access as a single entity, thus saving you from having to enter the particular point string each time you want to access it. Creating and using point groups is discussed in Defined Figures (Point Groups) routine (DF or PG - Section 6.20).
Print Coordinates: Click this button or press [Alt][T] to list selected points to your printer.
[Point Plot]: Click this button or press [Alt][P] to produce a point plot in the CAD window. Points and associated attributes are drawn according to the properties as set in the Drawing Properties menu (PR - Section 5.10).
[Field to Finish]: Click this button or press [Alt][F] to process and draw the selected points using your field codes with the Field to Finish routine (FF - Section 6.33).
[Contour]: Click this button or press [Alt][T] to draw a contour map using the selected points. This button transfers the selected points to the Contour routine (CI - Section 11.02).
[Use Point(s)]: Click this button or press [Alt][O] to return the selection set to the calling routine, i.e. the routine from which you called the Point Manager. For example, if you click the [Pts] button in the To Point field of the Inverse routine and select several points in the Point Manager, those points will be returned to the Inverse routine for processing.
[Close / Cancel]: Click this button or press [Alt][C] to cancel point selection and close the Point Manager.