|
Calculator
|
|
Calculator
|
This command eliminates the need to carry a separate calculator in the field. The calculator can be used to do scientific computations, standard calculations, conversions, triangle calculations including angles and curve calculations.
Standard Calculator
This calculator allows for most basic calculations to be done with this tool. Memory functions are also available.

Scientific Calculator
Values can be entered on the X register by typing on the keypad. The values can be rolled up and down with the up and down arrow keys and the Roll and RollD buttons on the screen. The Enter key finishes the entry of a number and pushes the stack. The C on the touch screen clears an entry. Additional functions on the screen can be obtained through touching the scroll [<] and [>] area of the screen.

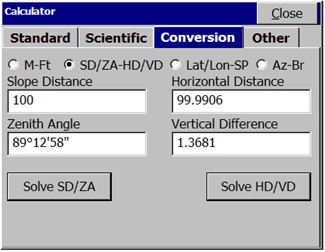
Conversion Calculator
Conversion values can be entered for various unit types and scenarios.
Feet, Meters and International Feet
Degrees, Minutes, Seconds and Gons/Grads and Decimal Degrees


After completing a conversion, you may enter a point ID and press Save to save the coordinates to the current job. You can also change the type of transformation or zone system used. If you don’t want NAD 83 (primarily used in the U.S.) you can go to Job Settings, GPS and change the Transformation type. For example, you could change the Transformation to UTM or NTF-France. Then back in Calculator, your coordinate to Lat/Long calculation would be based on the configured transformation. Note that when converting Grid System Coordinates to WGS84 coordinates and going WGS84 to Grid, for example, the geoid separate file (if any) is applied to the calculation.

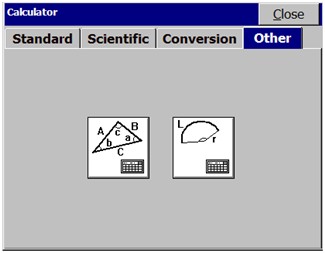
Other Calculations
There are two types of calculations that can be done from the Other tab. Click the large, square icons to go to the Triangle or Curve calculator.
Triangle Calculator
The next figure shows the Triangle calculator. The top of the dialog box indicates the mode of calculation. To change the mode, simply use the pull-down and pick on the desired mode.

After choosing a mode, simply apply the values to the appropriate blank and hit solve. Points from your current job can be selected to fill out the blanks as well. The points can be selected from the screen or from the point list by picking the appropriate button icon. After the calculations have been performed, there are choices of: Clear, Results, and View Triangle. Clear will clear the entry fields. Results will show the results dialog again. View Triangle will draw the triangle on the screen connecting the points chosen for the calculation.
Curve Calculator
The next figure shows the Curve calculator. Simply use the pull-down at the upper left and pick on the desired method of curve calculation.
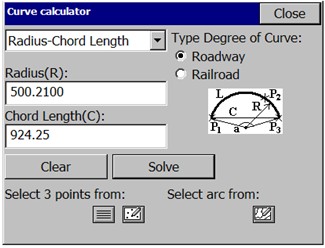
The type of curve can be toggled between roadway and railroad. Values can be entered into the blanks by keyboard entry, by selecting points from the current job from a point list or from the screen, or by selecting an arc drawn on the screen. Once the values are entered, the results show on the screen. The results can be visualized by selecting the results button. The curve can be viewed on the screen by selecting the view curve button.