|
Store Points
|
|
Store Points
|
Store Points is the principle data collection routine for GPS equipment. Store Points interacts with numerous settings, including the feature codes, and will draw line work. The Store Points screen in GPS shows the cursor moving on the screen in real-time. Shots can be taken anytime by pressing Enter. The screen will pan automatically, so you are always in view as you move. Points will plot on the screen as shots are taken.
In GPS mode, Enter has only one function: Read & Store. If you want the ōafter-shotö antenna height and description prompt, then that can be turned on in Configure Reading (C or Alt C from the Store Points screen). If you don’t have the height and description prompt turned on, then each shot is a single press of Enter, and you must put any antenna height changes or description or point ID changes in ahead of time, prior to pressing Enter.
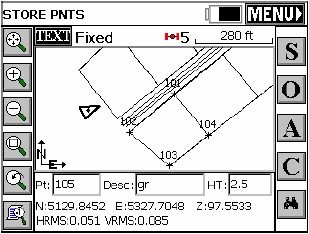
Coordinates are displayed at all times, as well as the Status (Fixed, Float, Autonomous) and HRMS and VRMS accuracy estimates. The icons at the left are for zooming and panning. From top to bottom, they are zoom extents, zoom in, zoom out, zoom window, zoom previous and point display control. If you prefer to work in a pure ōTextö screen, without graphics, you can tap the ōTEXTö button in the upper left. The following dialog will appear.
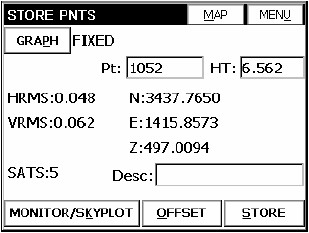
The Text screen uses a large character size for easy viewing, and limits options to Monitor/Skyplot, Offset and Store. You can return to the ōGraphö view by tapping the Graph button. You can also temporarily view your points on the screen by tapping ōMapö, then tap ōBackö to return to the text-based data collection screen. Note that the program will ōrememberö which screen you were in last (Graph or Text) and return to that ōmodeö of data collection automatically.
![]() In addition to pressing Enter, points can be stored by tapping S on the screen, or Alt S on the keyboard.
In addition to pressing Enter, points can be stored by tapping S on the screen, or Alt S on the keyboard.
![]() Pressing O for Offset leads to a GPS Offset screen that has options for keyed in offsets, as well as offsets taken by laser devices that measure distance only, or distance and azimuth (by compass).
Pressing O for Offset leads to a GPS Offset screen that has options for keyed in offsets, as well as offsets taken by laser devices that measure distance only, or distance and azimuth (by compass).
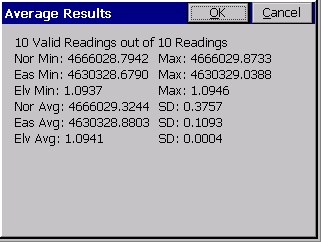
![]() With GPS, since shots ōclusterö around the true point location, it may add to accuracy to average 10 or more GPS readings when taking measurements. You will be prompted for how many readings to take (up to 999). Taking 100 readings is also a way to guage how fast your GPS equipment takes measurements. If 100 readings are taken in 10 seconds, you are reading at 10 per second, or 10 ōhertzö (hz). After the readings are taken, a display appears showing the range and standard deviation of the readings.
With GPS, since shots ōclusterö around the true point location, it may add to accuracy to average 10 or more GPS readings when taking measurements. You will be prompted for how many readings to take (up to 999). Taking 100 readings is also a way to guage how fast your GPS equipment takes measurements. If 100 readings are taken in 10 seconds, you are reading at 10 per second, or 10 ōhertzö (hz). After the readings are taken, a display appears showing the range and standard deviation of the readings.
![]() You can press C (or enter Alt C) to go directly to the Configure Reading screen, where you can set the number of readings to average, specify to store only fixed readings and turn on or off the Hgt/Desc prompt on Save.
You can press C (or enter Alt C) to go directly to the Configure Reading screen, where you can set the number of readings to average, specify to store only fixed readings and turn on or off the Hgt/Desc prompt on Save.
![]()
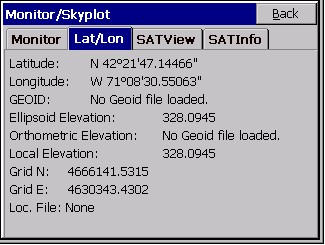
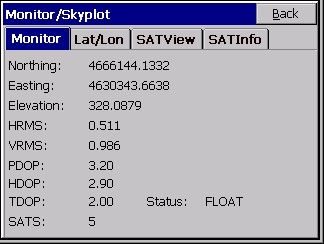
The Monitor/Skyplot screen is available for further status feedback by clicking the ōBinocularsö icon. Monitor has both a Coordinate and Lat/Long display, as shown in Figure 4-54.
In the Latitude/Longitude ōtabö, you can verify use of a Geoid for elevation adjustment, and also see your ōLocalization Fileö, which governs the transformation from Latitude and Longitude to local coordinates. It is a good habit to verify your Localization File in this screen prior to starting work, to ensure you are using the correct file. If no ōLoc. Fileö is shown, however, you will get unadjusted coordinates based solely on your Latitude and Longitude, as applied to the configured Transformation (eg. UTM, SP83, etc.).