|
Sideshot/Traverse
|
|
Sideshot/Traverse
|
This command, designed for total stations and manual entry. It is the principle data collection routine with total stations. Sideshot/Traverse interacts with numerous settings, including the feature codes that will draw line work. All settings in Configure Reading will impact Sideshot/Traverse, including the Number of Distance Readings, Average Direct & Reverse, Hgt/Desc Prompt on Save, Angle Only in Reverse Face and Function of Enter Key.
Foresights
The Foresight Screens are entered automatically after exiting the Take Backsight screen. The Foresight Screen is also entered quickly, after selecting Sideshot/Traverse from the main menu, if you press Enter or OK in the Backsight Point screen. When you choose Sideshot/Traverse, you are always given the option to accept the default backsight orientation and go straight to your foresights. There are 2 major types of Foresight Screens: (1) Standard Total Station, (2) Robotic Total Station. The GPS screen is discussed under the Store Points chapter. The total station screens are discussed next.
Standard Total Station Foresight Screen
Graphics or Text. Sideshot/Traverse (standard sideshots and traverses) can be run in either full graphics mode or full text mode. Graphic ōBackgroundsö can include linework that you create yourself using commands such as PL and 2DP and O2 (offset), or the graphics can include drawings that you ōdxfinö using the command IDXF (ōinö DXF) found in the Map view of SurvCE. When you exit SurvCE, this linework can be configured to ōsave on exitö and stay associated with your point file. Note that linewwork drawn by feature codes or ōdxf’d inö is on layers which can be ōfrozenö (hidden) or ōthawedö (shown) by the Layer command under View in the Map screen.
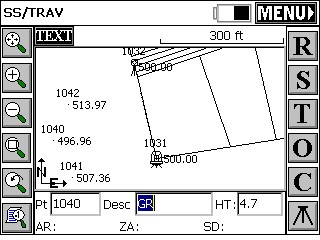
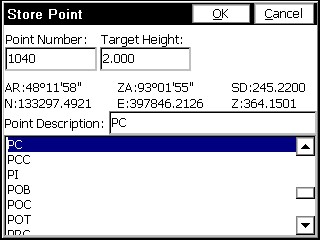
Unless the ōrod hgt/descriptionö prompt is clicked on, the Sideshot/Traverse screen is designed to ōquick-storeö points, with the user expected to enter, ahead of time, the correct description and rod heights in the edit boxes shown at the bottom of the dialog.
Robotic Features
The ōstatusö of the robot is displayed in the upper left-center, next to TEXT and above the Map. Status modes include:
The upper left buttons will display ōSRCHö and "STDBY" (Leica will display a combo button "SRCH" or "STDBY" and "DIST") The search and standby buutons let you initiate a Search after a ōLost Lockö condition, or go to Standby if Tracking was active (to drive a hub and stop the gun from moving), or go back to Search, leading to Tracking, from Standby (after driving the hub).
For Leica The ōDISTö button, takes the EDM signal on and off. With the signal on, more power is used, but you gain a lot by seeing continuous, real-time distance readings and by seeing your position on the screen, in the form of a triangle. Shots are nearly instantaneous, but respond to the ōfast-trackingö mode of the EDM (typically 10mm). If taken out of EDM Tracking, you lose your real-time movement on the screen, but measurements will respond to the accuracy of your Equipment Settings, which may call for standard or fine mode.
Note: The response to losing lock when taking foresights with robotic total stations is for the instrument to stop where it is. If you have set ōSearch when Lost Lockö on, the instrument will start searching immediately on loss of lock. Alternately, when running remote, you can use the joystick-arrow controls to move the instrument towards you and obtain lock again.