This command will list all of the points in the current coordinate (.crd) file. You can also edit any point in the list.
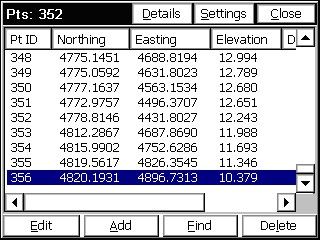
The above figure shows the List Points dialog. The point list includes Point ID, Northing, Easting, Elevation, and Description. The vertical bars in the ōheaderö lines separating Pt ID, Northing, Easting, etc. can be moved to ōcondenseö the display, as desired. The new positions, however, are not stored.
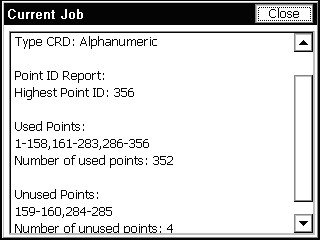
- Details: The number of points and highest point number in the file will now appear in the ōDetailsö option.
- Settings: Select the Settings button to customize the List Points display. The next figure shows the Settings dialog for List Points.
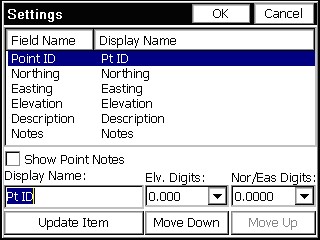
Show Point Notes: Notes can be placed in any order of the list, but can also be turned off, as shown above. (Only notes entered in response to ōPrompt for Point Notesö or ōEdit Notesö within List Points itself will display. Notes for GPS accuracy, time stamps and cutsheets, for example, appear in the raw file but not within List Points.)
Move Up/Down: To rearrange the order of the fields, highlight a field and use the Move Down and Move Up buttons.
Display Name: To rename a field, highlight it, enter a new name in the Display Name field and then tap Update Item. This would allow customization, where Northing, Easting could become X, Y as renamed, and ōre-orderedö header lines.
Precision (Elevation Digits - North & East Digits): The decimal precision for each field can also be set in the Options dialog.
- Edit: To edit a point in the list, double tap on it or highlight the point and tap the Edit button. You may edit any aspect of the point. To edit, move the cursor into the field of the aspect to modify and enter the new value. Choose OK to enter the edited point into the coordinate file, or choose Cancel to negate your modifications. The Input/Edit Attributes button refers to GIS data attributes associated with a point. These GIS attributes will export in the form of shape files (Tools pulldown in the Map screen). Few surveyors currently need the GIS attributing features of Carlson SurvCE, but these features help link SurvCE to the ESRI world, just as the DXF output of linework links to the CAD world.
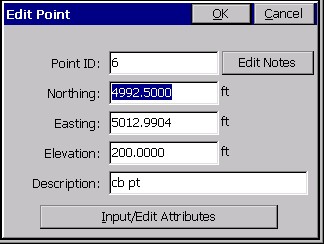
Note: If only the description value is edited, the raw data file will be updated without writing a store point record. If any other value that would change the point position is edited, the raw data file will record a store point record with the new postion of the point.
- Add: To add a point, press the Add button. The dialog add point dialog appears except all of the fields are blank. You must enter the point ID, northing and easting. A store point record will be written to the raw data file.
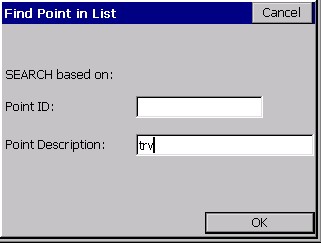
- Find: To find a point ID, tap the Find button. You can search for a point by Point ID or description, but not both at the same time. When searching by description, any part of the description can be used to find the point and gs* has the same effect as gs to find points beginning with gs. Both would find the dsescription ōgs Sta 1+00 L25ö.
- Delete: To delete a point, highlight a point ID and tap the Delete button. You will be asked to confirm this choice before the point is actually deleted.
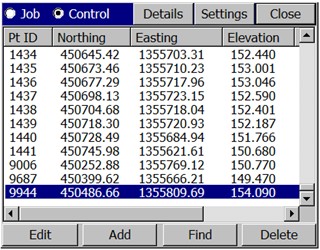
- Control File: When a control file is specified, List Points offers the option to select the control file and to list the control file points also. This feature enables the ōFrom Listö option found throughout SurvCE to access Control Points. The number of points and highest point number in the control file will now appear in the "Details" option.