Lines Menu
7.07 Side Shot (SS)
FUNCTION: The Side Shot routine is similar to a Traverse routine (TR - Section 7.09) in that it is used to compute the coordinates for a point when given a bearing (or angle from a backsight) and a distance from the currently occupied point. Both the currently occupied and the backsight bearing are held constant throughout the computation of all side shot points relative to a particular occupied point.
Activate the Side Shot routine by picking from the Lines menu; by pressing [Alt][L], [S], or by typing command SS at any data entry prompt.
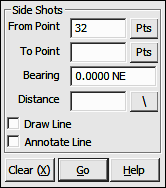
From Point: This is the currently occupied point. If you have an occupied point this box will automatically be filled for you. Changing the From Point is equivalent to running the Go To routine (GT - Section 6.06), and will change the BS Bearing, but not the Backsight Point.
|
|
TIP: Left-click the [Pts] button to select a point from the Point Manager (PM - Section 6.09). Right-click the [Pts] button to select a point from the CAD window (see Picking Points in CAD in Section 2.03). |
To Point: Enter the number of the foresight point or press [+] for the next unused point number.
Bearing: Enter the bearing, angle, deflection or azimuth in your chosen format or recall a bearing between any two points in memory (e.g. 15,20).
Distance: Enter the distance, or recall a distance between two existing points (e.g. 15,20). If you are entering a slope distance, click the [\] button next to the distance field, or press [/] or [\] on your keyboard and to enter your slope data according to the method you specified on the Slope Entry Configuration menu (KS - Section 5.02).
Draw Line: Check this box to have a line drawn from the occupied point to the side shot point. The line type properties are set through the use of the Drawing Properties menu (PR - Section 5.10).
Annotate Line: Check this box to annotate bearing and/or distance data from the occupied point to the side shot point. Annotation properties are set through the use of the Drawing Properties menu (PR - Section 5.10).
"Sight" Survey will print into the Text Output window the bearing, horizontal and vertical distances from the currently occupied point to the side shot point, and also the point number, ID, Northing, Easting and elevation of the side shot point. The currently occupied point, and the reference bearing remain unchanged.