Lines Menu
7.01 Inverse (IN)
FUNCTION: The Inverse routine is used to compute and report the bearing, horizontal distance, and difference in elevation between two points.
Activate the Inverse routine by picking from the Lines menu; by pressing [Alt][L], [I], or by typing command IN at any data entry prompt.
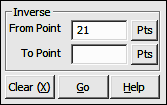
From Point: When you enter the Inverse routine, the From Point is the currently occupied point. If you have already established an occupied point this box will automatically be filled for you. Changing the From Point is equivalent to running the Go To routine (GT - Section 6.06).
|
|
TIP: Left-click the [Pts] button to select a point from the Point Manager (PM - Section 6.09). Right-click the [Pts] button to select a point from the CAD window (see Picking Points in CAD in Section 2.03). |
To Point: Enter an individual foresight point number, a point string, a point range, of type DF to recall a Defined Figure (see Section 6.20). If the point has not yet been assigned coordinates, the program will request them. Follow the Enter and Assign procedure (EA - Section 6.01) to assign coordinates and a description to the point.
|
|
TIP: Left-click the [Pts] button to select a point from the Point Manager (PM - Section 6.09). Right-click the [Pts] button to select a point from the CAD window (see Picking Points in CAD in Section 2.03). |
“Sight” Survey responds to an accepted foresight point by printing into the Text Output window the computed bearing and the horizontal and vertical distances from the currently occupied point to the foresight point, the foresight point number, ID, and its Northing, Easting and elevation. The foresight point becomes the currently occupied point and the reference bearing becomes the bearing just inversed.
To inverse from your point through a series of consecutive points, enter your To Point as the negative value of the last point number in the series. For example, if you are at point 3 and you want to inverse to 4, 5, 6, 7, 8, 9, and 10, in the To Point text box, enter -10. To inverse through all points in a consecutive manner, enter A. You may also inverse a random series of points such as 1,3,7,14,10 or even recall a Defined Figure or point group (DF or PG - Section 6.20). Finally, you may even include arc segments in the point series by designating the arc center point with an asterisk or less than sign ( * or <) for an acute curve, or a greater than sign ( > ) for an obtuse curve. For example, suppose your occupied point is 14. Entering a To Point of *19,15 will inverse the acute curve from 14 to 15, using the center point 19.