Points Menu
6.20 Define Figures (DF or PG)
FUNCTION: The Define Figures (or Point Groups) routine is used to create a group of points that may be treated as a single, named entity.
Activate the Define Figures routine by picking from the Points menu; by pressing [Alt][P], [F]; or by typing the two-letter command DF or PG at any data entry prompt.
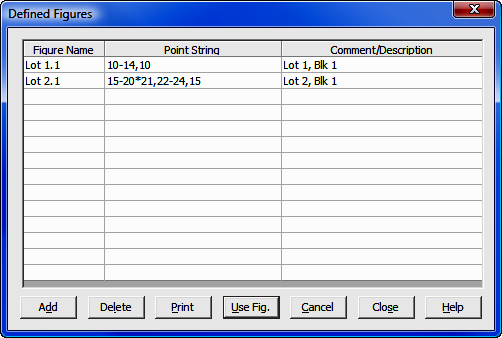
When selected, this routine will open the Defined Figures edit window. Using this window, you can add, edit, delete, and print groups of points known as defined figures. A defined figure or point group is a list of random and/or sequential point numbers which you access as a single entity, thus saving you from having to enter the particular point string each time you want to access it.
The Defined Figures edit window will accommodate an unlimited number of figure entries, turning into a scrolling menu as needed. The figures are displayed in alphabetical order by Figure Name. Figures that are added to the end of the list are sorted into their correct alphabetical order the next time the routine is executed. You may also click on the Figure Name heading to sort name in ascending or descending order.
Unlike most other Configuration items, Defined Figures must be set up for each job in which you want to use them.
[Add]: To Add an entry, click the [Add] button or press [Alt][D]. The Figure Name field in the first available row will be highlighted, awaiting your entry. A figure name can be any combination of letters, numbers and spaces, up to 65 characters in length. Type in a name for your figure and press [Enter] or [Tab].
The Point String field becomes highlighted, awaiting your entry. Point strings can be any combination of letters, numbers and spaces, up to 125 characters in length. Type in the point string (no point descriptions are allowed) according to the rules and examples found below and press [Enter] or [Tab].
A point string can include individual points and point ranges. Enter a point string by typing the point numbers separated by a comma, or a dash to indicate a range. For example, to define a figure from point 1 to 2 to 7 to 9 to 10 to 11 to 12 to 13 and back to 1, enter the string: 1,2,7,9-13,1
Curves may also be included in a point string by the addition of a center point identifier character immediately preceding the number of the curve’s center (or radius) point. Use the characters * or < to mark the center point of an acute curve (delta less than 180° or 200 grads). Use the character > to mark the center point of an obtuse curve (delta angle greater than or equal to 180° or 200 grads). For example, to inverse from point 1 to 2 to 7 (a PC) and then around an obtuse curve whose center point is 8 to 9 (the PT) to 10 to 11 and back to 1, enter the string: 1,2,7>8,9-11,1
Multiple consecutive curves, having the same center point, may be addressed individually, or in a range. For example, to inverse from point 1 through 7 (a PC) and then around four acute curves whose curve points are 10, 15, 16 and 17, and then on a line back to 1, enter the string in any one of the four following ways:
1-7*8-10*8,15*8,16*8,17,1 or
1-7*8,10*8,15*8-17,1 or
1-7<8-10<8,15<8,16<8,17,1 or
1-7<8,10<8,15<8-17,1
|
|
NOTE: Point ranges are not allowed when working with alpha-numeric point numbers. Each point number must be entered individually, separated by commas. For example: NECorL1,SECorL1,NWCorL2,NWCorL1 |
Figures can also call other defined figures, overcoming any potential limitation of the 125 character point string length. For example, suppose the figure BLOCK 1 contains the points 1, 7, 9, 5*8, 6 and figure BLOCK 2 contains additional points that you would like to append to BLOCK 1. Simply define BLOCK 1 as: 1,7,9,5*8,6,F:BLOCK 2
When figure BLOCK 1 has been completed, figure BLOCK 2 will be run automatically. Keep in mind though, that because figures can call other figures, it is possible to lock your computer into an endless loop. For example, BLOCK 1 may call BLOCK 2 which may call BLOCK 3 which may call BLOCK 1, and so on. Use care when calling other figures as to avoid loops and lock-ups.
Another time saving feature allows you to place the code AR for ARea after a defined figure point string, which sends the program to the Area Printout routine to report the area enclosed by the figure (see Section 10.01). A comma should be placed after the last point number in the point string, and before the AR code. For example: 1-4,1,AR
If you wish, you may use the Comment field to store additional information about the figure. This field can contain up to 255 characters and is provided strictly for your own information since it is not used anywhere else in “Sight” Survey.
To add another figure, press [Alt][D] or click [Add]. To exit the routine, click [Close] or press [Alt][S].
|
|
RULES FOR DEFINED FIGURES AND POINT STRINGS: 1. Separate single points by a comma, for example: 1,3,5,7 2. Separate a consecutive range of numeric point numbers by a dash, for example: 1-7 3. Enter all alphanumeric point numbers individually and separate them by a comma, for example: PT1,PT3,PC8,NCorL1 4. Preface any radius points with an asterisk (*) or less than size (<) for acute curves or a greater than sign (>) for obtuse curves, and use only the *, <, or > to separate the PC and the radius point of a curve; for example 5*10,8 sets the acute curve from 5 through center point 10 to end point 8; and 5>10,8 sets the obtuse curve from 5 through center point 10 to end point 8. Don’t place a comma after the 5. 5. Curve points may be entered within point ranges, if desired. For example: 1-7*8,10*8,15*8-17,1 is the same as entering points 1-7*8-10*8,15*8,16*8,17,1. 6. DO NOT start your point string with a radius point (*, >, or <) designation. 7. Preface any referenced figures with an F: and do not add any points after the referenced figure. 8. Use care when entering your point string since the program will not attempt to screen your entry for illegal characters or unassigned points. |
Editing Figures: To edit the Figure Name, Point String, or Comment fields for any figure, double-click your mouse on the field you want to edit. Make your editing changes and press [Enter]. If you erroneously edit a figure, you can click [Cancel] or press [Alt][C]to cancel all deletions and editing. Changes made to the figures are not recorded until the [Close] button is clicked.
[Delete]: To select a figure to delete, move your mouse to the left of the Figure Name until the cursor becomes a check mark. Click on the figure you want to delete and then click [Delete] or press [Alt][L]. If you delete a figure by accident, you can click to cancel all deletions and editing. Changes made to the figures are not recorded until the [Close] button is clicked.
[Print]: To print a listing of all the defined figures in the current job, click [Print] or press [Alt][P]. When the Print dialog box appears, click to send the figure list to your printer or to the Text Output window.
[Use Fig]: There are two ways to use figures in the COGO Routines: type F: followed by the figure name; or press [F11] or type DF or F: to open the Defined Figure window for selection. To move quickly through the edit window, press and hold [Ctrl] while typing the first letter of the desired Figure Name. The cursor will move to the first figure which begins with that letter. Use your mouse or the arrow keys to make your selection and then click [Use Fig] or press [Alt][U]. The Point String will automatically be placed into the current text box in the COGO window. (The current text box is the field where the Defined Figures routine was executed.) Modify the point string if desired, and press [Enter] to use the selected point string.
|
|
NOTE: Within the Point Plot (PP - Section 6.10) and List Coordinates (LC - see Section 6.12) routines, you can only access Defined Figures by pressing [F11]. |
[Cancel]: To cancel all changes or deletions that you have made, click [Cancel] or press [Alt][C]. This will cancel everything that you have done since the Defined Figures edit window was last opened. If you made some changes that you wanted to keep, you will need to rerun the routine and make those changes again.
[Close]: To exit this routine and save any changes that you have made, click [Close] or press [Alt][S].