Config Menu
5.04 COGO Configuration (KC)
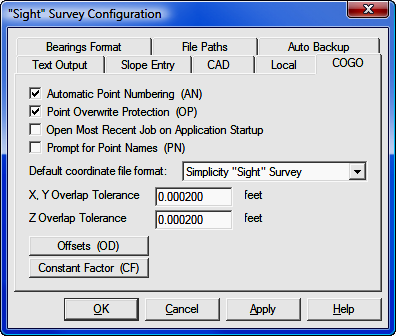
FUNCTION: The COGO Configuration menu controls file formats and certain other startup options for "Sight" Survey.
Activate the COGO Configuration routine by picking from the Config menu; by pressing [Alt][O], [G], or by typing the two-letter command KC at any data entry prompt.
|
CAUTION: Several configuration menu settings are dependent upon settings from other menus. For example, setting the directional units to Grads on the Local Configuration menu (LC - Section 5.05) will affect your options the CAD, Text Output, and Bearings Format menus. However, you must remember to click [Apply] at the bottom of the menu before any changes you make are accepted. Simply clicking on an item or changing a value does not change the setting unless you click [OK] or [Apply]. Clicking [Apply] will keep the configuration menu group open for multiple changes, while clicking [OK] will apply the changes and exit the menus. |
Automatic Point Numbering: This check box will enable or disable automatic point numbering. When on, every prompt for a new point number will be populated with the next available point number.
|
NOTE: Use the AN routine code to toggle Automatic Point Numbering between On or Off. |
Point Overwrite Protection: This check box will enable or disable automatic protection of already used points. When point overwrite protection is On, “Sight” Survey will warn you when you are about to overwrite an existing point. You may choose to either overwrite the point or enter a new point number. You may also manually override the point overwrite protection by placing an asterisk (*) immediately after the point number, such as 45*. Using the manual override method will suppress the warning message. We recommend that you always leave this setting On.
Open Most Recent Job on Application Startup: When this option is checked, "Sight" Survey will automatically open the last open job on startup.
Prompt for Point Description: When this option is checked, you will be asked to supply a point name or description of up to 28 characters in length whenever you enter or compute a new point. If you leave this option disabled, you can manually enter a point name using the Identify Point function (ID - Section 6.03).
|
NOTE: The two-letter code NO (for Names Output) can be used to toggle Prompt for Point Description between On and Off. |
Default Coordinate File Format: Click [q] to select the default coordinate file format. This format, unless changed on the New Job dialog (NJ - Section 3.01), will be used for coordinate file storage.
Offsets (OD): Selecting the [Offsets (OD)] button opens an Offset Define window. Using this window, you can add or delete offset values to be automatically used during Traverse with Offset routines (both line and arc). See Section 6.21 for a complete discussion of the Offset Define function.
Constant Factor (CF): Selecting the [Constant Factor (CF)] button opens a dialog box into which you may enter a numerical constant that will be applied to each entered distance. Use constant factors for things such as: to convert feet to meters (or any unit to another); to apply correction factors for steel tape measurements; to apply a grid factor, etc.
To invoke the constant factor on a particular distance, preface your distance entry with a semicolon ( ; )or follow the distance entry with the letter U, as in User defined constant. The letter's case does not matter. For example, if the multiplier is 0.90 and the measured distance is 300.00, an entry of ;300 or 300u would yield a distance entry of 270.00, which equals 0.90 * 300. To clear a Constant Factor, issue the CF command and enter a value of 1.
|
The Constant Factor has several pre-programmed applications. 1. A value followed by the letter T will cause the correction factor to become a temperature correction for steel tapes. For example, the entry 88T will convert to a factor for 88°F of 1+0.0000065*(88-68), (1+0.000001161*(T-20) in metric units). The number entered may be the temperature in °F, or °C (if working in metric units). The formula assumes the tape was standardized at 68°F (or 20°C). 2. A distance value followed by any of the following letters indicates the distance is entered in units different that specified as the working distance unit under the Local Configuration menu (LC - Section 5.05). Distances so entered are automatically converted to the specified local distance unit (US Survey Feet, International Feet, or Meters). K = Kilometers M = Meters F = Feet* I = Inches C = Chains (66 US Survey feet) L = Links (0.66 US Survey feet) P = Pole or Perch (16.5 US Survey feet) R = Rod (16.5 Survey feet) U = The user defined Constant Factor V = Vara (Value varies by region)
* When using the F (Feet) constant factor, "Sight" Survey will assume that it is the opposite of the specified local unit. For example, if the specified local unit is International Feet, an entry of 5280F would assume that you are entering 5280 US Survey Feet, which would convert to 5280.01056 International Feet.
See Data Entry Basics - Distance Entry (Section 2.05) for a complete listing of units and their conversion formulas. All conversions are computed by formula, not by conversion factors. |