Points Menu
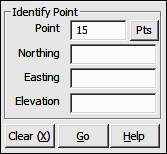
6.03 Identify Point (ID)
FUNCTION: The Identify Point routine is used to add or change an identifying name (or point descriptor) on an existing point.
Activate the Identify Point routine by picking from the Points menu; by pressing [Alt][P], [I]; or by typing the two-letter command ID at any data entry prompt.
Point: Type a point number to which you want to assign a name (or descriptor) and press [Enter] or [Tab]. To enter an alpha-numeric point number (e.g. PIN3456, or 22S30) you must precede the point number with an apostrophe ( ' ) to alert "Sight" Survey that you are not attempting to enter a two-letter command to change routines. For example: 'PIN3456, or '22S30.
|
|
TIP: Left-click the [Pts] button to select a point from the Point Manager (PM - Section 6.09). Right-click the [Pts] button to select a point from the CAD window (see Picking Points in CAD in Section 2.03). |
If the point has not been previously assigned coordinates, the entry field for the Northing will be the highlighted field, and you may treat the data entry as though you were in the Enter & Assign routine (EA - Section 6.01).
If the point exists, the Enter Description dialog box will appear, awaiting your description entry. To enter a new description simply type the description and press [Enter] or click [Go]. You may select one of other descriptions shown by picking with your mouse, or by pressing [Alt][#], where # is 1 through 6.
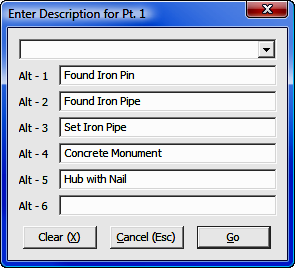
After entering or selecting a description, "Sight" Survey will assign the name to the point and return you to the Identify Point dialog box. To exit the routine at any time, simply select another routine from the menus, or type a valid two-letter command in any data entry field.
|
|
NOTE: The two-letter code PN (Point Names) can be used anywhere within "Sight" Survey to toggle Prompt for Point Names between On and Off. |