File Menu: Import
3.08 ASCII File
FUNCTION: The Import > ASCII File
routine is used to incorporate an ASCII (text) formatted coordinate file into
the current job file. This is a common file format that may be used to
read a file that has been created by another program or perhaps a data
collector.
Activate the Import > ASCII File routine by
picking
from the File: Import menu; or by pressing [Alt][F], [I], [A].
|

|
CAUTION: When importing into an existing job, it is
strongly recommended that you save your existing data before importing new
data. Then, if something should go wrong during the import (e.g.
wrong file, points accidentally overwritten, etc.) you should exit "Sight"
Survey WITHOUT saving the job and drawing
files. |
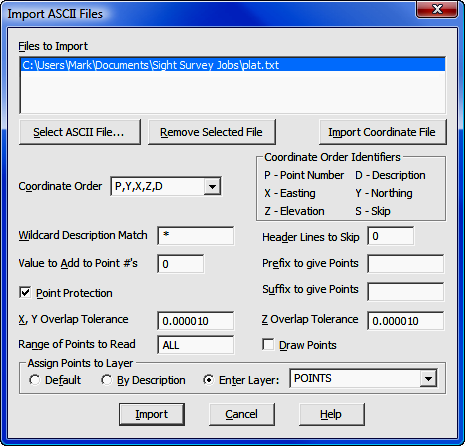
Files to Import: This is a listing of the ASCII
files you have chosen to import. You may specify multiple files for
importing and they will be imported in the order selected. To set or
change the values in these fields, press [Alt][S] of click
the [Select ASCII File] button.
|

|
HINT: If
you select multiple files to be imported, each file must have the same
format. |
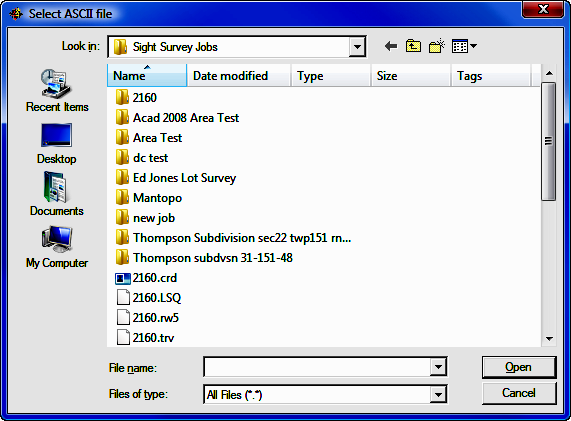
[Select ASCII File]: This button
displays a dialog box allowing you to select an existing file for
import.
Remove Selected File: To remove a file from the
Files to Import list, click on the file and then press [Alt][M] or click
the [Remove Selected File] button.
Import Non-ASCII
File: Non-ASCII files are coordinate files such as: Simplicity (.zak);
Carlson (.crd); and C&G (.cgc & .crd). If you realize that you
actually need to import a Non-ASCII (text) file, click this button to cancel the
routine and begin the Import Coordinate File routine (see Section 3.09).
Coordinate Order: Click [q] to
use this drop-down option box to select one of the pre-programmed formats, or
type the correct coordinate order into the field using the Coordinate Order
Identifiers. If you enter your own format, you can separate the fields
by any character or number of spaces that you desire. You may also use
quote marks if necessary. Simply use the proper Coordinate Order
Identifiers for the values. For example, an entry of P Y X "D" would give you point Northing Easting
"Description". The most common format is P,Y,X,Z,D which is a common delimited file
containing the point, Northing, Easting, elevation,
description.
Wildcard Description Match: If you select
Wildcard Description Match, you may enter a descriptive filter that, if
matched, will cause the matching points to be imported. If set to anything
other than an asterisk ( * ), you will only import points
with that match the filter. You can use * to mean any number of
characters, and just entering * (the default setting) is a
universal match. For example entering *corner would
match building corner, driveway corner, property corner,
etc. Likewise enter Property* would match
Property Corner, Property Line, etc. Entering a question
mark ( ? ) means any single character (e.g. Hub? would match Hub1, Hub2, Hub3, etc., but not
Hub10, Hub11 and so on where Hub is followed by more than
one character.) Wildcard filters are not case sensitive (e.g. HUB = Hub =
hub).
Value to Add to Point Numbers: There may be times
when you wish to renumber the imported points so they will not conflict with
points which may be contained in the current file. If that is the case,
enter a value to add to the imported point numbers. For example, suppose
you have a file containing points 1-88 and you want to import a file containing
points 1-45 but you don't want to overwrite any existing points. Entering
100 into the Value to Add to Point Numbers field will cause the imported
points to be numbered 101-145, thus preserving your original data.
|
|
HINT:
Prior to importing points, you should run the Blank Point Scan
(BP - Section 6.13) to assist you in determining
a safe starting point for renumbering. |
Header Lines to Skip: Some files may contain
header lines that are not actually coordinate data, but rather they are
informational items such as date, time, file name, user name, number of points
in the file, etc. "Sight" Survey cannot correctly parse this data, nor
does it require it for any other purpose. In fact, "Sight" Survey would
return a file import error when trying to decipher such data. To avoid
such errors, "Sight" Survey lets you specify the number of header lines that it
will skip when importing the data.
Prefix to Give Points and Suffix to Give
Points. Two additional fields are available when importing ASCII
files. Use these fields to essentially turn numeric points into
alpha-numeric points by prepending and/or appending text to the point
numbers. (DO NOT use these fields if you are not working in an
alpha-numeric format.) You may use any characters as a prefix or
suffix. Note that you may also prepend or append numerals to the point
numbers, similar to renumbering. If you have chosen to renumber the
points, all renumbering will be done prior to attaching a prefix or
suffix.
|
|
HINT:
Do not use the Prefix and Suffix fields if you
are not working in an alpha-numeric
format. |
Point Protection: Check this option to use
Point Overwrite Protection during import to protect against the overwriting
of existing data. See Point Overwrite Protection below for
instructions on handling duplicate points.
|

|
HOW "SIGHT" SURVEY SCREENS FOR DUPLICATE
POINTS
-
Checks to see if the point
number exists in memory. If not, the point is
imported.
-
If the point exists, checks
the coordinates and elevations of the imported point. If they are
within the tolerances (see below) and the point descriptions are
identical, the point being imported is the same as one in memory so it
is ignored and not imported.
-
If the
coordinates and/or elevation and/or descriptions do not match, the point
is identified as a duplicate and either: renumbered and added to the end
of the points in memory; or you are prompted for instructions of how to
handle the point. |
X, Y Overlap Tolerance and Z Overlap Tolerance:
Enter values for Positional (X & Y) tolerance and
Elevation (Z) tolerance. These values are used to determine
duplicate points. For example, if the difference between the imported
Northing and the existing Northing are less than the tolerance value, the
Northings are considered to be the same. If that same condition exists
with the Eastings and elevations, the points would be duplicates. As you
bring data out to the field and back into the office via a data collector, you
may end up with points where the Northings and Eastings match but the elevations
are different as in the case of a ground shot vs. an as-built shot.
However, these points might also inadvertently share the same point number and
you may want to keep them both. The fact that the elevations do not match
within the specified tolerance will insure that this point (when imported) is
flagged as a duplicate and you will be able to assign a new number to it, thus
preserving the data for both points.
Range of Points to Read: You may import any or all of the points in the ASCII
file. Type ALL to import the entire
file. To import a partial file enter the subject point numbers using the
Rules for Defined Figures and Point Strings as found in Section 6.20.
Draw Points: Select the Draw Points option to
immediately draw the imported points after the file is loaded. Points are
drawn using the configuration settings under Point Configuration (PC - Section 5.08).
Assign Points to Layer: When importing a file, you can
assign a layer or level for the imported points. Your choices are: Default (does not assign points to a layer); By Description (creates layers/levels from point
descriptions and assigns the point to that layer/level); or Enter Layer. If you select Enter Layer, press [q] to select a layer/level
from the list provided or type in the name of a layer/level to be
created.
|
|
NOTE: If
you assign layers during file import then later run
Field-to-Finish, your point layers will be reset according to the
field definition file used by
Field-to-Finish. |
[Import]: Click this button to import the specified
data file(s).
Point Overwrite Protection
If you
are using Point Protection and "Sight" Survey finds a duplicate point,
you are presented with an option dialog screen.
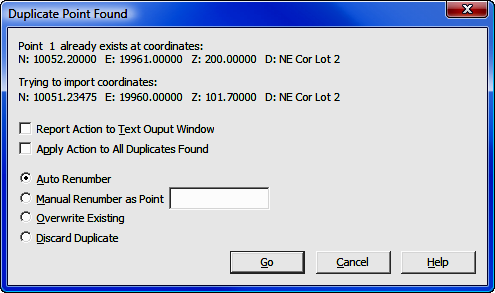
You will be shown the old and new point data, and given
options to:
 Auto Renumber:
Automatically assigns a new number to the imported point.
Auto Renumber:
Automatically assigns a new number to the imported point.
Manual Renumber: You must
supply a new number to assign to the imported point. You may enter a plus
(+) to assign the point to the next available
number.
Overwrite: Replace the old
point with the imported point.
Discard Duplicate: Do not import the
duplicate point.
Two additional checkbox options are shown on this screen:
Apply Action to All Duplicates Found: If
you check this box prior to selecting Discard, Overwrite, or
Auto Renumber, your choice will be applied to all the remaining points as
they import.
Report Action to Text Output Window: All
actions for renumbered, overwritten and skipped points are written into the
Text Output window. This is particularly useful if you are
renumbering imported points.
You may
also Cancel the import. Any points imported up to the time of
cancellation are retained in memory.