File Menu: Import
3.09 Coordinate File
FUNCTION: The Import > Coordinate
File routine is used to incorporate a non-ASCII formatted coordinate file
into the current job file. Available formats include: Carlson Numeric (the
default format); Carlson Alpha-numeric; C&G Numeric; C&G Alpha-numeric;
Simplicity "Sight" Survey 3 files; and Land Desktop Development files.
Activate the Import > Coordinate File routine by
picking
from the File: Import menu; or by pressing [Alt][F], [I], [C].
|

|
CAUTION: When importing into an existing job, it is
strongly recommended that you save your existing data before importing new
data. Then, if something should go wrong during the import (e.g.
wrong file, points accidentally overwritten, etc.) you should exit "Sight"
Survey WITHOUT saving the job and drawing
files. |
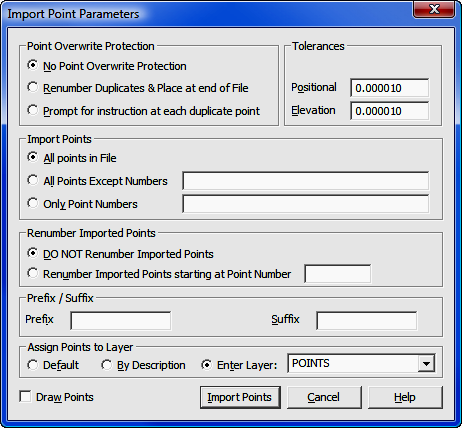
Point Overwrite Protection: Click the radio
button ( ) on any one of the three
options. Select No Point Overwrite Protection to import the point
file and overwrite any point in memory that has the same point number as an
imported point. Select Renumber Duplicates & Place at the End of
the File to automatically renumber any duplicate point and place it at the
end of the file. Select Prompt for Instruction at each Duplicate
Point to stop at each duplicate and let you decide what to do with the
point.
) on any one of the three
options. Select No Point Overwrite Protection to import the point
file and overwrite any point in memory that has the same point number as an
imported point. Select Renumber Duplicates & Place at the End of
the File to automatically renumber any duplicate point and place it at the
end of the file. Select Prompt for Instruction at each Duplicate
Point to stop at each duplicate and let you decide what to do with the
point.
|

|
HOW "SIGHT" SURVEY SCREENS FOR DUPLICATE
POINTS
-
Checks to see if the point
number exists in memory. If not, the point is
imported.
-
If the point exists, checks
the coordinates and elevations of the imported point. If they are
within the tolerances (see below) and the point descriptions are
identical, the point being imported is the same as one in memory so it
is ignored and not imported.
-
If the
coordinates and/or elevation and/or descriptions do not match, the point
is identified as a duplicate and either: renumbered and added to the end
of the points in memory; or you are prompted for instructions of how to
handle the point. |
Tolerances: Enter values for Positional
(X & Y) tolerance and Elevation (Z) tolerance. These values are
used to determine duplicate points. For example, if the difference between
the imported Northing and the existing Northing are less than the tolerance
value, the Northings are considered to be the same. If that same condition
exists with the Eastings and elevations, the points would be duplicates.
As you bring data out to the field and back into the office via a data
collector, you may end up with points where the Northings and Eastings match but
the elevations are different as in the case of a ground shot vs. an as-built
shot. However, these points might also inadvertently share the same point
number and you may want to keep them both. The fact that the elevations do
not match within the specified tolerance will insure that this point (when
imported) is flagged as a duplicate and you will be able to assign a new number
to it, thus preserving the data for both points.
Import Points: Click the
radio button () on
any one of the three options. You may import All Points in the
File; import All Points Except (specified) Numbers; or import
Only Point Numbers specified. If you select either options two or
three, in the corresponding field you must enter the subject point numbers using
the Rules for Defined Figures and Point Strings as found in Section 6.20.
Renumber Imported Points: There may be times when
you wish to renumber the imported points so they will not conflict with points
which may be contained in the current file. If that is the case, select
the option to Renumber Imported Points starting at Point Number and enter
the new starting point number into the adjacent text entry field.
|

|
HINT:
Prior to importing points, you should run the Blank Point Scan
(BP - Section 6.13) to assist you in determining
a safe starting point for renumbering. |
Prefix to Give Points and Suffix to Give
Points. Two additional fields are available when importing
files. Use these fields to essentially turn numeric points into
alpha-numeric points by prepending and/or appending text to the point
numbers. (DO NOT use these fields if you are not working in an
alpha-numeric format.) You may use any characters as a prefix or
suffix. Note that you may also prepend or append numerals to the point
numbers, similar to renumbering. If you have chosen to renumber the
points, all renumbering will be done prior to attaching a prefix or
suffix.
|
|
HINT:
Do not use the Prefix and Suffix fields if you
are not working in an alpha-numeric
format. |
Draw Points: Select the Draw Points option to
immediately draw the imported points after the file is loaded. Points are
drawn using the configuration settings under Point Configuration (PC - Section 5.08).
Assign Points to Layer: When importing a file, you can
assign a layer or level for the imported points. Your choices are: Default (does not assign points to a layer); By Description (creates layers/levels from point
descriptions and assigns the point to that layer/level); or Enter Layer. If you select Enter Layer, press [q] to select a layer/level
from the list provided or type in the name of a layer/level to be
created.
|
|
NOTE: If
you assign layers during file import then later run
Field-to-Finish, your point layers will be reset according to the
field definition file used by
Field-to-Finish. |
[Import]: Click this button to select data file to
import.
[Select File & Type]: This button displays
a dialog box allowing you to select an existing file for import.
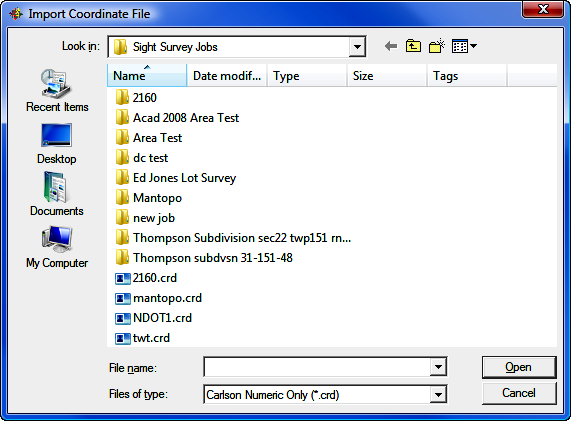
Use the
standard Windows dialog box to select a folder location. Left-click on an
existing file to import the file. Also choose a file type using the
Files of type field. When you have completed your selections, click
[Open] to import the file.
Point Overwrite Protection
If you
are using Point Protection and "Sight" Survey finds a duplicate point,
you are presented with an option dialog screen.
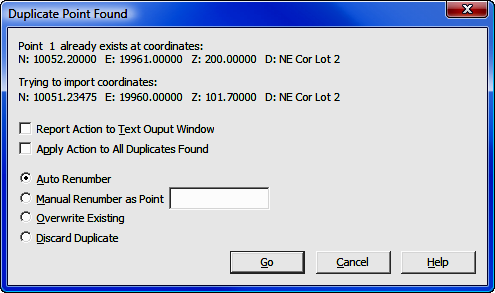
You will be shown the old and new point data, and given
options to:
Auto Renumber:
Automatically assigns a new number to the imported point.
Manual Renumber: You must
supply a new number to assign to the imported point. You may enter a plus
(+) to assign the point to the next available
number.
Overwrite: Replace the old
point with the imported point.
Discard Duplicate: Do not import the
duplicate point.
Two additional checkbox options are shown on this screen:
Apply Action to All Duplicates Found: If
you check this box prior to selecting Discard, Overwrite, or
Auto Renumber, your choice will be applied to all the remaining points as
they import.
Report Action to Text Output Window: All
actions for renumbered, overwritten and skipped points are written into the Text
Output window. This is particularly useful if you are renumbering imported
points.
You may
also Cancel the import. Any points imported up to the time of
cancellation are retained in memory.