Data Transfer

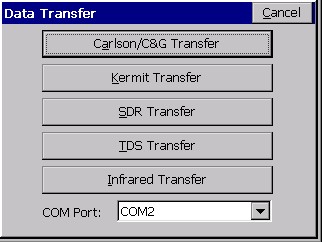
This command prepares Carlson SurvCE for transferring data to and from a desktop PC. Data Transfer requires that a companion program on the PC is running to receive and send files.  SurvCE, using the Data Transfer option, must “handshake” with the program on the PC in order for the transfer to be successful.  A serial cable must connect the PC to the handheld device running SurvCE. COM ports must be identified correctly, as well as baud rates.


Sending data to a computer using the Carlson Transfer Option

  1. Connect your serial cable to your PC. Select Data Transfer from the File menu. Choose Carlson/C&G Transfer.  This leads to a File Transfer screen on SurvCE, which says “Awaiting Connection”.  All the action is on the PC side.  There is no time delay in this handshake.  It will wait for the PC program to catch up.  When you connect the cable from SurvCE to the PC, MicroSoft ActiveSync may interfere and say “Connect to PC?”  If you get this question, say No and on your PC, click off the MicroSoft ActiveSync serial linkage if it is on.
  2. Execute SurvCom, or for Carlson Survey or SurvCADD users (July, 2001 build or later), choose Tools, Data Collectors, SurvCE/SurvStar option.  If you get “Failed to open Com 1 error code -3”, the most likely culprits include no cable connection or interference by Microsoft ActiveSync.  If connection is automatically established, SurvCE will display, “Connected to PC”.


  1. If only the left side of the screen on the PC displays data, then you do not have a connection yet.  Press the Connect button located at the bottom left of the file transfer dialog. The transfer program will respond with Retrieving File List.  Once the file list has been retrieved, the left side of the dialog box will show files located in the specified path on the PC and the right side of the dialog displays the files located in the designated path on the remote. You can change directories by scrolling to the top of the file list and choosing Up One Level (just like in Windows). In the above dialog, a filter was applied so that the only files in the form of *.crd are displayed.  Filters such as this can be set up using the Options button.
  2. To transfer one or more files, simply select or highlight the desired files and select the transfer button.  More than one file can be transferred from the remote to the PC or from the PC to the remote during the transfer process.  Standard Windows selection options apply.  For example, selecting one file and then while pressing the shift key on the PC, selecting another file deeper on the list will select all the files in between the first and last selected.  You can also select the first file to transfer and press and hold down the shift key and use the down arrow to specify the range of files to transfer.  Pressing and holding the control key on the keyboard allows for the selection of multiple files in any selection order, by picking the files with the left mouse button.
  3. After the files have been selected, press the transfer button. When the transfer is complete, the program will return Transfer Complete message and will then proceed to update the file lists on the PC and the Remote.


Note: The process of importing points to the data collector mimics the process of exporting points to the office computer, but in reverse.  If a point is found to already exist on the data collector, options appear to Overwrite All (Yes All) or Cancel All (No All).
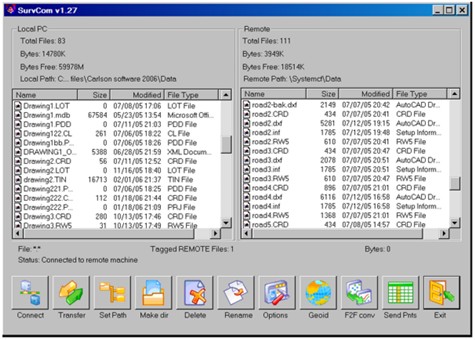

SurvCom Commands

These commands are found and can be seen in the SurvCom dialog box shown above.


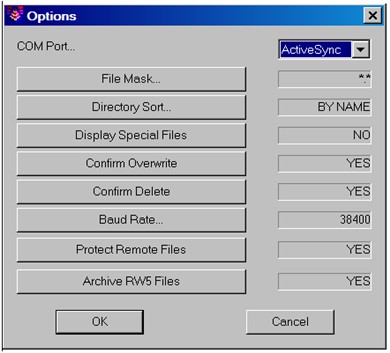
Com Port:  You must select which com port on the PC to use.

File Mask:  You must select a file filtering syntax.

Directory Sort:  You must select how to sort the list of files.

Display Special Files:  Toggle whether or not you should see special files.

Confirm Overwrite: Check this to confirm before overwriting files.

Baud Rate:  You must choose the baud rate for transferring data.

Protect Remote Files: Check this to protect files on the mobile device.

Archive RW5 Files: Toggle YES or NO.


Note: The following two options appear in the Data Transfer dialog only if detected or available: