Lines Menu
7.13 Traverse Right of Way (RW)
FUNCTION: The Traverse Right of Way routine functions as a multiple offset intersection routine to lay out one or two lines parallel to a known line.
Activate the Traverse Right of Way routine by picking from the Lines menu; by pressing [Alt][L], [W], or by typing command RW at any data entry prompt.
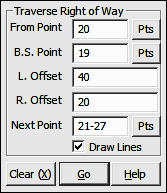
From Point: This is the currently occupied point. If you have an occupied point this box will automatically be filled for you. Changing the From Point is equivalent to running the Go To routine, and will change the BS Bearing.
|
|
TIP: Left-click the [Pts] button to select a point from the Point Manager (PM - Section 6.09). Right-click the [Pts] button to select a point from the CAD window (see Picking Points in CAD in Section 2.03). |
BS Point: This is the current backsight point. This point is used to establish a perpendicular direction for the offset points placed at the beginning of the right of way. If this point is the same as the From Point, offsets at this point will be placed perpendicular to the leg extending from the occupied point to the first foresight point.
|
|
TIP: Left-click the [Pts] button to select a point from the Point Manager (PM - Section 6.09). Right-click the [Pts] button to select a point from the CAD window (see Picking Points in CAD in Section 2.03). |
Left Offset: Enter the offset distance to the left, with respect to the forward direction of travel. If you do not want to set a right-of-way on the left side, just press [Enter].
Right Offset: Enter the offset distance to the right, with respect to the forward direction of travel. If you do not want to set a right-of-way on the right side, just press [Enter].
Next Point: Type in individual point numbers, pressing [Enter] after each number, or press [+] for the next unused point number. You may also enter a point string into this field or even recall a Defined Figure or point group (DF or PG - Section 6.20).
|
|
TIP: When ending your right of way: If the foresight point specified is the same as the occupied point, the offsets will be placed perpendicular to the leg extending from the backsight point to the currently occupied point. |
“Sight” Survey will respond to each accepted right-of-way point by computing and printing into the Text Output window the offset point coordinates and a point name. Offset point numbers are automatically assigned. “Sight” Survey will also update the data entry screen by correctly displaying the current point and the correct backsight point.
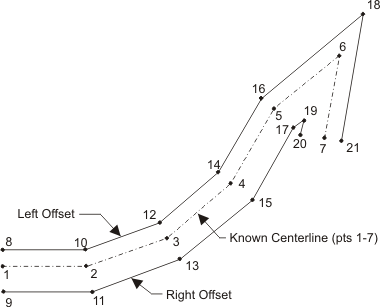
In this example, set your initial From Point to 1 and your BS Point to 2 (to set offsets 8 and 9 at point 1 perpendicular to line 1-2). Enter your Next Point as 2-7. When point 7 is your From Point, set the Next Point to also be 7 and points 20 and 21 will be set perpendicular to line 7-6.