Data Entry Basics
2.01 Using Files from Other Programs
"Sight" Survey is fully capable of using files from a variety of sources including older Simplicity Systems programs and Carlson Survey. Of course, "Sight" Survey is capable of importing ASCII point files, but there may be times when you want to use a job developed under different software. As long as you can produce at least an ASCII coordinate file and an AutoCAD DXF or DWG file, you can recreate the job in the "Sight" Survey environment.
Many users of previous versions of "Sight" Survey may have want or need to use old data and drawings they have accumulated over the years. This is entirely possible although the drawing file will need to be converted. The old "Sight" Survey coordinate file (.zak) does not need to be changed.
Drawing Files: Older "Sight" Survey drawings were stored in files having a .DRG filename extension. The .DRG file is a proprietary file type for TrueCAD (by Choice Computing), and this older format is not supported by your new "Sight" Survey. To use these older drawings you first need to convert them to an AutoCAD .DWG or .DXF format using your old "Sight" Survey program. Note: The conversion to an AutoCAD format is necessary even if you intend to import the drawing into MicroStation.
STEP 1: Export the DRG file to a DWG or DXF file: Open "Sight" Survey 3 (or 2) and load your job as you always have. Once it has loaded:
"Sight" Survey 2 users select File > Export > Drawing.
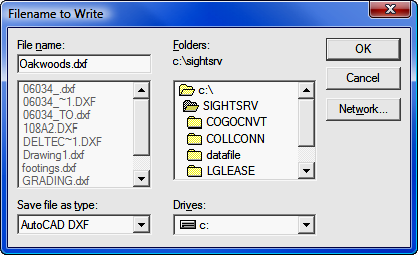
"Sight" Survey 3 users type XF to save the drawing as a DWG or DXF file.
Save file as type: Select AutoCAD DXF or AutoCAD DWG.
|
WHAT TYPE SHOULD YOU USE? It makes no difference to "Sight" Survey 2009 what format (type) you use to convert your drawing; the program will automatically convert DXF files into the correct DWG format. However, using XF to create a DWG file will yield better results in terms of color and font selections. Converting DXF files set properties for the various entities to By Layer, while converting to a DWG file will set the properties to the actual settings from "Sight" Survey 2/3. When possible you should convert to a DWG file inside "Sight" Survey 2/3. |
Enter the File Name as filename.DWG (or filename.DXF) and make sure the Save file as type setting is AutoCAD DWG (or DXF). Click [OK].
"Sight" Survey 2 Users: You will be prompted at the top of the drawing screen: Write everything? (else just selected). Click [Yes] and proceed to Step 2.
"Sight" Survey 3 Users: You will be presented with a DXF Transfer Options dialog.
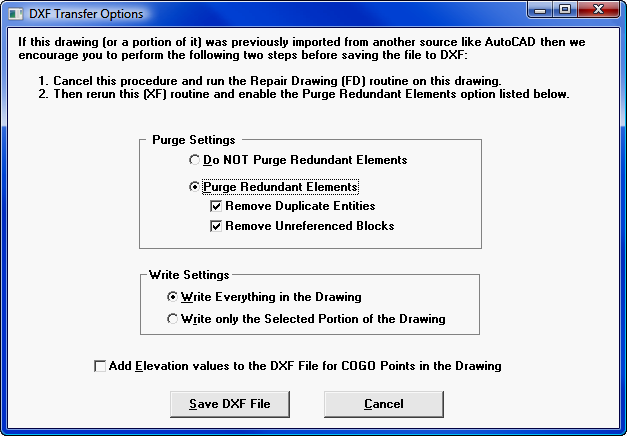
Select to Purge Redundant Elements and leave the two checkboxes checked. Also select Write Everything in the Drawing.
Click [Save DWG (or DXF) File].
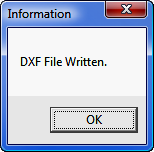
STEP 2: Once you have confirmation that the drawing file has been saved, click [OK] and then close your old "Sight" Survey.
Start "Sight" Survey 2009 by double-clicking the SS2009 External icon on your desktop.
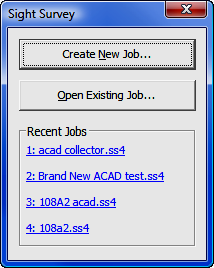
Left-click on the [Create New Job] Button.
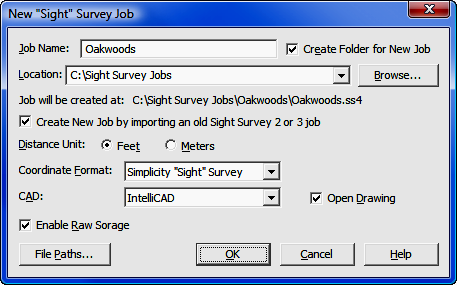
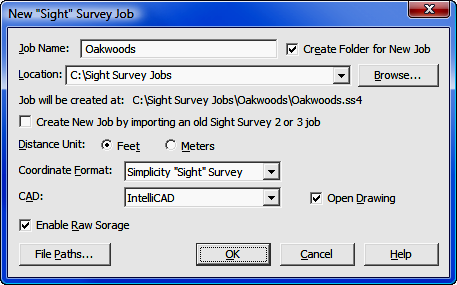
In the New Job window, set the Job name to the desired filename. Check the box: Create new Job by importing an old Sight Survey 2 or 3 job.
Set everything else as shown on the dialog above, with two exceptions:
The Location (the path to the job) – leave it as it appears when the dialog opens. Do not change this setting.
CAD – select IntelliCAD, AutoCAD or MicroStation.
Click [OK].
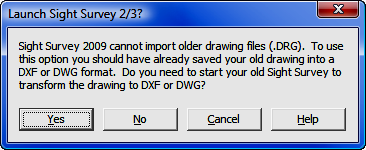
Just in case you have not yet converted your old drawing file, this dialog will allow you to launch your old "Sight" Survey and make the conversion.
[Yes]: Clicking [Yes] will launch "Sight" Survey 2/3 provided that your old "Sight" Survey is in the default location. If you installed it to another location, DO NOT click any buttons on this dialog, but use your normal "Sight" Survey 2/3 startup procedures to launch the old program. After you have converted the drawing and closed "Sight" Survey 2/3, click [No] on this dialog.
[Cancel]: Click [Cancel] to return to the New Job dialog to change your settings.
[No]: Click [No] to continue importing your job.
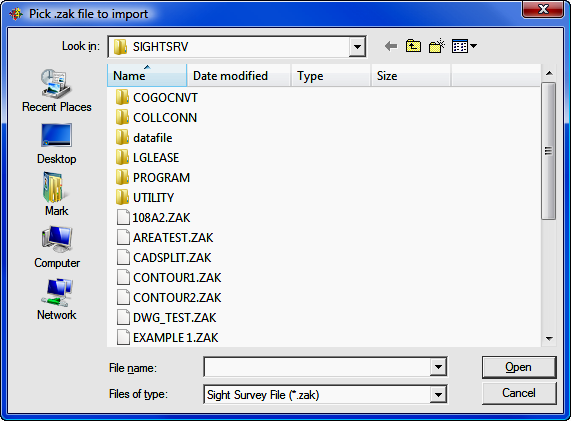
Pick .zak file to import: "Sight" Survey 2009 will display a Windows File Selection dialog box pointing to a folder location of C:\SightSrv. This is the default location for "Sight" Survey 2/3 files. If you are saving data files to a different location, you will need to navigate to your data folder.
Select the old .ZAK file you want to import and click [Open]. You do not need to import a drawing file, only the .ZAK file. The drawing file will be automatically included.
"Sight" Survey 2009 will open the imported job. If you do not see the drawing, issue a Zoom All command in "Sight" Survey by typing the two-letter command ZA. Before continuing, it is a good idea to save your job. Select File > Save or left-click the save icon in the "Sight" Survey toolbar.
Note to IntelliCAD Users:
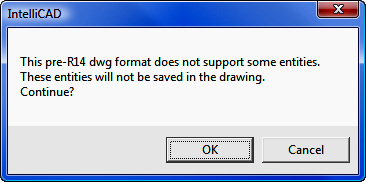
If you have imported a DWG file, when the drawing first opens you will likely see this error message.
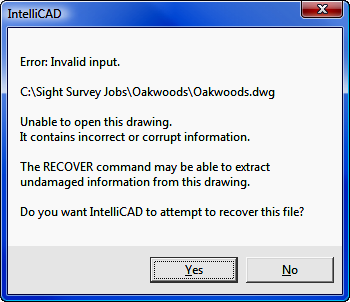
The error message is caused by settings in the release 12 formatted drawing file that are not recognized by IntelliCAD. These are general settings and there is nothing wrong with your drawing. Click [Yes] to continue loading the drawing.
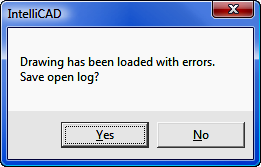
A log file is created as the drawing is recovered, resulting in another message. You do not need to save the log file. Click [No].
When you attempt to save the imported drawing for the first time, you will also see this dialog. Again, there is nothing wrong with the drawing, and nothing will be left out of the drawing when you save it. Click [OK] to complete the initial save process. Your drawing is saved in the most current IntelliCAD/AutoCAD drawing format and you will not see this message again.
Using Old Simplicity (DOS) Survey 3 & 4 Jobs
There may be times when you need to import an old DOS Survey 3 (.DAT) or Survey 4 (.DAT) file. "Sight" Survey is capable of directly reading these file types using File > Import > Coordinates (Section 3.09). In some cases you may also have a Generic CADD or General CADD drawing (.GCD) that you created with the old Simplicity Draftsman program. Unfortunately, "Sight" Survey is not capable of directly reading those drawings. But don't despair, you still have the tools to create a new "Sight" Survey job.
Converting the COGO files: You can use "Sight" Survey 2009 to import any Survey 3/4 data file and create a .ZAK file. Under File > Import > Coordinates simply select the file name and set the file type as Survey 3 or Survey 4.
If you have GCD drawing files, you can use General CADD or Generic CADD to save a copy of the GCD file as an AutoCAD DXF or DWG file.
Using your existing .DAT file and your new DXF/DWG file, simply follow the instructions for Using Old Files from Other Software located later in this section.
Using Carlson files is a relatively simple process since no file conversions need to be made.
Importing Your Job: Open your new "Sight" Survey and left-click on the [Create New Job] button.
Job Name: Give your job a name: the same name as the Carlson job you are importing.
Location: This setting displays the location of the root folder, the folder in which the new job folder will be created. If you are not creating a new job folder, this is the location where all files associated with the new job will be stored. To change this location, click the [Browse] button.
Create New job by importing an old Sight Survey 2 or 3 job: This box should be unchecked.
Distance Unit: Specify the distance unit for this job, either feet or meters.
|
NOTE: US Survey Feet or International Feet? If you have selected Feet as your Distance Unit, you can specify US Survey Feet or International Feet from the Local Configuration menu (LC - Section 5.05). |
Coordinate Format: Click [q] and select a coordinate format from the list. It should be the same format as the Carlson file you are importing.
CAD: Select your AutoCAD version and click [OK]. “Sight” Survey will initialize a job file and open the CAD window.
Close "Sight" Survey: Select File > Exit or type the two-letter code SY. Save the data file and the drawing file.
Import the Files: Use Windows Explorer (My Computer) to copy the existing .CRD and DWG file from the Carlson Jobs folder to the folder for the new job under Documents\Sight Survey Jobs folder. Overwrite the .CRD and .DWG files that are already there since they are empty anyway. Now restart "Sight" Survey and reload the job. Your CRD file and DWG file will be loaded and ready to use.
Using C&G files is a relatively simple process since no file conversions need to be made.
Importing Your Job: Open your new "Sight" Survey and left-click on the [Create New Job] button.
Job Name: Give your job a name: the same name as the C&G job you are importing.
Location: This setting displays the location of the root folder, the folder in which the new job folder will be created. If you are not creating a new job folder, this is the location where all files associated with the new job will be stored. To change this location, click the [Browse] button.
Create New job by importing an old Sight Survey 2 or 3 job: This box should be unchecked.
Distance Unit: Specify the distance unit for this job, either feet or meters.
|
NOTE: US Survey Feet or International Feet? If you have selected Feet as your Distance Unit, you can specify US Survey Feet or International Feet from the Local Configuration menu (LC - Section 5.05). |
Coordinate Format: Click [q] and select a coordinate format from the list. It should be the same format as the C&G file you are importing, either numeric or alphanumeric.
CAD: Select your AutoCAD version and click [OK]. “Sight” Survey will initialize a job file and open the CAD window.
Close "Sight" Survey: Select File > Exit or type the two-letter code SY. Save the data file and the drawing file.
Import the Files: Use Windows Explorer (My Computer) to copy the existing C&G coordinate file (.CRD or .CGC), the index files (.IDX or .CGI) and the DWG file from the C&G Jobs folder to the folder for the new job under Documents\Sight Survey Jobs folder. Overwrite the coordinate, index and drawing files that are already there since they are empty anyway. Now restart "Sight" Survey and reload the job. Your coordinate and drawing files will be loaded and ready to use.
Using Old Files from Other Software
As long as you can create an ASCII coordinate file and (optionally) an AutoCAD DXF or DWG file, you can port a job to "Sight" Survey. Once you have these file, follow this general procedure:
Start a New Job in "Sight" Survey: Choose your Job Name, Coordinate Format, and CAD program.
Import the Data: Click File > Import > ASCII Files and import your coordinate file.
Import the Drawing: If you want to import a DXF/DWG file, follow the steps below appropriate to your CAD program.
AutoCAD/IntelliCAD - Import the Drawing File:
On the AutoCAD/IntelliCAD command line, type Open [Enter] and select the correct file type (DXF or DWG).
Using the Windows dialog box, find the drawing file and click [Open].
Type Zoom [Enter] [E] [Enter] to Zoom Extents and you should see your drawing.
Notice that the title of the drawing is set to the name of the drawing file you just imported.
Minimize the drawing. (Not the entire CAD screen, just the drawing.) You should now see the original drawing screen. It will be blank, but the title will reflect the name of the job you are creating.
Close this drawing so we can save our imported drawing file to the same name. Click the X in the upper right corner of the drawing (not the CAD window, but only the current drawing).
Restore the minimized drawing.
In the command line, type SAVEAS [Enter]. Using the navigation dialog box, go to the folder for the new job under Documents\Sight Survey Jobs folder. In the job folder you will find the name of the new job with a .DWG file name extension. Double-click the file and the drawing will be renamed and saved as the current drawing. You may now continue working in your new job file.
MicroStation - Import the Drawing File:
In MicroStation, click File > Open and select the correct file type (DXF or DWG).
Using the Windows dialog box, find the drawing file and click [Open].
Click the Fit View toolbar icon and you should see your drawing.
Notice that the title of the drawing is set to the name of the drawing file you just imported.
Click File > Save As. Using the navigation dialog box, set the File Type to DGN and go to the folder for the new job under Documents\Sight Survey Jobs folder. In the job folder you will find the name of the new job with a .DGN file name extension. Double-click the file and the drawing will be renamed and saved as the current drawing. You may now continue working in your new job file.
If your drawing has disappeared, you can either click the Fit View toolbar icon again, or click into "Sight" Survey and type ZE to Zoom Extents.