


This tool is used for management of a complete project. A project can contain multiple drawings, and each drawing within that project can contain multiple associated data files.
Think of the Project Explorer as the trunk of the hierarchical tree structure that develops into a project as illustrated below:
 As you work in a drawing, Carlson keeps track of the
files that you create (such as TIN and coordinates files). These
are related to the drawing and you can use the Drawing Explorer to
manage them. The Project Explorer is used to manage multiple
drawings. In the following illustration, two views of the same
Project are displayed:
As you work in a drawing, Carlson keeps track of the
files that you create (such as TIN and coordinates files). These
are related to the drawing and you can use the Drawing Explorer to
manage them. The Project Explorer is used to manage multiple
drawings. In the following illustration, two views of the same
Project are displayed:

| Control | Action |
|---|---|
|
|
Adds a drawing and its data file(s) into the project. |
|
|
Removes the selected file(s) along with any "child" (subordinate) files from the project. Note that removing a data category or file at the "project" level also removes the category or file at the "drawing" level. |
|
|
Creates a report through the Report Formatter Options dialog box. The Report Formatter can be used to move to the Available entries on the left to the Used area on the right. When coupled with the Up/Down options to control the order, highly customized reports can be generated and saved for subsequent use. Click the Display to obtain the report. |
|
|
The Change Directory option allows you to instruct Carlson Software to re-direct the location for files from an old folder location to a new folder location. This option is helpful if project data files are manually moved to a new folder location. |
|
|
The Settings button allows you to create Categories of file types and assign data files to a particular Category and assign how project data files are presented in the Project Explorer. |
|
|
The Refresh button re-reads the current Project file along with the various Drawing file settings and updates the Project listing appropriately. |
|
|
Exits from the Project Explorer command. |
|
|
Displays the on-line help. |
The project history/log report file can be generated using Report button. The Project Explorer tracks all the data files used with the project. The report function also uses the data file information logged with the Carlson Data Depot. The program allows you to report all revisions or only the last commit on all project files from Carlson Data Depot. The information reported include project file, drawing name, file category, file path, file name, file type, date, time, size, revision, author, date committed and commit message along with project properties (i.e. company name, project name etc). Here's a sample report.
Company Name              : Carlson

Project Name              : Data Depot

Project Description       : Date Depot Description

Project Due Date          : Jun 11, 2010
File Name File Type                       Size   Revision Author       Date Committed    Message

EXAMPLE1  Centerline Files (.cl)          376    16       Carlson.User 05/10/10 16:50:30

EXAMPLE1  Coordinate Files (.crd)         116480 29       Carlson.User 05/10/10 16:51:08

EXAMPLE1  Grid Files (.grd)               99568  12       Carlson.User 05/10/10 16:50:18

NEWTRI    Triangulation Mesh Files (.tin) 63822  25       Carlson.User 05/10/10 16:50:59

ROADS     Profile Files (.pro)            64     21       Carlson.User 05/10/10 16:50:45
Linking a project to the Carlson Data Depot requires that you properly configure the Data Depot through the Set Project/Data Folders command and then open a drawing and assign it to a Project (.PRJ) file. If a project is not linked to the Data Depot, a question mark is overlaid on all the files and folders under that project as shown:

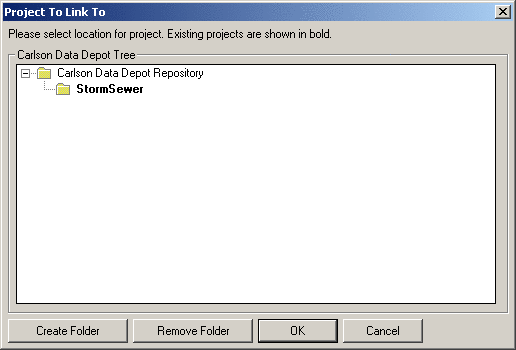
To link a project to the Data Depot, perform the following steps:


When new files are created inside the project, they are shown as
not linked to the Data Depot (using the question mark icon) and can
later be linked to the Data Depot by right clicking and using the
Add to Data Depot command.


Add Existing Files: Allows the user to select an existing data file from local
storage which will be added to the project and the Data Depot. The
data file will be associated (placed under) the currently selected
drawing.
Remove: Removes
the selected file from the project without removing it from the
Data Depot.
Properties: Brings up the system file properties dialog.
Add to Data Depot: Incorporates the selected file(s) into the Data Depot.
Update from Data Depot: Gets the last committed version of the selected file(s)
from the Data Depot.
Update XREF's: Gets the last committed version of any XREF files associated with the selected drawing.
Commit to Data Depot: Incorporates locally modified/locked file(s) that are
already part of the Data Depot into the Data
Depot.
Purge Local Copies: Deletes the selected file from the local storage leaving it in the Data Depot and the project. The local copy can be restored later by using the "Update from Data Depot" command.
Edit Mode (Lock): Locks the selected file(s) for local editing and prevents others from modifying the file(s). If the drawing or data file is newer in the Data Depot than on local storage this command will be disabled.
Read-Only Mode (Unlock): Unlocks the selected file(s) so that they may be edited by others.
History: Displays the history log of changes made to the selected
file.
Clean (project level only): "Cleans" the project of items that don't exist in both the Data Depot and local storage.
Once the project has been added to the Data Depot, it can be
quickly updated or accessed by other users and be ready for use via
the Get
Project from Data Depot command:
Pulldown Menu Location: File > Project
Keyboard Command: prjxplore
Prerequisite: None