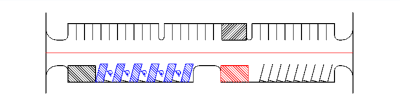
Design Parking Along Alignment
Parking Design is a set of tools to create a network of parking
treatments.
Parking Design dialog
Layout tab
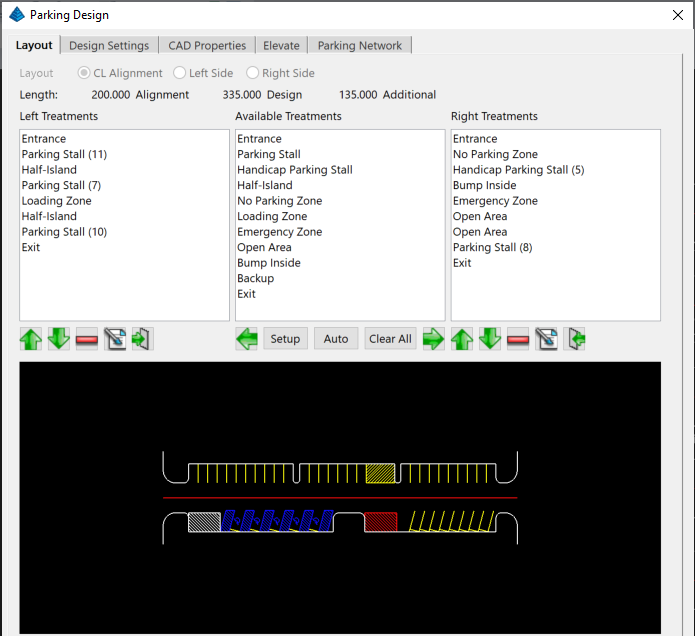
Layout:
CL
Alignment Design by centerline path
Left Side Design Left side
only
Right Side Design Right
side only
Length:
Alignment Initial length of
selection
Design Design length of
treatments
Difference Additional
length or Remaining length
Left Treatments List of
parking treatments assigned to left side
Up/Down Reorder the selected parking
treatment
Remove Remove the selected
parking treatment
Edit Edit selected parking
treatment
Mirror Mirror left parking
treatments to the right
Available Treatments List
of parking treatments available for design
Left Add selected treatment to the left
side of design
Setup Edit selected parking
treatment's default values
Auto Open the Automation
settings
Clear All Remove all
treatments from parking design
Right Add selected
treatment to the right side of design
Right Treatments List of
parking treatments assigned to right side
Up/Down Reorder the selected parking
treatment
Remove Remove the selected
parking treatment
Edit Edit selected parking
treatment
Mirror Mirror right parking
treatments to the left
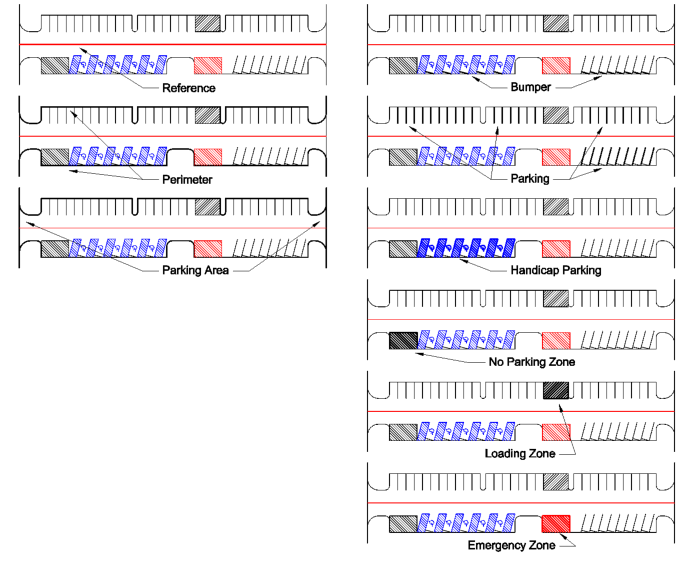
Treatment Setup/Edits
Treatment edit is the same for edit of a side's treatment and
setup of available treatments.
Entrance
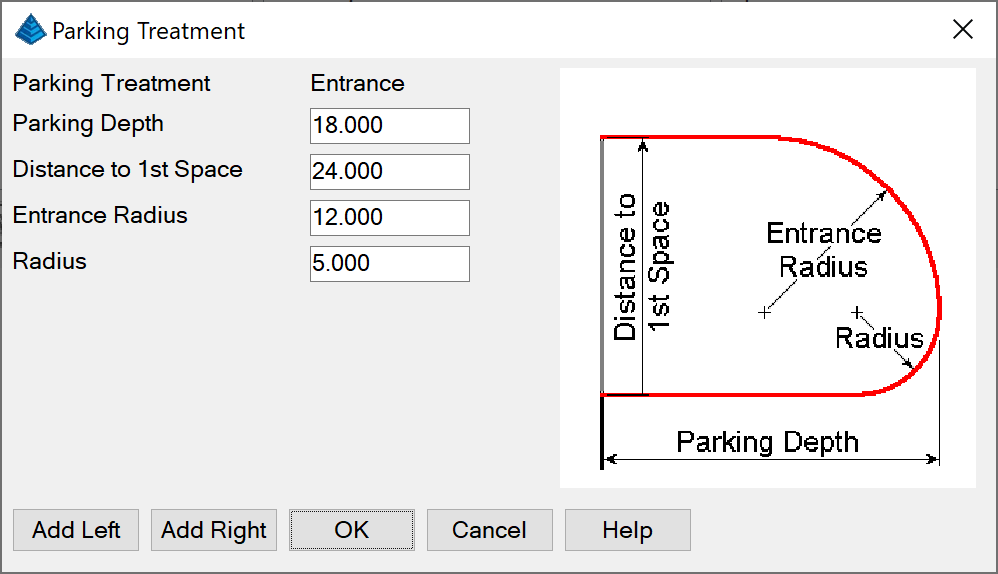
Parking Depth: Distance from parking
perimeter to inside of entrance.
Distance to 1st Space:
Distance from entrance to start of parking treatments.
Entrance Radius: Radius on
the outside of entrance.
Radius: Radius on the
inside of entrance.
Parking Stall
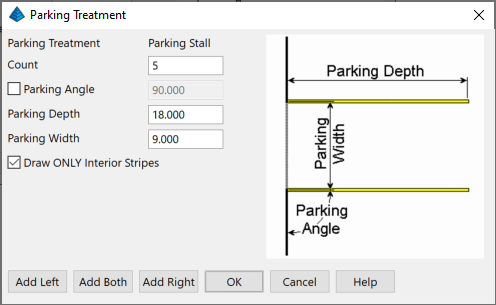
Count: Number of parking stalls.
Parking Angle: Toggle to
set the angle of parking stall.
Parking Depth: Depth of
parking stall.
Parking Width: Width of
parking stall.
Draw ONLY Interior Stripes:
Include or exclude first and last stripe lines.
Handicap Parking

Count: Number of handicap parking
stalls.
Parking Angle: Toggle to
set the angle of parking stall.
Parking Depth: Depth of
handicap parking stall.
Parking Width: Width of
handicap parking stall.
Draw ONLY Interior Stripes:
Include or exclude first and last stripe lines.
Draw Handicap Marker: Draw
the handicap marker in the parking stall.
Draw Buffer: Location of
parking buffer
None No buffer is drawn
Left Buffer is drawn on the
left side of stall
Right Buffer is drawn on
the right side of stall
Both Buffer is drawn on
both sides of stall
Buffer Width: Width of
parking buffer.
Half-Island
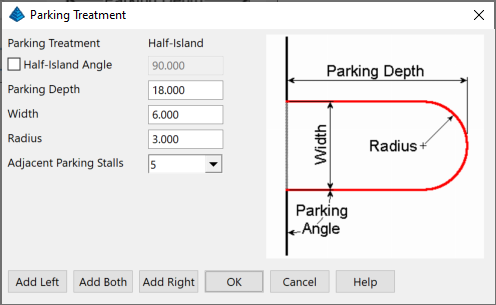
Half-Island Angle: Toggle to set the
angle of half-island.
Parking Depth: Distance
from parking perimeter to inside of half-island.
Width: Width of
half-island.
Radius: Radius on inside of
half-island.
Adjacent Parking Stalls:
(Optional for Available Treatment's Edit) Number of parking stalls
to add if none are adjacent to half-island.
No Parking Zone/Loading Zone/Emergency Zone
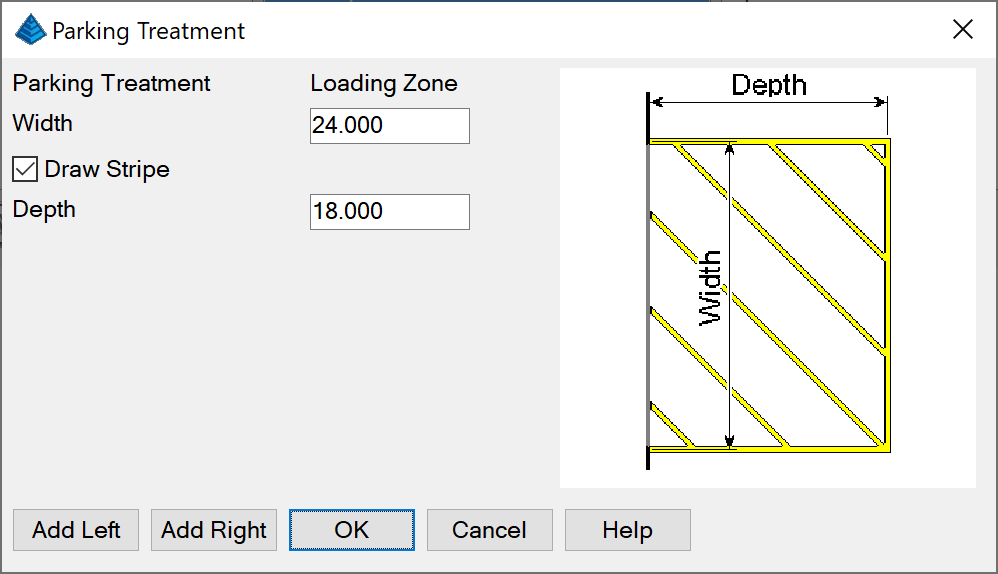
Width: Width of parking treatment.
Draw Stripe: Draw the
Stripe for parking treatment.
Depth: Distance from
parking perimeter to inside of treatment.
Open Area
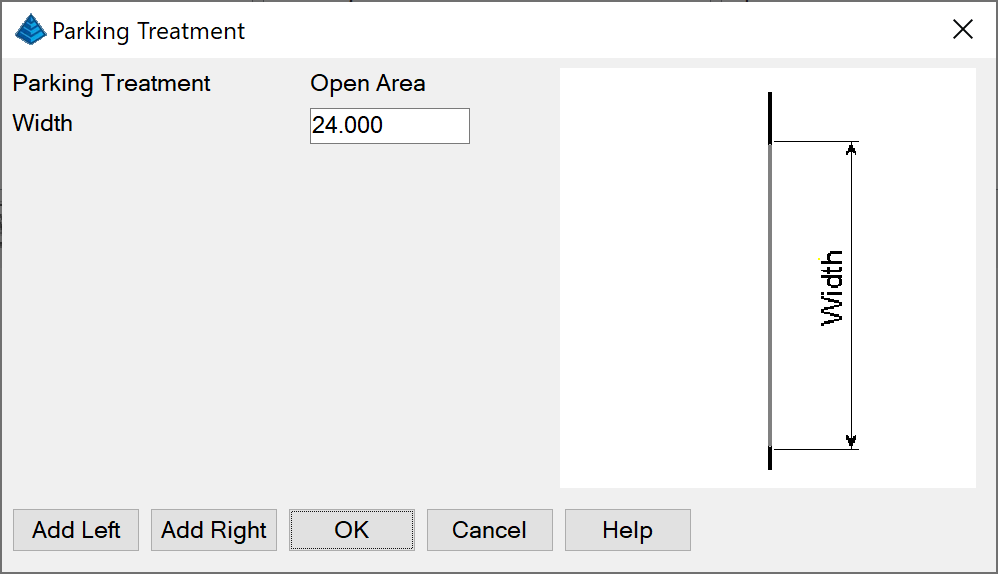
Width: Width of open area.
Bump Inside
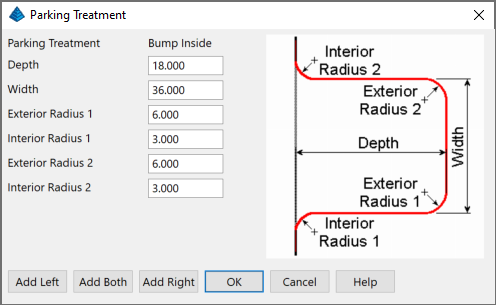
Depth: Distance from parking perimeter
to inside of bump inside.
Width: Width of bump
inside.
Exterior Radius 1: Radius
of first side on the inside of bump inside.
Interior Radius 1: Radius
of first side on the outside of bump inside.
Exterior Radius 2: Radius
of second side on the inside of bump inside.
Interior Radius2 : Radius
of second side on the outside of bump inside.
Backup
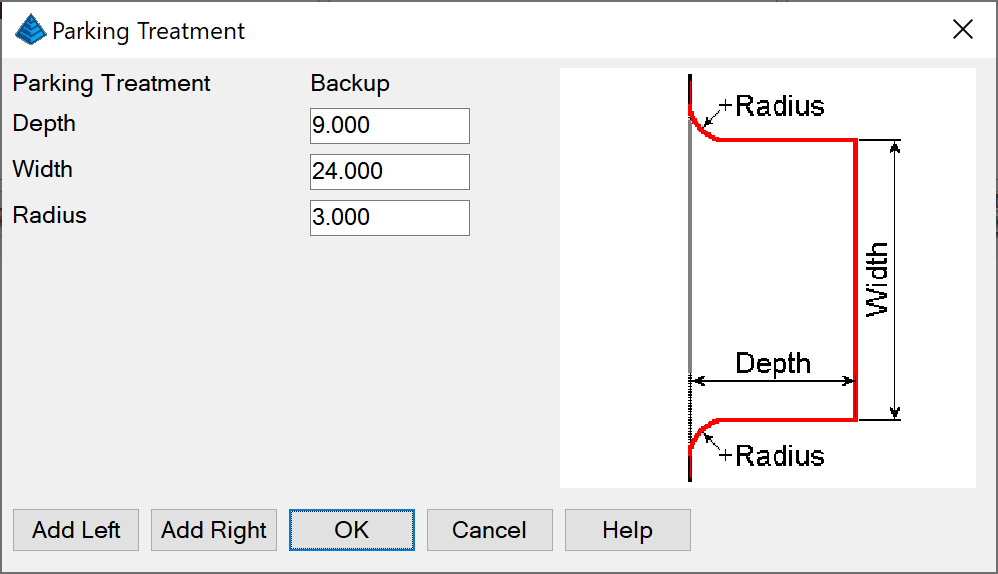
Depth: Distance from parking perimeter
to inside of backup.
Width: Width of backup.
Radius: Radius on the
outside of backup.
Exit
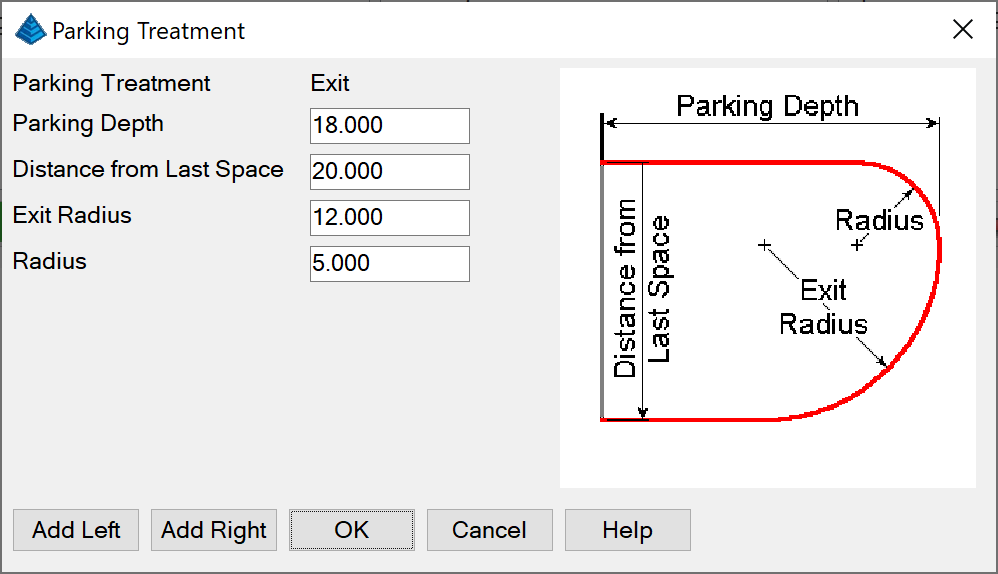
Parking Depth: Distance from parking
perimeter to inside of exit.
Distance from Last Space:
Distance from last parking treatment to exit.
Exit Radius: Radius on the
outside of exit.
Radius: Radius on the
inside of exit.
Add Left: (Optional for
Available Treatment's Edit) Adds the treatment to the left
list.
Add Right: (Optional for
Available Treatment's Edit) Adds the treatment to the right
list.
Automation dialog
The Automation dialog can automatically generated based of
selected parameters. When placing treatments it will use the
defaults of the treatment from the Layout tab. Various options can
be selected to get a start of a parking design based on the initial
selected length.
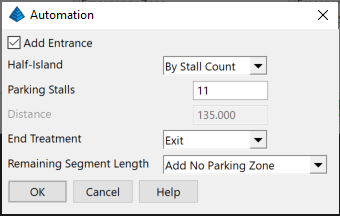
Add Entrance: If the
default Entrance is added to both the left and right sides of the
automatic design.
Half-Island: Method for
adding half-islands to the automatic design.
None No half-islands will be
automatically added to the automatic design.
By Stall Count Half-islands
will be added after a number of stalls.
By Distance Half-islands
will be added after a specified distance.
End Treatment: Type of end
treatment to use when generating an automatic design.
None No end treatment will be
automatically added to the automatic design.
Backup A backup is added to
the design to allow for vehicles to backup and exit.
Exit An exit is added to
both the left and right sides.
Remaining Segment Length:
The way that the remaining length is used for treatment
generation.
Add
No Parking Zone Add no parking zone of remaining length.
Add Open Area Add open area
of remaining length.
Distribute Distribute the
remaining length among last treatment.
Append to End Treatment Add
remaining length to the segment end treatment.
OK Automatically generate
the parking design based on the parameters specified.
Design Settings tab
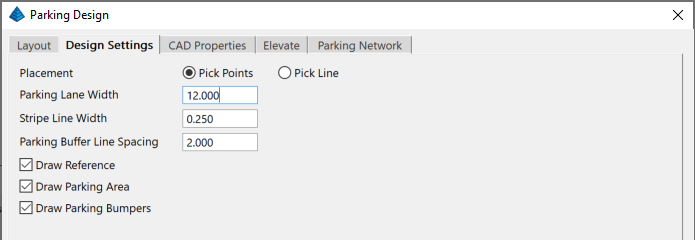
Placement:
Pick
Points Graphically select the start and end points for
parking alignment.
Pick Line Graphically
select a line for parking alignment.
Parking Lane Width: Width
of the drive lane of parking.
Stripe Line Width: Line
width of the parking stripes.
Parking Buffer Line
Spacing: Distance between buffer line stripes.
Draw Reference: Toggle to
draw the reference alignment.
Draw Parking Area: Toggle
to draw the closed parking area.
Draw Parking Bumpers:
Toggle to draw the parking bumpers on angled stalls.
CAD Properties tab
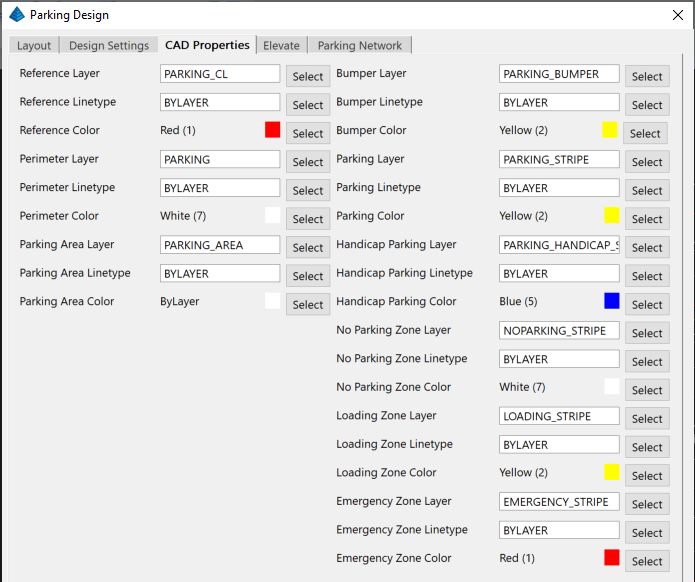
Reference Layer: Layer to
draw the reference CL.
Reference Linetype:
Linetype to draw the reference CL.
Reference Color: Color to
draw the reference CL.
Perimeter Layer: Layer to
draw the perimeter.
Perimeter Linetype:
Linetype to draw the perimeter.
Perimeter Color: Color to
draw the perimeter.
Parking Area Layer: Layer
to draw the parking area.
Parking Area Linetype:
Linetype to draw the parking area.
Parking Area Color: Color
to draw the parking area.
Bumper Layer: Layer to draw
the parking bumpers.
Bumper Linetype: Linetype
to draw the parking bumpers.
Bumper Color: Color to draw
the parking bumpers.
Parking Layer: Layer to
draw the parking stripes.
Parking Linetype: Linetype
to draw the parking stripes.
Parking Color: Color to
draw the parking stripes.
Handicap Parking Layer:
Layer to draw the handicap parking stripes, buffer and marker.
Handicap Parking Linetype:
Linetype to draw the handicap parking stripes, buffer and
marker.
Handicap Parking Color:
Color to draw the handicap parking stripes, buffer and marker.
No Parking Zone Layer:
Layer to draw the no parking zones.
No Parking Zone Linetype:
Linetype to draw the no parking zones.
No Parking Zone Color:
Color to draw the no parking zones.
Loading Zone Layer: Layer
to draw the loading zones.
Loading Zone Linetype:
Linetype to draw the loading zones.
Loading Zone Color: Color
to draw the loading zones.
Emergency Zone Layer: Layer
to draw the emergency zones.
Emergency Zone Linetype:
Linetype to draw the emergency zones.
Emergency Zone Color: Color
to draw the emergency zones.
Select: (Layer) Select the
corresponding layer from list.
Select: (Linetype) Select
the corresponding linetype from list.
Select: (Color) Select the
corresponding color from list.
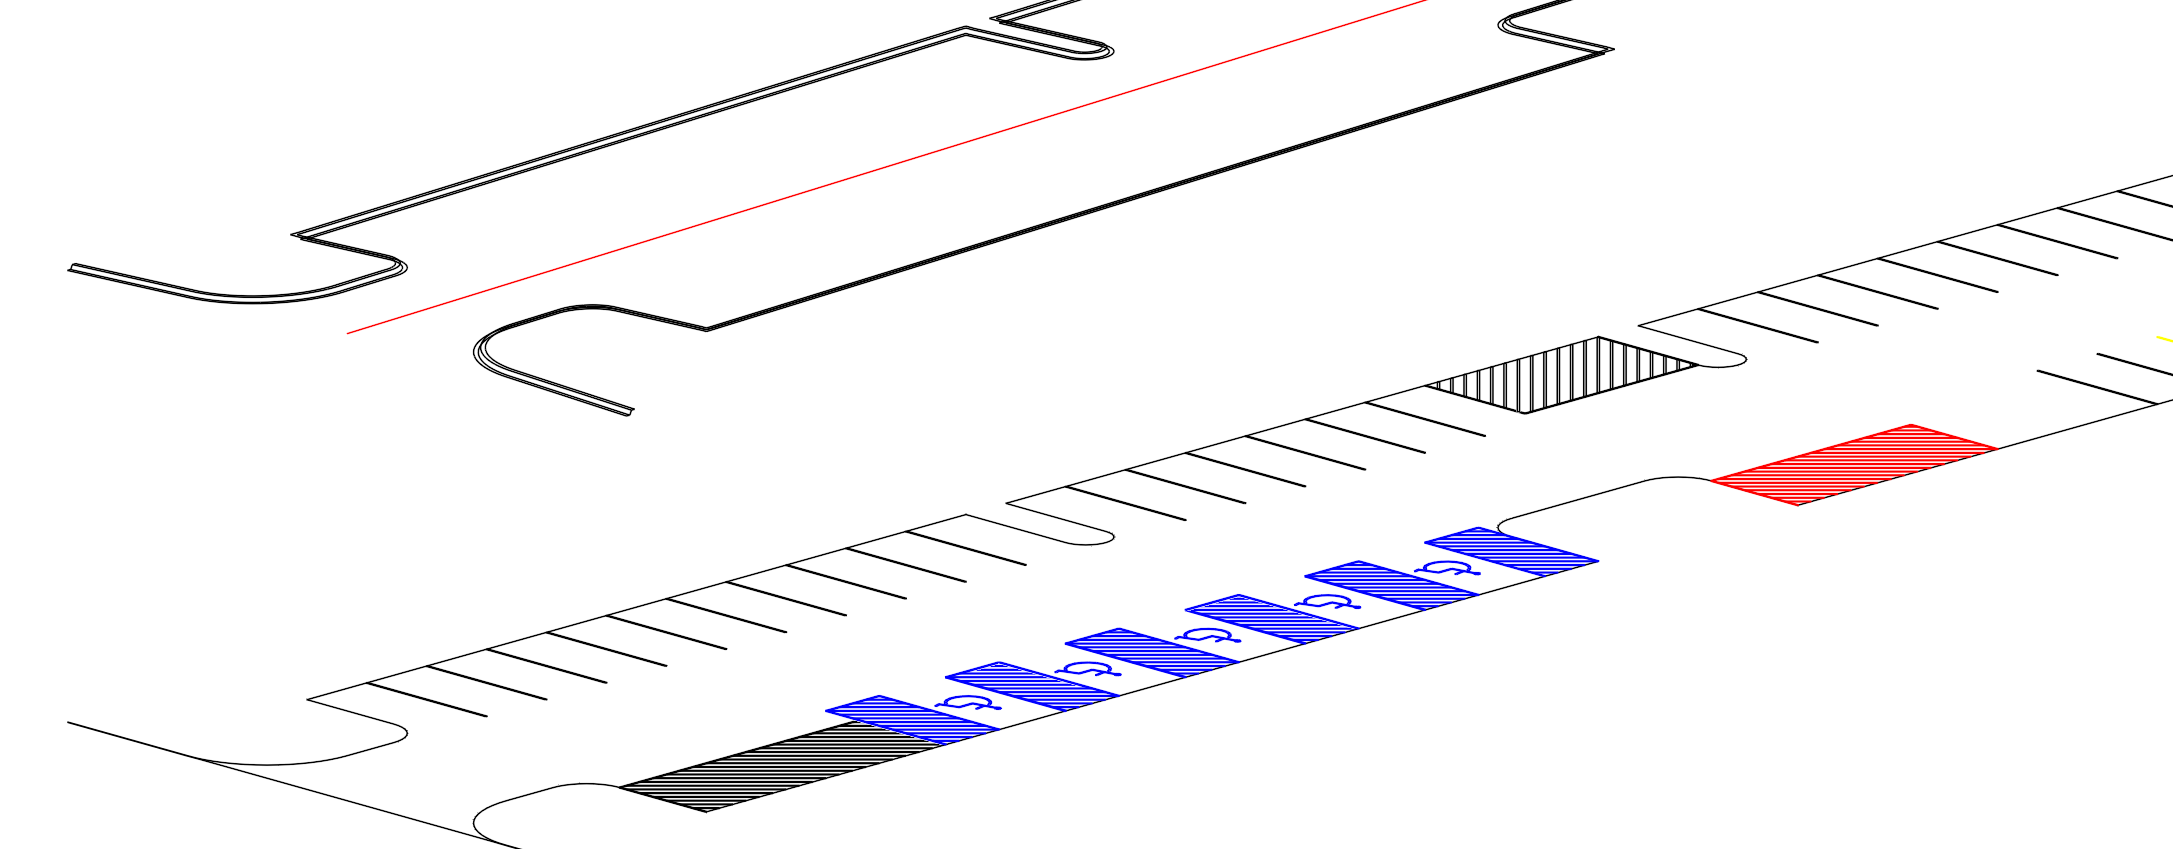
Elevate tab
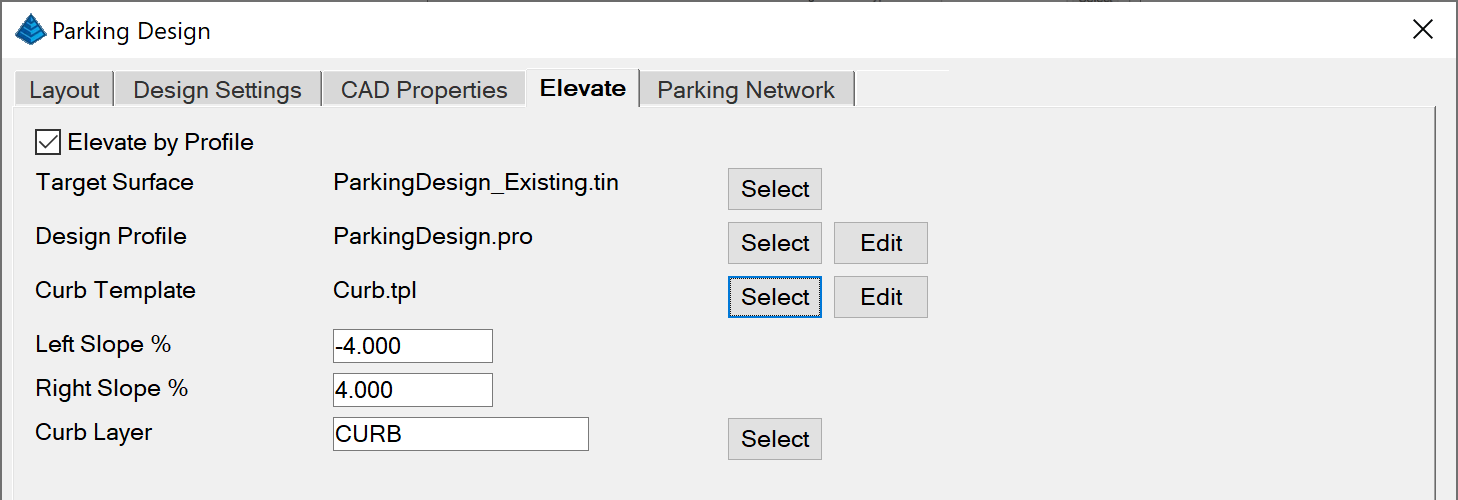
Elevate by Profile: Elevate
the perimeter linework by the profile and side slopes.
Target Surface: Existing
Surface to target. Select:
Use this button to browse to and select the Existing Surface file
to be used for the Road Network. Either a TIN or FLT triangulation
file are accepted as valid surfaces, both of which can be made
within the command Triangulate and Contour. For speed, it is
recommended that the binary TIN file format be selected.
Design Profile: Design
Profile of parking alignment. Select: Select the design profile file.
Edit: Edit the design
profile.
Curb Template: Curb
Template to draw along perimeter. Select: Select the curb template file.
Edit: Edit the curb
template.
Left Slope %: Left slope
from profile.
Right Slope %: Right slope
from profile.
Curb Layer: Layer to draw
the curb linework.
Parking Network tab
For integration with Road Network the parking design command can
create the necessary data files to process with Road Network.
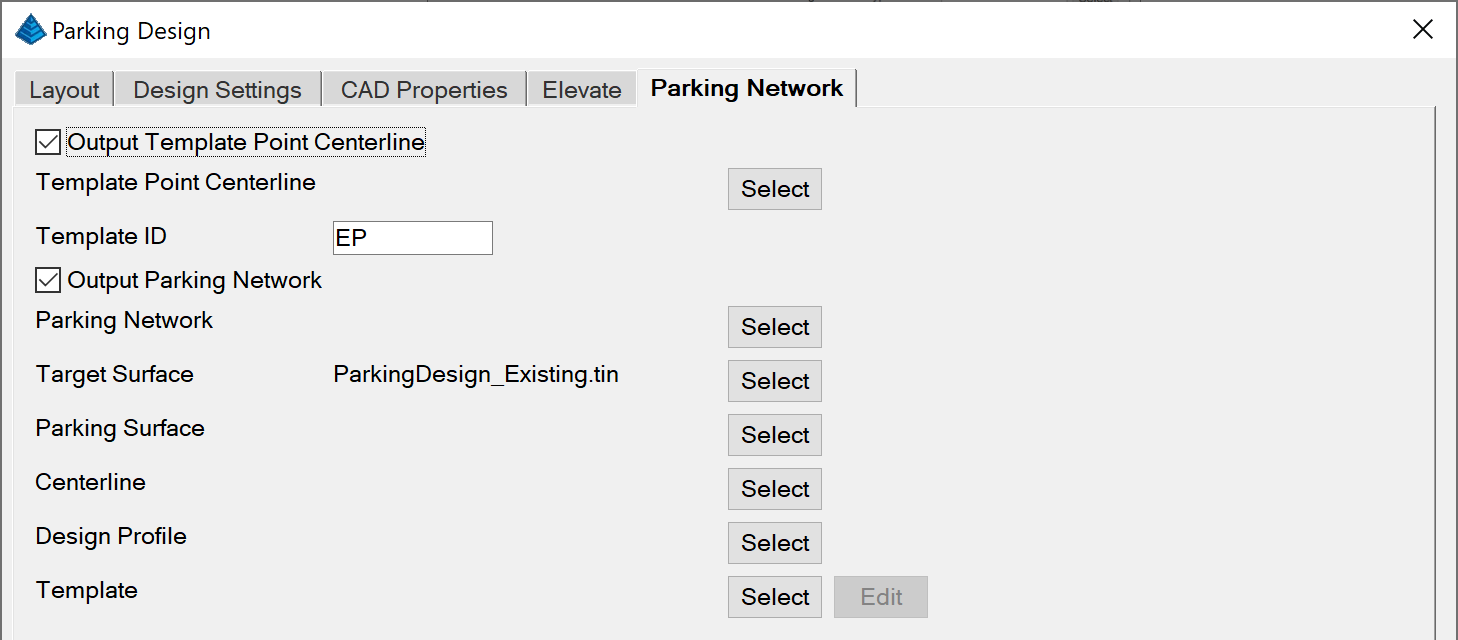
Output Template Point
Centerline: Toggle for creation of a Template Point
Centerline.
Template Point Centerline:
Specified Template Point Centerline TPC file to create from the
parking design.
Template ID: ID to use
within the TPC file.
Output Parking Network:
Toggle for creation of a Road Network RDN file from the parking
design.
Parking Network: Specified
Road Network RDN file to create from the parking design.
Target Surface: Existing
Surface to target. Select:
Use this button to browse to and select the Existing Surface file
to be used for the Road Network. Either a TIN or FLT triangulation
file are accepted as valid surfaces, both of which can be made
within the command Triangulate and Contour. For speed, it is
recommended that the binary TIN file format be selected.
Parking Surface: Parking
Surface to create. Select:
Use this button to browse to and select the Parking Surface file to
be output from Road Network. Either a TIN or FLT triangulation file
are accepted as valid surfaces For speed, it is recommended that
the binary TIN file format be selected.
Centerline: Parking
alignment centerline to create. Select: Use this button to browse to
and select the Centerline file to be output for Road Network.
Design Profile: Parking
alignment centerline's profile to create. Select: Use this button to browse to
and select the Profile file to be output for Road Network.
Template: Template to use
for the Road Network. Select: Select the template file.
Edit: Edit the
template.

The Save and
Load buttons save and
recall the parking design settings to a .PKD file.
Prompts
Pick Start Point
[CL-Centerline/P-Polyline] (Enter for none): Pick the
start point for the parking alignment.
Pick Next Point: Pick
the next point of the parking alignment.
Pick Next Point (enter to
end): Pick additional points of the parking alignment or
enter to end point selection.
Centerline Select the
centerline file to use for the parking alignment.
Polyline Select the line
for the parking alignment. The parking design will start at the
line start point draw the direction that the line is drawn.
Optional Prompts
Select polyline to align
Entrance (Enter for None): Select another polyline to
align the entrance. If selected the entrance will join to the
selected polyline.
Select polyline to align Exit
(Enter for None): Select another polyline to align the
exit. If selected the exit will join to the selected
polyline.
Pulldown Menu Location:
Area/Layout > Parking Utilities > Design Parking Along
Alignment
Keyboard Command:
park_design
Prerequisite: