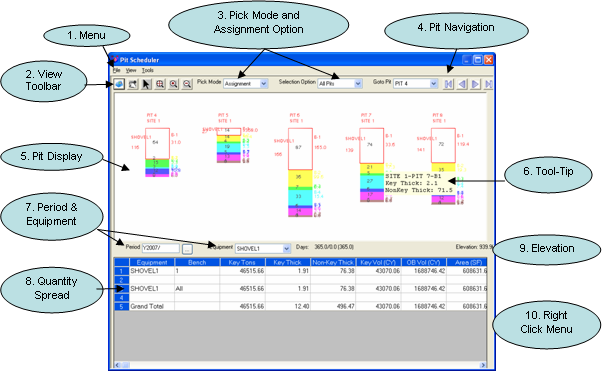
Pit Scheduler
Pit Scheduler is a
short-range surface mine scheduling command and is located under
Reserves/Timing dropdown menu in Carlson Surface Mining. It
displays selected pits in a cross section view with benches and
allows user to assign equipments to pit benches by time period. The
planner can simply pick on a bench to mine/un-mine it and the
updated quantities will appear in the quantity spreadsheet. These
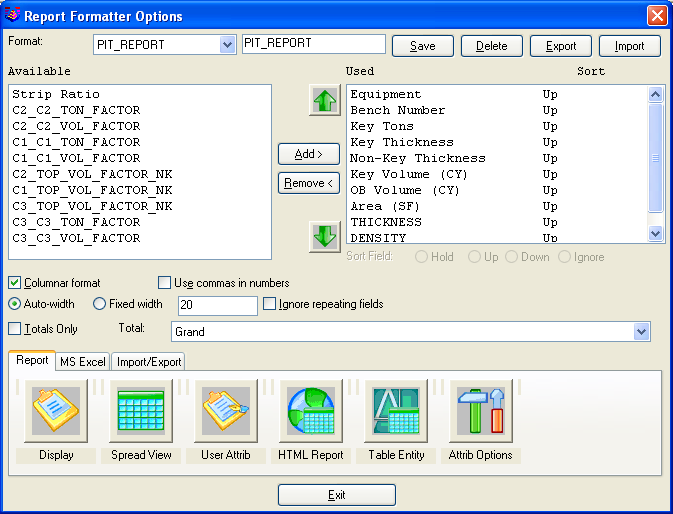
quantities can be reported using report formatter at any
time.
Interface Components
1.
Menu
The Pit
Scheduler has three main dropdown menus.
a. File Menu
i. Read Pit Blocks: This
command can be used to read in the new pits in the view to work
on.
ii. Report: This command can
be used to report the currently assigned quantities.
iii. Export to Bitmap: This
command can be used to save the current pit display in to a bitmap
file.
iv. Save and Exit: This
command saves all the assignment and exits from the Pit
Scheduler.
v. Exit: This will exit from
the Pit Scheduler without saving any assignments.
b. View Menu
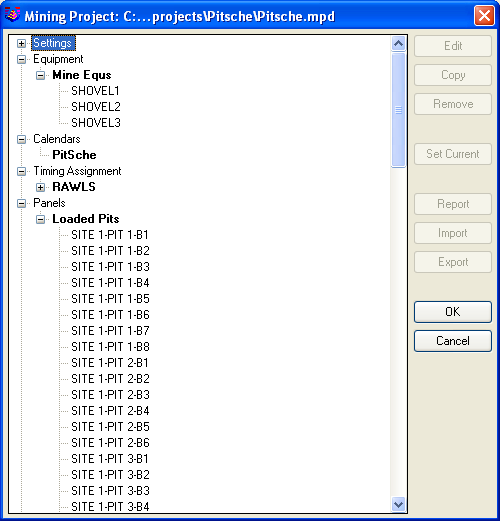
i. Project Manager: This command brings up the
Surface Project Manager that can be used to define equipments,
timing calendar, and other components to be used in scheduling and
to view assignments and loaded pit names.
ii. Settings: This command
shows the settings for Pit View, Pit Text and Mining.
- Pit View:
These settings can be used to modify the pit display to view it
more efficiently. The “Pit Width” and “Pit Separation” can be set
for better viewing the pits based on their thickness. The pit width
is the width of the pit column and pit separation is the separation
between two pit columns. The “Show Pit” allows user specify
the number of pits to view in current view. If “Zoom selected Pit
in plan view” is on as soon as used clicks on a pit it will be
highlighted in the AutoCAD drawing plan view and the view will be
zoomed in to current pit. The “Set Common Elevation” option allows
pits to be hanged from a common elevation specified in the
“Elevation” edit box, if this option is turned off the program
looks for the “SURFACE” attribute for the pit and reads the
elevation from there.
- Pit Text:
The Pit Text settings can be used to display different text in the
pit display for a pit column.
- Mine
Settings: These settings are used in timing the pits similar to
used in Equipment Timing.
c. Tools
Menu
i. Clear Assignments: This
command clears all the assignments for the current equipment
selected in “Equipment” dropdown list. This will allow user to
select the assignments for equipment from the
beginning.
ii. Clear All Assignments:
This command will clear all the assignments for all the equipments
and bring the mine to the starting point, and allows user to start
the scheduling from the beginning.
2. View Toolbar
3.
Pick Mode and Selection Option
a. Pick Mode: is used to set the mode for
selection of pit benches. There are three pick
modes:
i. Assignment: This mode is
used to assign the current equipment selected in the “Equipment”
dropdown list to the selected bench/benches based on the “Selection
Option”.
ii. Waste Bench: This mode is
used to specify whether a bench will be mined or treated as waste
bench. The waste bench quantities will not be added to the
quantities as it will not be mined.
iii. Add Delay: This
mode allows user to add delays associated with a bench. If this
mode is selected than based on the selection option delay will be
added to the bench/benches and mining will be delayed by delay
duration. (Look in Surface Equipment Timing for more information on
adding delays)
b. Selection Option: is used to apply the pick
mode to the benches. There are five selection options user can
choose from.
i. Individual Pit: the pick
mode will be applied to the selected bench in selected
pit.
ii. Current View: the pick
mode will be applied to the selected bench for all the pits in the
current view.
iii. All Pits: the pick mode
will be applied to the selected bench for all the pits loaded in
the Pit Scheduler.
iv. Pits to the Right: the
pick mode will be applied to the selected bench for selected pit
and to all the pits on right side.
v. Pits to the Left: the pick
mode will be applied to the selected bench for selected pit and to
all the pits on left side.
4. Pit Navigation
The Pit Navigation can be used
to scroll through the loaded pits. The “Goto” pit allows user to
select the starting pit for the view. The Left or Right View
scrolls the view to left or right respectively by the number of
pits selected in “Show Pits” in the Settings dialog under View
Menu. The Move Left or Right scrolls the view by a single
pit.
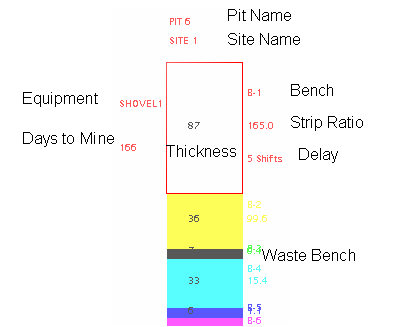
5. Pit
Display
The Pit Display shows the pits
with benches in a plan view based on the view and text settings.
Following figure shows a typical Pit with all text options turned
on.
6.
Tool-Tip
A Tool-Tip window is shown with
the full name of bench (Site-Pit-Bench) and Key and Non-Key
thickness when user cursor over a bench.
7.
Period & Equipment a.
Period: can be used to view the number of days used and
available for the selected equipment. The Period string can be
formatted using the Period Formatter dialog or can directly be
typed in the edit box. The Period string must be in the specified
format. As soon as the user updates the Period and hit enter the
“Days:” label is updated to show “Used Days/Available Days (Period
Days)”.
a.
Period: can be used to view the number of days used and
available for the selected equipment. The Period string can be
formatted using the Period Formatter dialog or can directly be
typed in the edit box. The Period string must be in the specified
format. As soon as the user updates the Period and hit enter the
“Days:” label is updated to show “Used Days/Available Days (Period
Days)”. b.
Equipment: This dropdown lists all the defined equipments in
the Project Manager. The current selected equipment is used for
assignments.
b.
Equipment: This dropdown lists all the defined equipments in
the Project Manager. The current selected equipment is used for
assignments.
8. Quantity Spread
The quantity spread shows the quantities
and qualities for the equipment selected in “Equipment” dropdown
for each bench it is assigned to. The spread shows Equipment,
Bench, Key-Tons, Key-Thickness, Non-Key Thickness, Key Volume, OB
Volume, Area, Acres, and Strip Ratio columns followed by the pit
attribute values. It is important to note that the Strip Ratio will
always be reported as units of nonkey volume to key tonnage
(yd^3/ton or m^3/tonne).

9. Elevation
The current elevation of cursor
is show on the “Elevation” label. If the “SURFACE” attribute is
defined for the pit it will show the actual elevation for that pit
and its benches.
10. Right Click Menu
A Right Click menu pops-up when
user right click on a Pit Column. This menu lists Edit Pit followed
by the full name of benches in that pit. The thickness of a bench
can be very small that it becomes hard to pick that bench using
left click, in that case right click menu can be used to pick that
particular bench. It shows the mined benches with a check mark. The
“Edit Pit” command can be used to edit the pit values and
attributes. (For more information refer to “Edit Pit” command under
Boundary dropdown menu of Carlson Surface Mining).
Pulldown Menu Location: Reserves/Timing in Surface
Mining
Keyboard Command:
pit_scheduler
Prerequisite: Pits with assigned quantities