
The Carlson Data Depot is a document management system to allow tracking of the changing states of files and projects over time and merge the contributions from multiple users providing data integrity, productivity and accountability for the managed products. Also, having a central project repository helps with data back-up eliminating the fear of losing data due to local drive failures. The Carlson Data Depot protects against productivity loss due to re-implemented work, not only avoiding losses of data, but also making each user's work readily available to other users on the project. The general process for implementing your preferred document management system is:
Carlson Software supports the following version control systems:
Subversion is a powerful revision control system which is actively evolving and is part of Apache web-server project. The home page of this project is http://subversion.apache.org/, with a book on setup, use and administration available in print and online at http://svnbook.red-bean.com.
Carlson Software supports Subversion release 1.5.6 or newer.
While there multiple ways to setup Subversion repository and connect to it, the most typical scenario is setting up Subversion server and connecting to it through the web-server. Local directory setup is also available, but not useful in group environments. Running the shared directory on the network should not be attempted since it could lead to the repository corruption and permanent data loss.
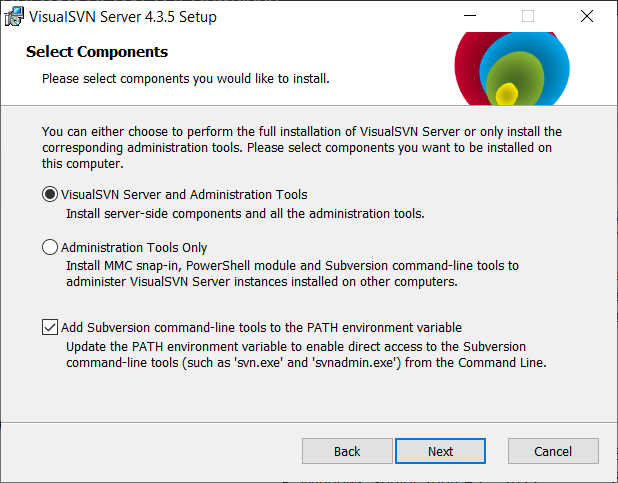
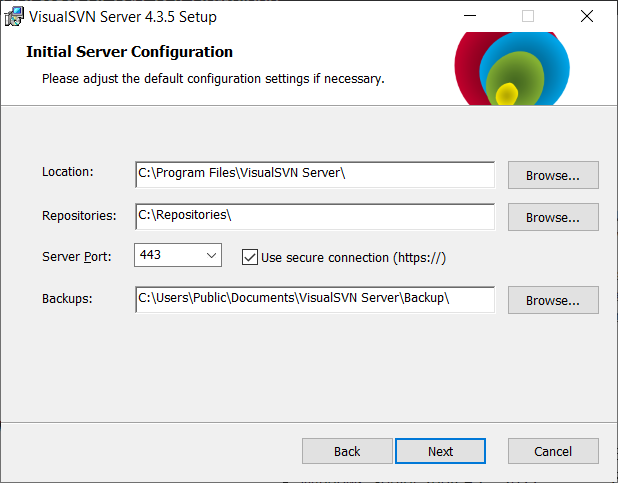
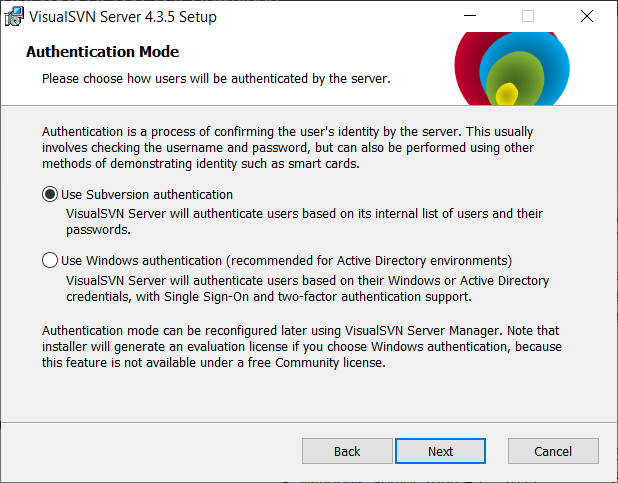
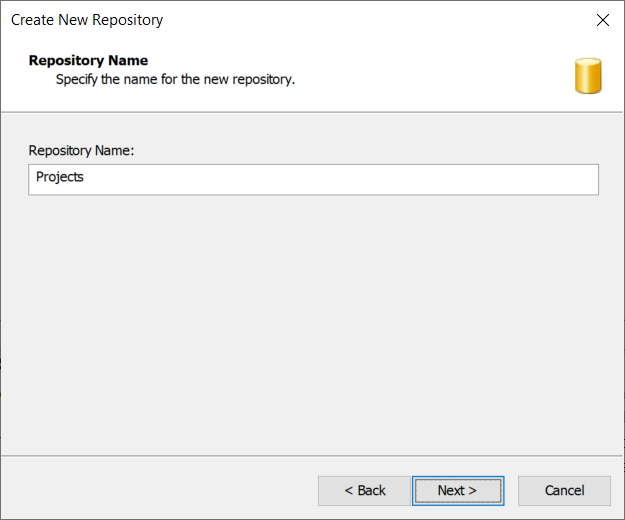
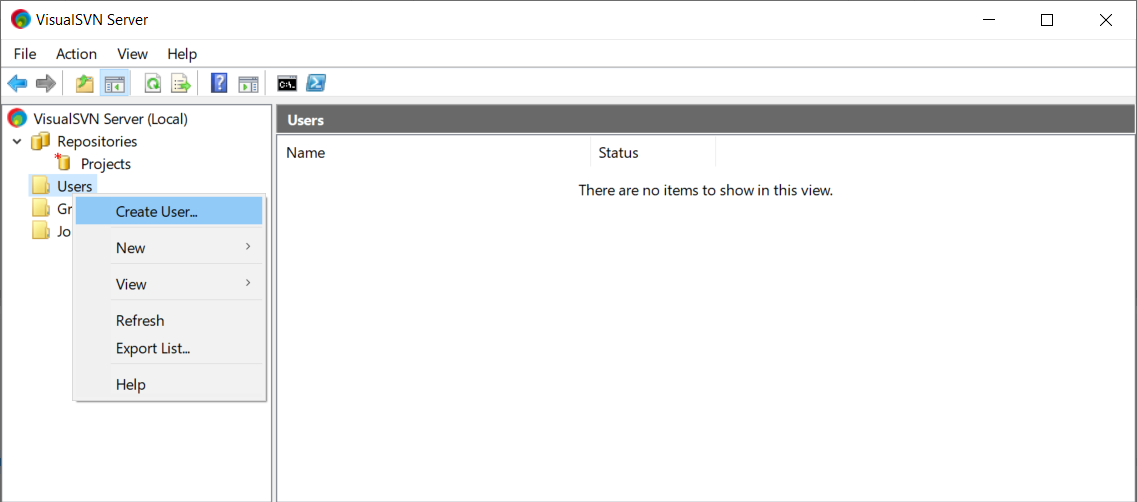
For users who run Windows on their host there is a nicely integrated front-end to a standard Subversion server (included): VisualSVN server (http://visualsvn.com/server/). There are two licenses available for commercial users:
This document will concentrate on install of the basic edition.
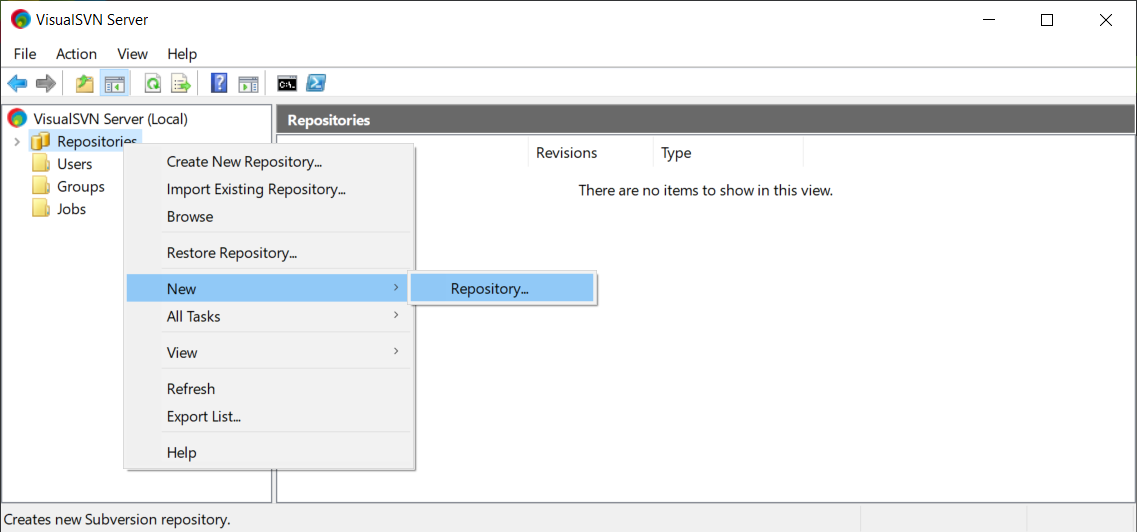


This completes the server side installation of Subversion.
Subversion is a project which was born on Unix platform, so it is fairly straightforward to set up and run on the Linux host. Specific details may vary for different distributions, but below is a quick summary of steps for Redhat or CentOS based hosts, which should at least point you in the right direction.
The following packages should be installed:
Run the following command to configure the Subversion file structure:
svnadmin create --fs-type fsfs /var/lib/subversion/repos
where 'fsfs' refers to the type of the file storage being selected and last argument is the future location of the repository data files on the system.
The Apache configuration file httpd.conf is typically located in the /etc/httpd/conf folder. Please modify it to contain a section like this:
<Location /repos>
    DAV svn
    SVNParentPath /var/lib/subversion/repos
    AuthType Digest
    AuthName "Subversion"
    AuthDigestdomain /repos/
    AuthUserFile /var/lib/subversion/svn_passwd
    Require valid-user
    SSLRequireSSL
</Location>
Restart Apache server. This should let you reach your Subversion server with URL like this:
https://server_name/repos
The configuration above assumes the authentication for the domain "Subversion" handled by Apache itself. Much more powerful options are available, but since these are standard Apache features, plenty of documentation for is readily available.
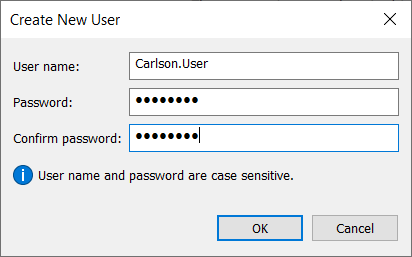
To add new users, please use the following command:
htdigest -c /var/lib/subversion/svn_passwd "Subversion" user_name
where -c is for "create" and only should be used first time. Supply user name for whom the password is being set. The permissions are controlled by the svnserve.conf file typically located in /etc/subversion directory. The equivalent configuration to the Windows example above would look like this:
[Projects:/]
Carlson.Readonly=r
Carlson.User=rw
For further documentation please refer to the book mentioned above or to the numerous Subversion resources online.
The Windows MSI installer with the basic Win32 client binaries can be downloaded at:
http://www.collab.net/downloads/subversion/
Running this installation file installs the required binaries to create the Subversion repository on the server or local machine under "C:\Program Files\Subversion" using the default options.
To create the Subversion repository:
cd "C:\Program Files\Subversion"and press the Enter button to complete this step as shown above.
svnadmin create c:\svnrepoand press the Enter button to complete this step as shown above. This will create a "svnrepo" folder under the "C" drive (c:\svnrepo); see the Notes section below for important information. The path and the name of the repository could be path to a network drive as well. For setting up a Subversion Repository on the server, refer to the http://subversion.tigris.org documentation.
NOTE: Once you have created a Subversion Repository, do not add, delete, or modify files in the Repository folder unless you know how to avoid corrupting the repository.
In order to connect Carlson to Subversion repository, please go to Settings -- Configure Carlson -- Project/Data Folders. Set the project type to Subversion and click Setup button. Specify the server location like:
file:///c:/svnrepo
for a local example above, or:
https://server_name/repos
for a network server as described above. Other URL types supported by Subversion for the scenarios beyond the scope of this document are permitted as well.
There are various graphical-user interface (GUI) client applications available for accessing the SVN repositories on the Internet for free:
Once a supported document management system has been properly
installed and configured for each computer work-station, continue
with the Data Depot configuration by initiating the
Set Project/Data Folder command.
Please see your ProjectWise Administrator for instructions on configuring ProjectWise Datasources for your company. Here are steps to add a sample project to ProjectWise.
1) In the ProjectWise Explorer (not to be confused with the
Project Explorer, which is the Carlson routine that operates inside
of CAD) create a new project under the datasource that you will be
connecting to in the "Documents" section (right click on Documents
and use "New Project"). Name your project the same name as what you
will be calling it in CAD. For example, call it "NewProject".
2) If you don't have one already, in Windows create a folder where
you will store your project and related files. Place any files
under that folder. You don't have to place all the files in that
one folder. You can use any hierarchy layout that you want but in
this sample case for illustration just uses the root folder of the
project and a single drawing.
3) Open a drawing that belongs to this project.
4) Go to the menu item Settings->Set Project Data Folders:
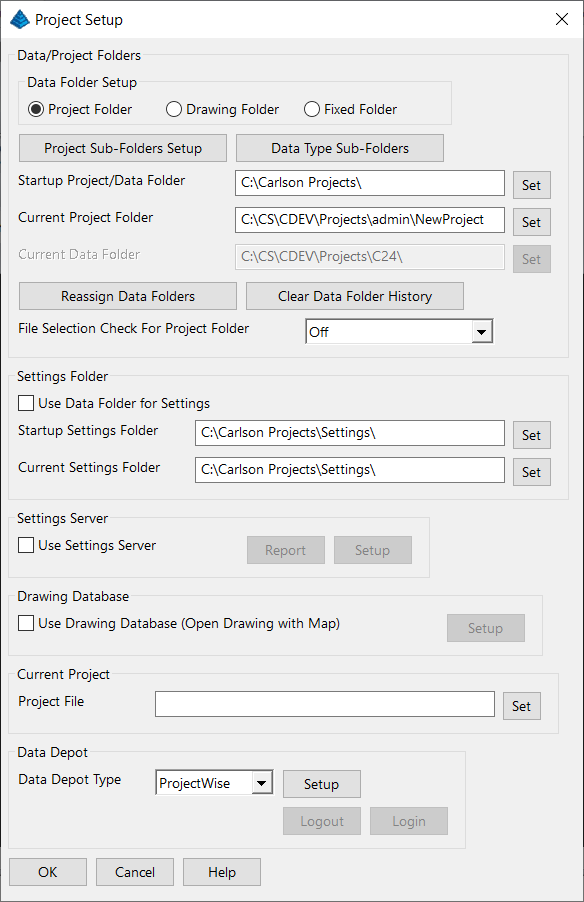
Your settings should look something like this. Select the "Project
Folder" option. Make sure you set your Project File. When you click
on Project File->Set, it will prompt you to either select an
existing or create a new project:
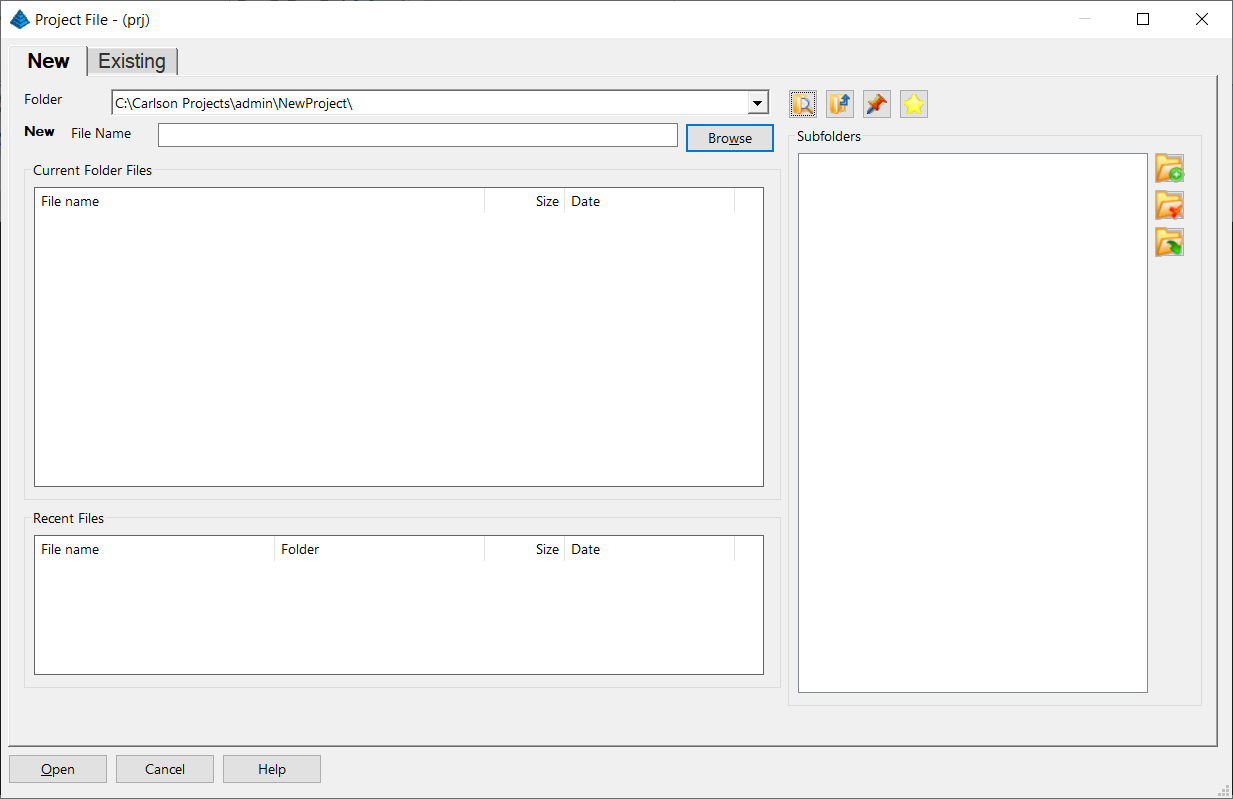
The project folder should have the same name as that you used in
ProjectWise. In this case "NewProject". This name is
case-sensitive. The .PRJ file name itself can be anything you want
to call it. In this case it is called "newproject" as shown above.
So the actual project file name is "newproject.prj". If you have
multiple drawings that are part of this same project, you will want
to make sure they all point to this same project file and have the
same settings at this time. In this sample case, there is only the
one test.dwg drawing.

You will notice that the actual folder name shown above is
C:\Carlson Projects\admin\NewProject. This is because in the Data
Depot Settings the user's name is included in the folder name. In
this case the user's name is "admin". This makes it easy to use a
single computer with multiple users where they can store their
local copy independently of other users.
5) Open the Project Explorer in CAD (menu option
File->Project->Project Explorer). You should see the
following alert:
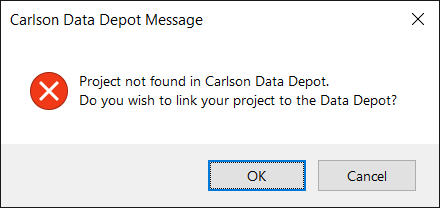
Select OK. Next you will be asked to select the project in
ProjectWise that you want to store the files under:

6) Select the new project you created earlier in step 1. In this
sample case it is "New Project" as shown above.
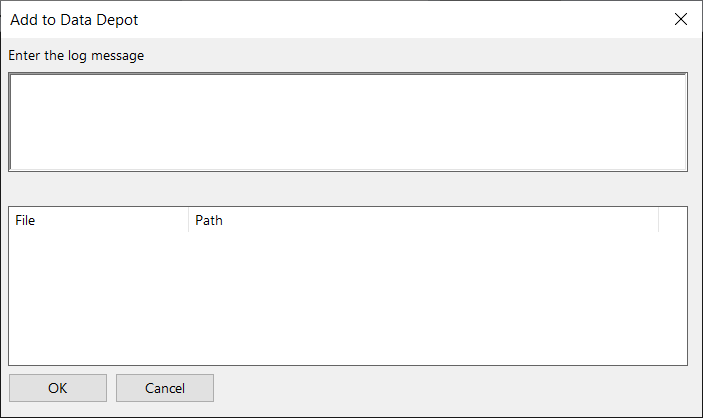
At this dialog, keep the default of "The project and all associated
files". Enter any log message you want. This will appear in your
ProjectWise audit trail.
At this point it should upload all of the files that are part of
this project. In this sample case that is test.dwg and associated
files. If there are any XREFs that have not been uploaded they will
also be uploaded at this time.
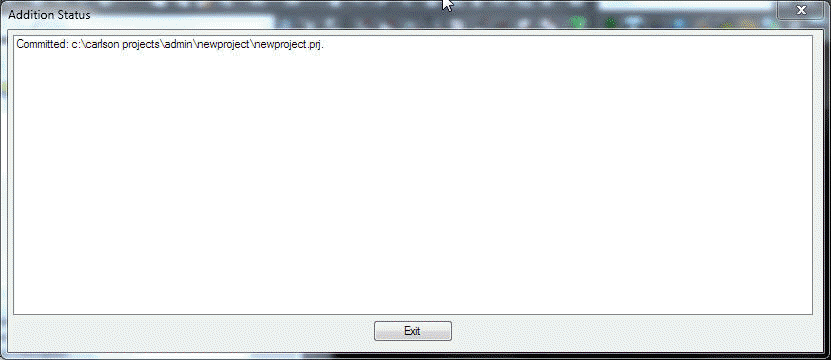
Once done uploading you will see a message showing that the project
file has been uploaded (shown below). In the command window you
will also see a list of all of the files that were uploaded to
ProjectWise (test.dwg, test.crdb and test.ini in this sample
case).
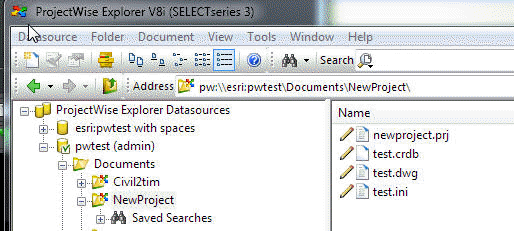
You can now go to your ProjectWise Explorer to see the
results:

1. Go to the menu item Settings->Set Project Data
Folders:
2. Click the Login button to log in to the server located at the
location specified in the "Data Depot Settings" dialog box(accessed
by clicking Setup next to Data Depot Type):

Pulldown Menu Location(s): None
Keyboard Command: None
Prerequisite: None
| Converted from CHM to HTML with chm2web Standard 2.85 (unicode) |