Point GIS Editor
This command can be used to import, export, edit and report GIS
data for points. The GIS data is stored in the current coordinate
file which must be set to the CRDB format. To set this
format, go to Points > Set Coordinate File and enter a file name
with the .CRDB extension. To change a current coordinate file into
CRDB format, go to Points > Coordinate File Utilities.
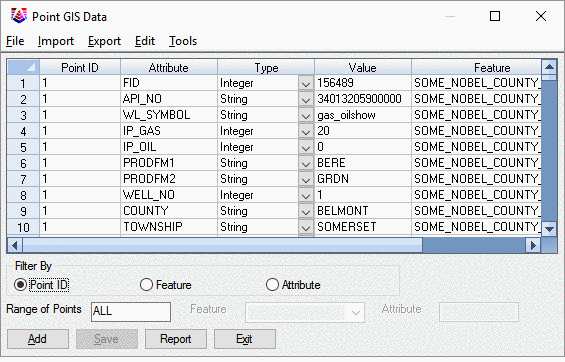
The program uses a spreadsheet for the GIS data sorted by point
number. Each GIS record contains a point name, attribute name, data
type, value and feature. The Point ID references a point name with
x, y, z and description from the coordinate file. The Attribute is
the name of the GIS data. The Type is the data type of String,
Integer for whole numbers and Double for numbers that can have
decimals. The Value is the actual GIS data value. The Feature is
the name for a set of attributes. For example, Manhole could be a
Feature name and the Manhole feature could have Attributes like
material, size, condition, etc. The Feature name is
optional.
The Filter By settings control the data shown in the
spreadsheet. The Point ID method allows displaying data for a
specified set of points. The Feature method displays data for the
specified feature. The Attribute method displays data for the
specified attribute. The Inclusion Perimeter method prompts to
select closed polylines and only shows the point data that are
inside the selected inclusion polylines.
You can edit directly in the spreadsheet. Use the Add and Delete
functions to add or delete records from the spreadsheet. The Save
function saves the GIS data to the CRDB. The Report function uses
the Report Formatter to make a custom report of the GIS
data.
The Import/Export menu has import/export functions to transfer
various data with CRDB. These methods are described below. The Edit
menu has Find, Replace, Delete Row, Delete Range functions.
The Tools menu has a special function to add or subtract a GIS
attribute value to the coordinate file elevations such as
converting the rim elevations in the coordinate file to inverts by
subtracting the depth attribute.
Import from SurvCE GIS Attributes(VTT)
SurvCE stores GIS attribute data in a .VTT file. This file
contains point numbers, attribute name, value and feature name
which imports directly to the CRDB.
Import from Carlson Link
This method imports GIS data assigned to entities with the GIS
Settings > Single File Database.
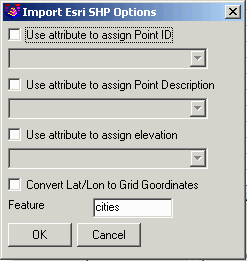
Import from ESRI SHP File
The SHP method imports from the ESRI SHP file. The import
options include selecting which GIS attribute to use for the
coordinate file point name, description and elevation. There is
also a setting to convert the ESRI SHP lat/lon coordinates to grid
coordinates which requires the grid projection to be already
defined in the Drawing Setup command.
The MSC method reads the ESRI MSC data that is assigned to
drawing entities.
Import from Google Earth File
This function reads GIS data contained in Google Earth KML or
KMZ files. The program converts the lat/lon coordinates from the
Google file into grid coordinates which requires the grid
projection to be already defined in the Drawing Setup command.
Import from StarNet PST File
This function import a PST file in from StarNet. It is
required to define GIS Features first .
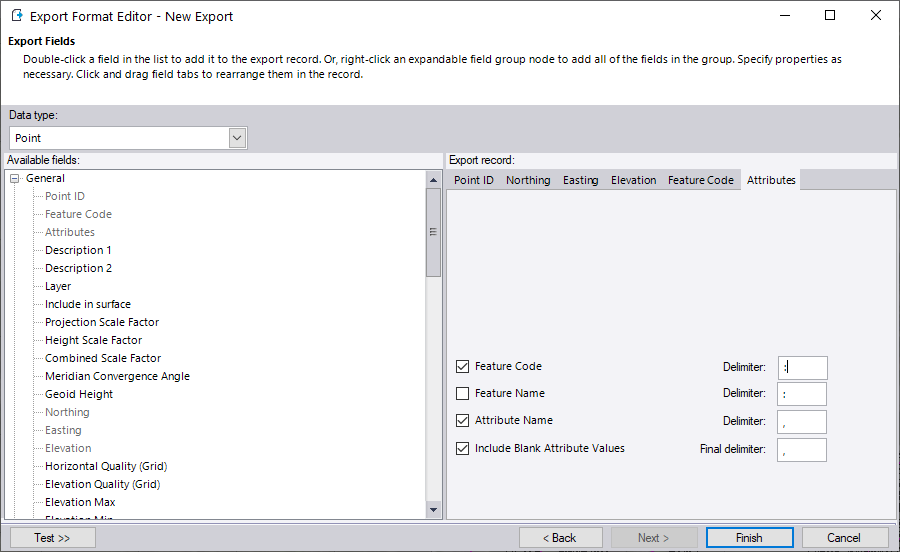
Import from Trimble CSV with Attribute File
This function imports a CSV file in from Trimble Business Center
with point name and coordinates followed by attributes. Trimble
allows users to modify the format of the CSV file, so it is
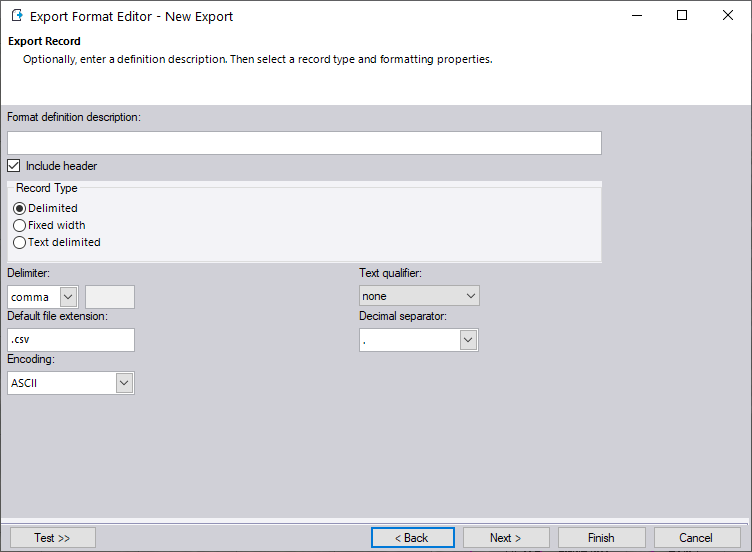
important to match the format when exporting/importing. The
below screenshots show the suggested options when using the Export
Format Editor in Trimble Business Center, as well as the suggested
import options in Carlson.
It is especially important to note that the encoding of the file
should be set to ASCII, and the extension should be set to
CSV.
The Point ID, Northing, Easting, Elevation,
Feature Code, and Attributes need to be included in the export. The
main thing to modify will be the Attributes field, as shown
below.
The below image shows the settings needed to import the CSV file
exactly as it is configured with the above Export Settings.

To ensure your import format matches your CSV
file, you can click the Preview Format button to see exactly what
the program will expect on import. An example is shown below.
Import from Trimble JXL
This import processes a Trimble JXL file which is an XML based text
file.
Import from Text
This function reads the point attributes from a CSV/TXT text
file. Before using this command, GIS features should be defined via
the Define
GIS Features command.
There are two import options on the below dialog - Process
Coordinate Info and Feature. If the points are
already defined in the coordinate file (Northing, Easting,
Elevation, Description), then the Process Coordinate Info
option can be disabled to only import the GIS data. If the points
are not defined, you can enable this option to import the
X,Y,Z,Desc for the points. The Feature dropdown list allows
you to specify the GIS feature to associate with the newly imported
data. Note that only one Feature may be selected, so if your data
to import is associated with multiple features, they should be
imported separately.

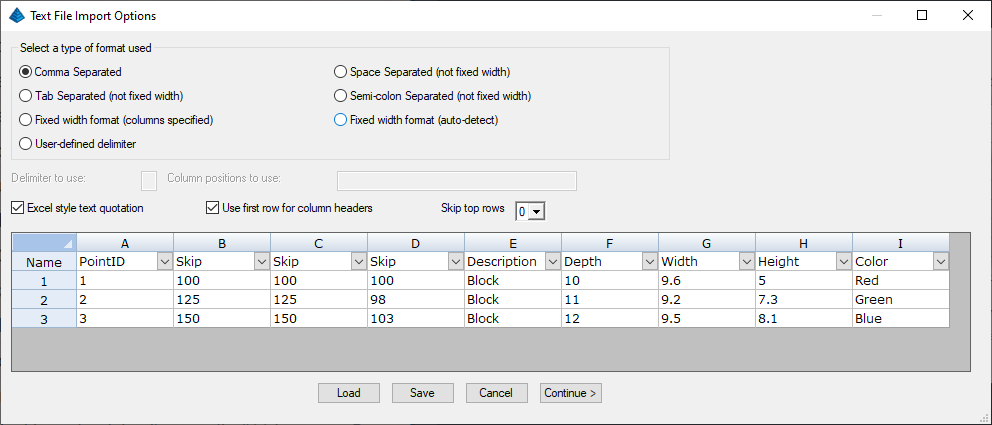
After selecting the appropriate options on the
first dialog, the below formatter will appear. You will first need
to select the delimiter used in your text file (most commonly a
comma if using a CSV file). Each column must be defined used the
dropdown list.
If you chose to Process Coordinate Info on the previous dialog, you
will see 5 predefined fields: PointID, Northing, Easting,
Elevation, and Description. When this option is enabled, you must
specify a Northing and Easting for each point. If a PointID is not
specified, the program will create one on import.
If you disabled the Process Coordinate Info option, the PointID
will be the only predefined option. When this option is disabled,
you will only need to specify a PointID for each point.
If a column does not need to be imported, you may use the Skip
option for the column header to skip that row.
Each column aside from the predefined option is expected to be a
GIS attribute. In the below image, four GIS attributes have been
defined for Depth, Width, Height, and Color.
Use first row for column headers: When enabled, this option
will use the first row of the .csv file to set the column headers.
It is important to note when using this option, you should ensure
that the column headers for PointID, Northing, Easting, Elevation,
and Description are spelled properly, as any misspellings or
abbreviations for these columns will prevent proper import.
Skip top rows: This option will skip the specified number of
rows when importing. This is useful if you have header information
in the .csv file. If you are using the first row for column
headers, the row of headers will not be imported even if this value
is set to zero.
Excel style text quotation: When enabled, the program will
look for quotation marks around text in the .csv file and remove
them. For example, if a piece of text is found in the .csv file
such as "Red", it will only import Red.
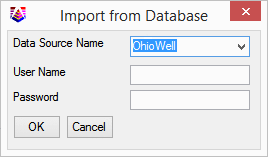
Import from Database
Step 1: Setup DB connection
Data Source Name = Specifies the name of the ODBC data
source (DSN). The drop box contains all available DSN in the local
host. Please see how to setup DSN at the end of this document.
User Name = Specifies the user name required to login to the
RDBMS. (Optional)
Password = Specifies the password required to login to the
RDBMS. (Optional)
Usually, DSN is sufficient to connect to the db, but there is
some special case that user name and password are also needed. So
User name and password are optional.
Note: need to hide the password.
Notes: 64 bits application will use 64 bits ODBC drivers. It is
possible to connect 64 bits application to 32 bit ODBC driver, but
it requires additional setup using ODBC-ODBC
Bridge.
Click OK button to continue setup or Cancel button to exit
Step 2: Setup Data matching
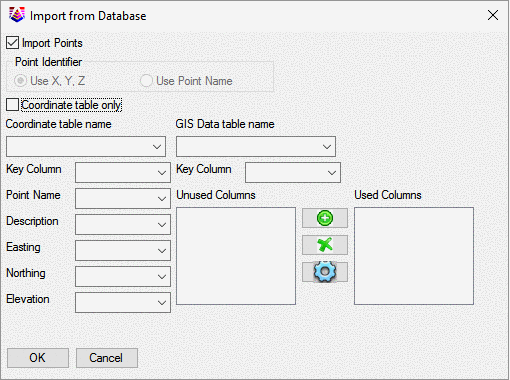
Import Points – import points or skip them.
Point Identifier – use for identify points between the user
data and CRDB coordinates. If the Import Points toggle box is not
selected, then the dialog will prompt user to select the point
identifier, either ‘Use X, Y, Z’ or ‘Use Point Name’.
Use X, Y, Z = use coordinate x, y, z value to identify point.
Use point Name – use point name to identify point.
Coordinate table only - coordinate table contains both
coordinate info and GIS Data
Coordinate table name = the table name of the coordinates
stored in the user db.
Key Column = a column which will uniquely identify a
point.
GIS Data table name = the table name of the GIS data stored
in the customer’s database. This table name will also be used as
feature name in the CRDB.
Key Column = a column which will uniquely link to the
coordinate table.
Currently, there are 6 fields in CRDB coordinates table, P, N, E,
Z, D. P stands for Point Name. N stands for Y-coordinate. E stands
for X-coordinate. Z stands for elevation. D stands for description.
The Dialog uses Point Name, Description, Easting, Northing, and
Elevation to represent the CRDB five columns.
If the ‘Import Points’ toggle box is selected, then all five fields
will be enabled and list the name of the column in the coordinate
table. The user needs to select corresponding column name. Column
name could be used only once in these five field.
If the toggle box is not selected and if ‘Use X, Y, Z’ is selected,
then ‘Easting’, ‘Northing’, and ‘Elevation’ will be enabled.
Otherwise, only ‘Point Name’ will be enabled.
The ‘Unused Columns’ and ‘Used Columns’ are used for selection of
the columns in the GIS Data table. The default content of ‘Unused
Columns’ contains a list of columns in the GIS Data table. The user
can Add/Delete/Setup each by selected it.
The Setup Button will allow user to setup the association between
CRDB GIS Data attributes and the user database.
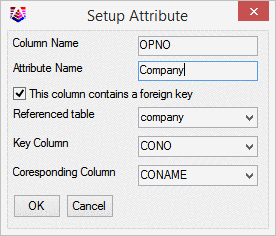
Step 3: Setup attributes
Column name = name of the column in the GIS Data table
Attribute Name = name of the CRDB GIS Data attribute.
This column contains a foreign key = If the value of the column
doesn’t contains actual data, but only a reference, then it
contains a foreign key. For instance, a DB has a table name
‘company’ and a table name ‘well’. A well belongs to a company, and
a company has many wells. ‘company’ contains an ID and a name. A
well will use the company ID to identify a company. In order to
import the company name to the CRDB, the user needs to provide the
name of the referenced table, the name of the foreign key and the
name of the storage column.
Referenced table name = name of the referenced table
Key Column = name of the referencing key. This combo box
contains all columns in the referenced table.
Corresponding Column = name of the column that data actually
store. This combo box contains all columns in the referenced
table.
If this toggle box is not selected, then actual data is stored in
the GIS Data table.
Note: If user selected the same column for the Key Column and
Corresponding Column, then just ignore the referenced.
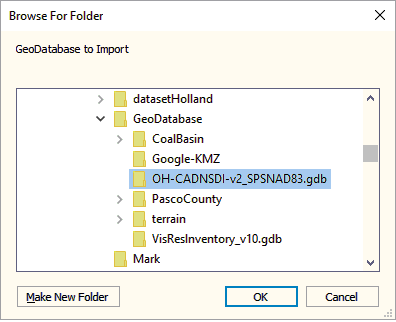
Import ESRI File GeoDatabase to CRDB
Step 2: Setup Data matching
It has the same interface as import from Database. Please see
Import from Database section for detail.
Import OpenGIS GML File to CRDB
Select a feature from the list and select Point Name and
Description fields. Also select unused columns and move to
the used columns.

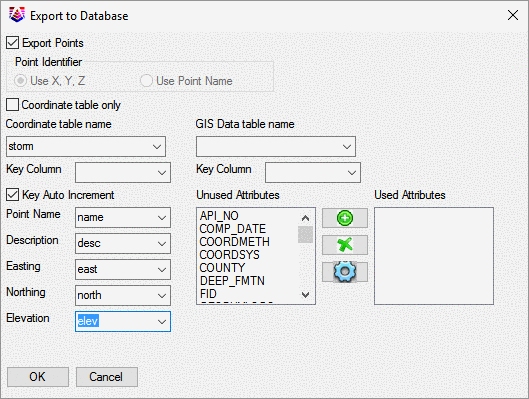
Export CRDB to a database
Step 1: Setup a db connection – this step is the same as
import data from a database
Step 2: Setup data matching
It is similar to import data from a database. Except the
following,
Key Auto Increment –the user database will automatically increment
the point identifier when a new point is inserted. If this toggle
box is not selected, then the CRDB’s point name will be used as the
primary key. Then the Key Column and Point Name have to be the same
column.
Instead of setup column, export function has to setup column. The
Attributes list box contains a list of available attribute in CRDB
GIS Data table. In order to setup the column, first, the user has
selected an attribute name, and then clicks on setup button
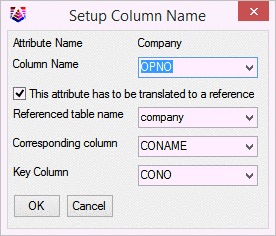
Step 3: Setup the column name
Attribute Name = the name of attribute name in the CRDB GIS Data
table.
Column Name = the name of column name in the user’s GIS Data
table.
This attribute has to be translated to a reference = data has to be
translated and use the foreign key’s value to store in the user’s
GIS Data table.
Corresponding column = the name of column that will match the value
of the attribute
Key column = the name of column that will be the referenced key and
stored in the user’s GIS Data record.
Click OK button when complete setup. Cancel button to cancel and
exit.
Export CRDB to ESRI File
GeoDatabase Note: make sure the GeoDatabase dataset/table is
editable.
It has similar interface as export to a database.
Export CRDB to SQLite/Spatialite DB
After selecting an output file, the Export to Database dialog will
display. The program will use the project which is setup in
the Drawing Setup dialog. It is optional to include Z
coordinates. The user can select any available point feature
or select the current feature.
Pulldown Menu Location: GIS Data
Keyboard Command: gis_pt_editor
Prerequisite: Current coordinate file set to CRDB format