Map object data/ODBC Database editor dialog
This routine creates, reviews and appends GIS data linked to
entities stored in the drawing.
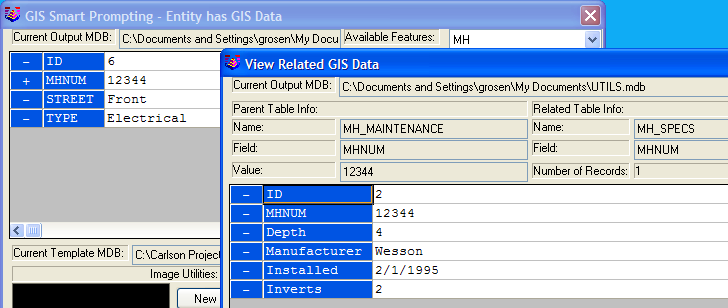
The GIS Smart Prompting dialog has a spreadsheet format for
editing the data fields. The GIS table to process is selected in
the pull-down list in the upper right of the dialog. The GIS tables
that are available depend on the tables that are defined in the
current data source. Use the GIS
Settings and Define GIS
Features commands to setup the tables. Once you select a
table to process, the fields for that table are displayed in a
spreadsheet format. If a field is related to a field in
another table in the database, a "+" character is shown next to the
field name. Picking the "+" will open another dialog box with
the related data in the other table. The data in this related
table is not editable, only the data in the initial linked
table.
The bottom portion of the dialog has features for attaching
images to the entity. (Note: The bottom portion is only
limited to single file type database and ESRI MSC Data.) Existing
image files (BMP, JPG or GIF) can be linked by choosing the New
option. The Update option will replace the current image with a
newly selected image. The Delete option will remove the current,
attached image. The Capture button will take a shot in the field
using a configured camera and then attach the image to the entity.
Different digital cameras can be used by picking Pick or Set
Camera.
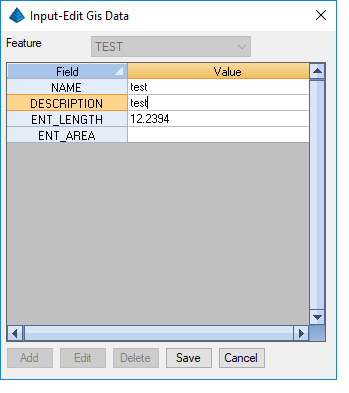
The GIS Data Editor command is an excellent way to simply review the data associated with an entity. If the entity has GIS data, the banner line at the top of the dialog will display "Entity has GIS Data". If not, the banner line will display "Entity has no GIS Data". Even when the entity has no data, the default values for the prompts will appear. Pressing OK will assign this data to the entity. To avoid assigning data to the entity (if it has none), press Cancel. Alternately, you can use the commands GIS Inspector Settings, followed by GIS Data Inspector, to review the data with no possibility of editing or inputting data in the process.
There are three methods for selecting the drawing entities to process: S for Select, P for Pick and N for Number:
Select Object method: With this method, you pick the
drawing entity to process the data attached to that entity. When
selecting a Carlson point, the point number is used to link to the
database.
Pick method: For this method, you pick inside a closed
polyline to process the data attached to that polyline.
Number method: Here you simply input the point number from
the current CRD file to process.
Map Object Data has different dialog that only allow user to
select GIS Feature table and add/edit/delete data.
Select object
(Number/Pick/<Select>): P
Pick a point inside polygon
(Select/Number/<Pick>): pick a point
GIS Smart Prompting dialog
make selections
Map object data/ODBC Database editor dialog
Pulldown Menu Location: GIS Data
Keyboard Command: gisdata
Prerequisite: GIS Feature file name and GIS Data Format must be
defined in GIS Settings dialog
| Converted from CHM to HTML with chm2web Standard 2.85 (unicode) |