|
Settings (Topcon 800/8000/APL1 TS)
|
|
Settings (Topcon 800/8000/APL1 TS)
|
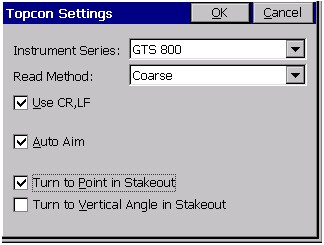
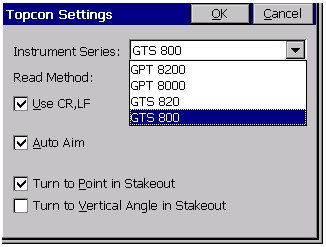
The following information describes the various options available for the Topcon 800/8000 total stations.
Carlson SurvCE supports the Topcon 800 series (800, 802, 800A, 8000, 8200), when running in direct mode (measurements taken from the instrument, no radio connection to the prism). All 800 series instruments are motorized. The Topcon 8000 is a reflectorless unit. The Topcon 800A is motorized but not fully robitic. The 800AR is motorized and robotic. The Topcon 802 refers to a “2-second” version of the 800 series, for example.
To operate either direct or remote, press the Power button to turn the instrument on. After you level, the instrument will go through a motorized self-test. You obtain a 6-icon menu. To run direct, press F2 for Standard. This puts you in the measure screen. Note that in Direct mode, the Topcon 800 typically expects 1200, E, 7, 1 for communication, but 9600, N, 8, 1 in Remote mode. Note that the Topcon 820 and 8200 are a new series of instruments, where Topcon 822 indicates a “2-second” version of the 820 series. Running Direct, the Topcon robotic instruments that have the reflectorless option offer a handy, one-click reflectorless off-on icon at the top of the screen, as shown above in the discussion of the Leica TPS series where it also applies.
Direct
The following settings are presented by selecting the Topcon 800/8000 Direct instrument.
Remote
This configuration works for the Topcon 800 series running in remote mode (radio link active, equipment operation driven from the prism). The optional RC2 unit, mounted on the prism pole, provides a “quick lock” feature for rapidly guiding the instrument to the prism. Additionally, the RC2 provides an alternative to radios allowing limited remote communication between the data collector and instrument. Be sure that the RC2 unit is pointed directly at the instrument before executing a “quick lock.”
To operate in remote mode, obtain the 6-icon menu, press F1 for Program, F6 for More, then F3 for External Link. Press F2 to verify your currents settings, then hit Escape and press F1 to execute the remote settings.
The Parameters refer to the 3 ways of communicating robotically (Cable, RC2 and Radio Modem). The Cable option implies 2 operators, one driving the instrument directly with SurvCE and one at the rod. For the RC2 and Radio Modem options, SurvCE drives the instrument remotely from the rod. Note that the RC2 “quick lock” function has a maximum range of 1500ft, while the two way remote communication is limited to 800ft.
Topcon provides distinct cables for radio communication and RC2 communication. The “Y” cable is used with radios and RC2 in combination, but is not required. You can press the yellow button on top of the RC2 to initiate a “quick lock”. The “Y” cable is not used for RC2 only communication. The advantages of using both radio and RC2 are range (works remotely over 800ft), speed (faster reading), and ease of operation.
Within SurvCE, go to Equipment, select Topcon 800 Remote, use default port and baud settings.
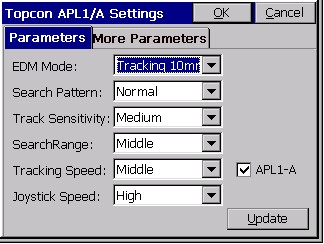
Parameters
As shown in the following dialog figure, the left tab is for setting the Parameters.
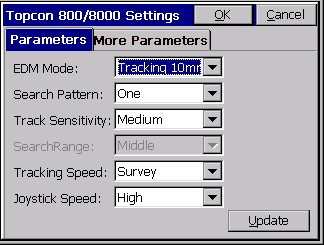
The recommended settings are as follows:
More Parameters
The right tab is for setting the More Parameters.
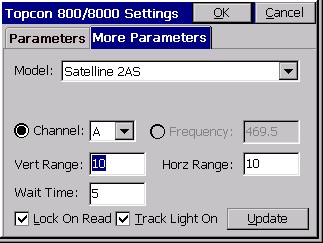
The recommended settings are as follows:
Select Update to send these parameters to the instrument and the program will confirm with a “dling” sound. Then pick OK.
SurvCE will track the prism in the fastest mode (10mm), then switch to configured reading when a shot is taken. Note, configured reading was also set to Tracking 10mm, which will take a nearly instantaneous shot. If configured for Fine (1mm), the shot will take 2-3 seconds. Here we have taken a foresight to point 3 and have moved in tracking mode to a new position, ready for a configured reading on point 4. “Configured Reading” shots are taken with Enter or R for Read. The “S” button will take a “fast read” or Tracking Read, no matter what the Configured Reading mode.
If using RC2, Select QuickLock button. Otherwise, use arrow keys to turn the instrument, look for the 2 blinking lights (if track lights are turned on) and then tap Search. Above, we’ve set the vertical and horizontal search ranges to 10 degrees. When you obtain lock, you will get 3 beeps from the RC2, and in all cases, SurvCE will say Tracking, meaning you are locked on.
Pressing QLOCK does an RC2 “quick lock” search and only appears as an option if you are configured for RC2 or RC2 with radios. Standby let’s the instrument hold its position and stop tracking allowing you, for example, to place the rod on the ground and drive a stake, then get on line again and use QLOCK (RC2) or SRCH (non-RC2) to regain the link.
With robotic total stations, commands such as Turn to Angle, Set Collection (choose “robotic” sets) and Check Backsight will turn robotically.
Set Collection Notes
Set Collection works best with radio linkage (radio alone or radio with RC2), but has limited functionality in RC2 only mode. Robotic sets use BD-FD/FR-BR observation order. Note, “non-robotic” sets can be done with a robotic total station. The “Angle Only in Reverse Face” can be toggled on for faster Face 2 readings. “Auto Turn,” available for all observation orders but Robotic Set, will turn the gun automatically to all known points. An hourglass will appear when Robotic Sets is selected, during which time SurvCE initiates constantly streaming data. When in robotic Set Collection, an option to obtain the Robotic screen (search and joystick features) is available. After all sets are collected, the user is prompted whether to move to a new setup station, collect still more sets, or review the set data. Close this dialog and Set Collection is complete for that backsight and foresight.
Topcon APL1
This is an older Topcon robotic total station with excellent tracking.
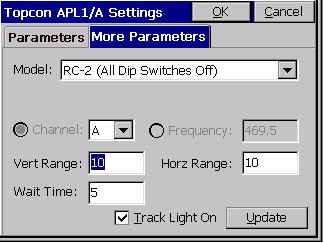
It’s a larger instrument often used in construction and machine control applications. It communicates only by radio with the 2ASx type radios. You must set the Com parameters on APL1. You only have to do this once.
Putting the APL1 in the “Remote Mode”:
The total station is now in the Remote Mode.