This command allows the user to input any combination of turned angles, azimuths or bearings to define a traverse or figure. The command prompts for an Angle-Bearing Code which defines the angle or bearing type. This command always occupies the last point it calculated and backsights the point before that.
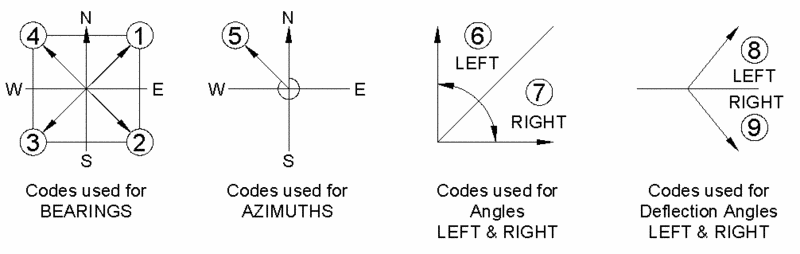
Codes 1 through 4 define the bearing quadrants:
1 = Northeast
2 = Southeast
3 = Southwest
4 = Northwest
The remaining codes define as follows:
5 = Azimuth
6 = Angle turned to the left
7 = Angle turned to the right
8 = Deflection angle left
9 = Deflection angle right
For both the Angle-Bearing Code and the Distance prompt, the user can enter point-defined responses: two points separated by an asterisk, as in 2*3 for the bearing (or distance) defined by 2 to 3. You can also add math expressions. For angles, 2*3+90 would deflect 90 degrees right from 2 to 3. For distances, 2*3/2 would mean half the distance of 2 to 3. You do not need to enter N before entering a number-defined distance. Just bring up the number inverse prompt. For distances, the # symbol can also be used to indicate point numbers like in SurvCE. So 2#3 means the distance between points 2 and 3.
The command draws lines between located points (if the Line On/Off in the COGO menu is set to on) and plots the points calculated and stores them in the current coordinate (.CRD) file if point numbering is On. The point settings are defined in the Point Defaults command. If Point Protect is turned on, Traverse checks if the point numbers are already stored in the file. Point Protect is set in the Coordinate File Utilities command.
There are Angle-Bearing code input options for Traverse that are set by entering O for Options. The Angle Right option prompts for the angle right and skips the angle-bearing code prompt. The Azimuth option prompts for the azimuth and skips the angle-bearing code prompt.
Occupied Point ?
Pick point or point number: pick a point
You will
only be prompted for the occupied point the first time you use the
command.
Use the Inverse command to set the occupied and backsight
points.
Exit/Options/SideShot/Inverse/Enter Azimuth
(ddd.mmss) <>: o
Angle prompt angle right or azimuth only
[Right/Azimuth/Prompt]? p
Exit/Options/Arc/Points/Line/SideShot/Inverse/Angle-Bearing
Code <5>: press Enter Pressing Enter uses the
default angle right code.
Enter Angle (dd.mmss) <90.0000>: 88.1324 You
can also enter L or R to define an angle 90 degrees Left or
Right.
Backsight Point ?
Pick point or point number: pick a point
Number inverse/<Distance>: 100
Select Coordinate (.CRD) File This dialog only appears if
there is not a current coordinate (.CRD) file.
Exit/Options/Line/Side Shot/Inverse/<Angle-Bearing Code
<7>>: 14*9-45.2045 Uses the bearing defined by
point numbers 14 & 9 and subtracts the angle 45 degrees, 20
minutes, and 45 seconds. You can use a + or - in this type of
entry.
Number inverse/<Distance>: N (note: you can enter
14*9/2 here, as well)
Point number inverse (i.e. 10*20): 14*9/2 This causes
the command to recall the distance from point number 14 to 9 and
divide it by 2.
Exit/Options/Line/Side Shot/Inverse/<Angle-Bearing Code
<7>>: L
Select Line or Polyline that defines Bearing: select line
that defines bearing
Number inverse/<Distance>: 100
Exit/Options/Line/Side Shot/Inverse/<Angle-Bearing Code
<7>>: E Enter
E to end the command. Enter S or SS to execute the Side
Shots command or I to execute the Inverse command.
For instruction on how to insert either new or existing points into the drawing, see Draw-Locate Points in the Points Commands section of the General Commands chapter. This feature can be found in the Points pulldown of all menus.
Pulldown Menu Location: COGO
Keyboard Commands: T, Traverse
Prerequisite: None
| Converted from CHM to HTML with chm2web Standard 2.85 (unicode) |