This command allows you to customize the labeling for lines and
polylines. You are first prompted to select a line or polyline to
label, given the existing defaults currently set. The linework is
shown as labeled on the screen. The command line, shown below, also
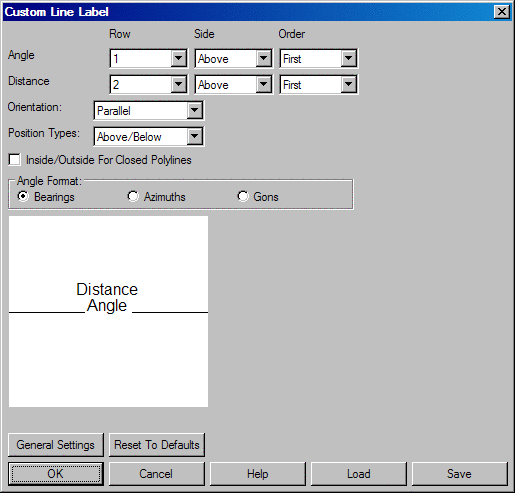
offers you an important choice called Options. When you type 'O'
for options the below dialog box appears. In this dialog, there are
three columns at the top of the dialog, along with other features.
On the command line, there is also a choice called Format (F),
which allows you to enter quick-key style keywords for quickly
changing the label format. See below for these
Row: This column allows you to stack the data in
different ways. You can place more than one item in the same row.
If None is selected, then that item will not be
displayed.
Side: This column allows
you to place each item either inside or outside of the line or
polyline.
Order: This column
determines the order of items when they are placed in the same
row.
General Settings: This
button brings you to the Annotate Defaults dialog, see 'Annotate
Defaults' for more.
Reset To Defaults: This
button restores the default settings shown above.
Load/Save: You may also Load and Save
different label configurations with the corresponding
buttons.
Options/Format/Points/<Select line or
polyline>: select entity
Options/Format/Points/<Select
line or polyline>: O
Custom Line Label dialog
choose your preferences and click
OK
You can decide to go into the Option dialog at the
start of the command, or after your initial labeling. If you use
the Format command line option, you will be asked to enter the
Format command. The choices are:
B = bearing
A = azimuth
G = gon
D = distance
R = next row
_ = switch side of line
Pulldown Menu Location: Annotate > Angle/Distance
Keyboard Command: annline
Prerequisite: An arc to label