In order to schedule equipment through pits, pits (which are
closed polylines) must have three distinct types of Extended Entity
Data (EED, extra information) associated with them. They must have
(1) a pit name, (2) NonKey Volume, Key Volume and Key Tons and
optionally quality information and (3) direction of mining. The
Assign Directions command places the direction of mining into the
pit itself, where it is permanently stored along with other aspects
of the drawing. Directions can vary by bench. The command prompts
to assign the same direction to the Whole pit, or by bench. If
doing by bench, the routine must be run separately for each
bench.
Assign Directions is found within Boundary in the Carlson Surface Mining. There are six methods employed to assign direction: Automatic, Text, Sequence, Polyline, Bearing and Azimuth. The "automatic" method will mine "longways" across the pit, following the longest axis detected, but may not choose the preferred direction along that axis. The text method finds the side closest to the insertion point of the pit name and will mine from that side perpendicular across the pit away from the text. The sequence method will mine left to right and/or right to left across a series of pits as specified by the user, the polyline method will follow a "direction polyline" across a pit or series of pits and the Bearing or Azimuth method will mine at defined bearing or azimuth angle. Below is the prompting and results obtained with each method:
Assign direction using which method
[<Auto>/Text/Sequence/Polyline/Bearing/AZimuth]: A or
press Enter
Select pit polylines to have direction assigned to:
Select objects: Pick the pits and the direction is assigned
as shown below
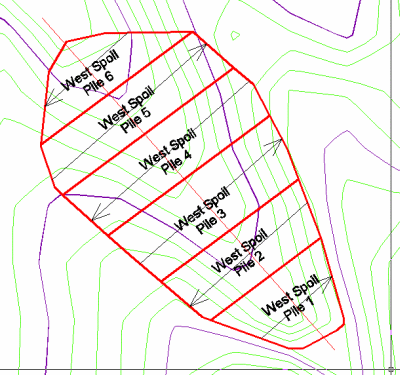
In this example, the left most pits were given a direction opposite from the remaining pits. For long-term studies or quick estimates using smaller pits, the direction can be considered a moot point, since you will get where you're going to be whether you mined left to right or right to left through an individual pit. But for larger pits or short-term studies, direction is critical. A pit direction can be easily reversed using the Reverse Directions command.
Next we will look at the Text
option.
Assign direction using which method
[<Auto>/Text/Sequence/Polyline/Bearing/AZimuth]:
T
Select pit polylines to have direction assigned
to:
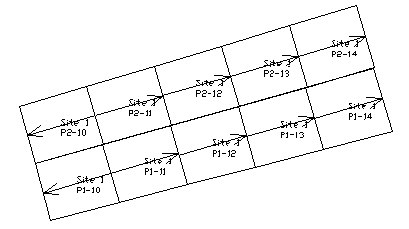
Select objects: pick the pits and the required pit text as
shown below
The highlighted pit has the direction
information assigned already.
Would you like to overwrite this (<No>, Yes, None, All):
A for All. This prompt only occurs when pits are chosen that
already have pit direction. Note that the command "Clear
Directions" could be used to remove directions prior to using
Assign Directions.
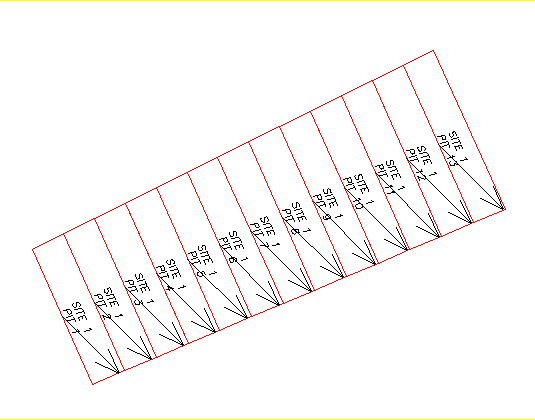
The arrows show the resulting directions. Note that this routine looks for the pit name for the direction, not for the "site" name. (All pits have a two-tiered naming convention: site and pit, which can be re-worked as pit and block or any other two-level form, to adapt to company practices.) In Pit 5, for example, the "Site 1" text is ignored and the "Pit 5" text is used for direction. In Pit 7, the Site 1 text is completely outside the pit, but is irrelevant since only the Pit 7 text is used for direction. If pits were named Pit 1, Block U15A, then the insertion position of "Block U15A" would be used for setting directions.
Next we will look at the Sequence option.
Assign direction using which method
[<Auto>/Text/Sequence/Polyline/Bearing/AZimuth]:
S
Select pit polylines to have direction as signed to:
Select objects: select the pits (Don't worry if you also
select other polylines. It only finds pits.)
Select a direction polyline.
Select objects: select a polyline that crosses all of the
pits This would be the short south to north polyline in our
example.
Assign direction in which sequence (<LL>, LR, RL, RR):
LR
In our example, we selected LR, which causes the pits to be
mined left to right on the first pit (with respect to the
south-to-north direction polyline--imagine yourself standing at the
beginning of the polyline looking down it. LL would mine all pits
coming from your left. LR would mine from the Left first, then the
Right in the next one and so forth. RR and RL are just the
opposite.), then right to left on the second pit, then left to
right on the third, etc. An entry of LL would cause the pits to be
mined from the left side to the right side. An entry of RR, for
example, would mine all the pits from right to left. The entry of
RL would mine first right to left, then left to right. The sequence
method is ideal for assigning direction to a series of long and
narrow pits that have not been broken up into small blocks.
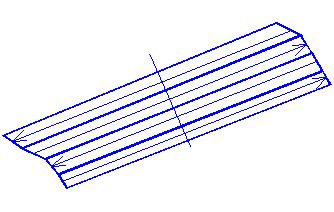
If these same pits were each subdivided into 10 or more blocks, or there are many pits that would not be intersected by the sequence polyline, for example, then the following method, direction by polyline, is most appropriate.
Next we will look at the Polyline option.
Assign direction using which method
[<Auto>/Text/Sequence/Polyline/Bearing/AZimuth]:
P
Select pit polylines to have direction assigned to:
Select objects: select the pits (Don't worry if you also
select other polylines. It only finds pits.)
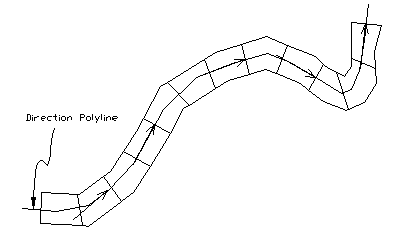
Select all direction polylines.
Select objects: In the example above, select the single
direction polyline.
The polyline-based selection is ideal for contour mines or outer
pits in a mountaintop removal situation in Appalachia, or for pits
that follow sinuous property lines. Most Midwest and western pit
mining is linear, but the polyline technique for setting direction
is still applicable. Direction polylines cannot have arcs, so if
you've used an arc to draw the polyline, use the command Remove
Polyline Arcs on the Edit menu to remove them.
Last we will look at the Bearing and Azimuth option
Bearing Option:
Assign direction to whole pit
or to a specific bench [<Whole>/Bench]: W or Enter to
assign direction to whole pit
Assign direction using which
method
[<Auto>/Text/Sequence/Polyline/Bearing/AZimuth]: B for
Bearing
Select pit polylines to have
direction assigned to:
Select objects: select
the pits (Don't worry if you also select other polylines. It
only finds pits.)
Enter Bearing (Qdd.mmss):
145.0000
The highlighted pit has the
direction information assigned already.
Would you like to overwrite this
[<No>/Yes/None/All]: A
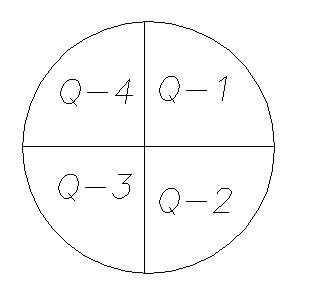
The Bearing is entered in the format (Qdd.mmss), the following
figure shows the quarter numbers and the angle is calculated
clockwise.
Azimuth Option:
Assign direction to whole pit or to a specific
bench [<Whole>/Bench]: W or Enter to assign direction
to whole pit
Assign direction using which
method
[<Auto>/Text/Sequence/Polyline/Bearing/AZimuth]: B for
Bearing
Select pit polylines to have
direction assigned to:
Select objects: select
the pits (Don't worry if you also select other polylines. It
only finds pits.)
Enter Azimuth (ddd.mmss):
135.0000
The highlighted pit has the
direction information assigned already.
Would you like to overwrite this
[<No>/Yes/None/All]: A
The Azimuth angle is calculated from
the true north.
Pulldown Menu Location: Boundary
Keyboard Command: assign_dir
Related Commands: Display Directions, Reverse Directions,
Clear Directions, Create Pit Plines from Mineplan