A contour is drawn as a polyline which consists of a series of
connected points with a constant elevation. There are two ways to
digitize contour lines: sketch mode or point mode. You can start
digitizing a contour with one mode and switch to the other during
digitizing the contour. Sketch mode uses more points than pick
mode. In general, we recommend using pick mode to digitize
the straight parts of lines because it reduces the number of points
and speeds up calculations, but using sketch mode to digitize the
curved parts because it is fast and accurate.
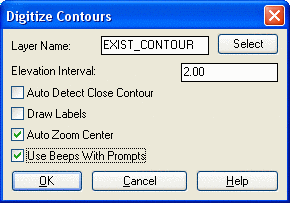
This command lets you digitize contours as polylines one at a
time. The first time it prompts you with the Digitize
Contours Dialog. Enter the layer name or select it from a
list of existing layers. Look at your hardcopy plans and determine
an elevation interval that is between most of the contours and
enter it in the Elevation Interval field. You are able to modify
both the value and the direction of the elevation interval between
digitizing contour lines, using the buttons on the puck.
To have Carlson Civil automatically close contours whose beginning and ending points are within a specified range, check the Auto Detect Close Contour. Draw Labels will draw the elevation at the starting point of the contour. In Pick mode, if you want the program to automatically zoom the display to center around the last point when you get near the edge of the screen while picking points, check the Auto Zoom Center. Click OK to start digitizing.
If this is your first time digitizing a contour, you are
defaulted to the Pick Mode digitizing, otherwise you will be
defaulted to the previous digitizing mode. If you want to use the
other digitizing mode, press 0 (the number "zero") on the
puck or enter
0 from the
keyboard. Place your cursor at one end of the contour line and
begin digitizing the line. While digitizing a line, you can force a
contour to close on itself by pressing A on the puck to end the
contour and connect the last point to the first point, remove a
mistake by pressing
B on the puck, or
switch to the other digitizing mode by pressing 0. During Sketch Mode
digitizing, you can stop digitizing by pressing the Pick or Enter button on the puck, take
some rest or make edits, and start sketching again. At the end of
the contour line, press Enter on your puck or keyboard. The
contour is completed, and the elevation for the next contour is
automatically incremented. You will be asked to digitize the next
contour. If you press
A on the puck or
enter Yes on the keyboard, you can
digitize another contour, or press B on the puck or
enter No on the keyboard to end
digitizing contours.
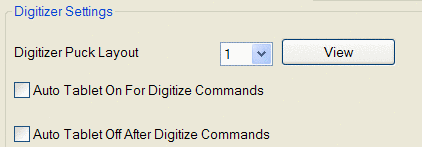
To digitize with a mouse instead of a digitizing tablet, go to
the Settings menu,
Configure, and
General Settings. In
the General Settings dialog box, under Digitizer Settings, clear
the check box for Auto Tablet On
For Digitize Commands.
This is the Digitize Contours dialog
box.
Pulldown Menu Location: Surface >> Digitize
Contours
Keyboard Command: digcont
Prerequisite: Calibrate the tablet with the Tablet Calibrate menu option if
contours are to be taken off an existing hardcopy drawing.