Create Drillhole From eLog
This command will create drillholes from electronic logs of
gamma ray and density readings that vary with depth (although other
attributes may also be used for strata classification). These eLog
files have an .las file extension, which should not be confused
with point cloud scans that sometimes use the same file extension.
It is important to note that gamma/density surveys can vary greatly
by equipment, and input settings will likely need to be calibrated
to the equipment and project.
When the command is executed, the below dialog will
appear.
To create a drillhole from an .las file, the following steps
should be taken:
- Click Choose Fields to setup the strata classification
table
- Populate the strata classification table
- Click Load eLog to import .las files
- Click Create to place the drillholes in the
drawing
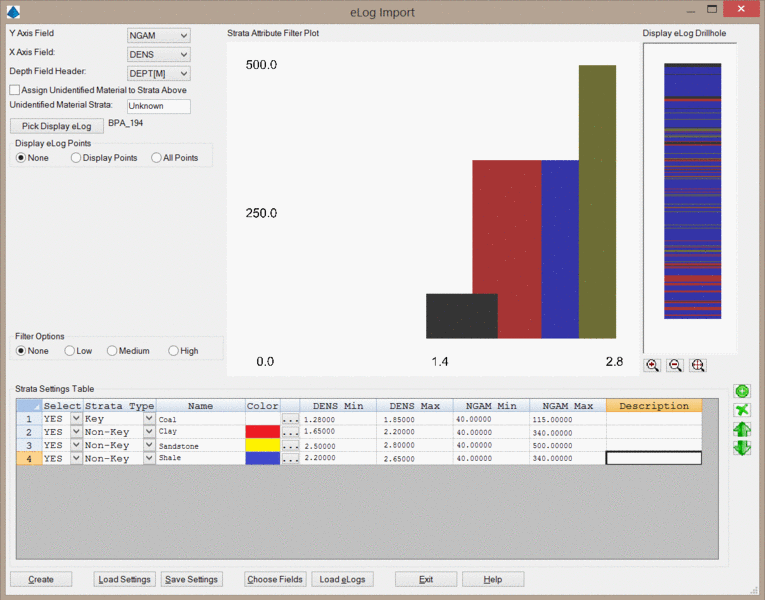
Y-Axis/X-Axis Field: These dropdown menus set the
attributes to display on each axis of the strata classification
chart shown in the middle of the dialog. The dropdown menus will
only be populated after selecting fields with the Choose
Fields button. These fields only affect the visualization of
the strata classification table and do not affect how the strata
are actually classified.
Depth Field Header: This dropdown menu sets the attribute
to use for the Depth of the drillhole.
Assign Unidentified Material to Strata Above: This
checkbox controls the classification of strata that do not fit into
the strata classification table. When this option is enabled,
unidentified strata will be assigned to the strata above it. When
this option is disabled, unidentified strata will be assigned a
name according to the Unidentifiable Strata Name
field.
Unidentifiable Strata Name: This field sets the name for
strata that do not fit into the strata classification
table.
Pick Display eLog: This button allows you to select an
eLog file to use with the data preview. When multiple files are
being imported at once, it can be useful to select a few different
files to ensure the strata classification is applied correctly.
When you click the Choose Fields button, the eLog file you use will
be automatically selected for this option.
Display eLog Points: This option allows you to sample
points on the graph area. Displaying these points allows you to
quickly check where your eLog data fits into the strata
classification you have defined.
The None option will not display data points.
The Display Points option will display points for the
current eLog only (set via the Pick Display eLog
button).
The All option will display points for all eLog files found
in the Load eLogs list.
Filter Options: These options will filter the .las file
to remove noise in the gamma/density readings. If the strata
classification changes in an unrealistic manner, filtering the data
may correct the problem.
The None option will not filter the input data.
The Low, Medium, and High options will filter the data more and
more aggressively. When these filters are used, it is recommended
to thoroughly check the output for accuracy.
The strata classification table is the spreadsheet at the bottom of
the dialog. This table classifies each section of the drillhole to
a strata according to min/max values of the density, gamma
readings, and other attributes. This table should only be modified
after selecting fields with the Choose Fields button. Strata
may be added, removed, and sorted using the green icons to the
right of the table. Here it is important to note that strata listed
higher in the table will take precedence over strata on lower rows.
In other words, if a section of the drillhole matches the criteria
for multiple strata, it will be assigned to the first strata listed
in the classification table. This concept is visualized in the
classification chart. For example, in the above image, there is
some overlap between the criteria for Coal and for Clay. Since Coal
is listed at the top of the classification table, the black box in
the chart representing Coal is drawn over the red box representing
Clay.
Select: This column controls if the strata is used for
classification. If this option is set to No, the respective strata
will not appear in the drillhole.
Strata Type: This option allows you to define each strata
layer as Key or Non-Key.
Name: This column sets the name for each strata.
Color: This column sets the color for each strata in the
classification chart. This color is not used for any other purpose.
Colors may be set by clicking the ellipse button to the right of
this column.
Attribute Min/Max: These columns will be set
according to the fields found in the .las file. Each column sets a
bounding value for the strata. In the example shown in the above
image, strata to be classified as Coal must have a density between
1.28 and 1.85 (note that these values are actually expressed as
specific gravity) and a gamma reading between 40 and 115.
Description: This optional column can be used as a
descriptor of the strata. This description will not be stored in
the drillhole, however.
Create: This button will create a drillhole from the
current .las file. When clicked, you will be prompted to select a
location for the drillhole.
Load/Save Settings: These options will load/save settings
to a .gd file.
Choose Fields:This button will prompt you for an .las
file. The attribute headers found in the .las file will be added to
the strata classification table.
Load eLog: This button will prompt you for one or more
.las files. When clicked, the below dialog will appear.
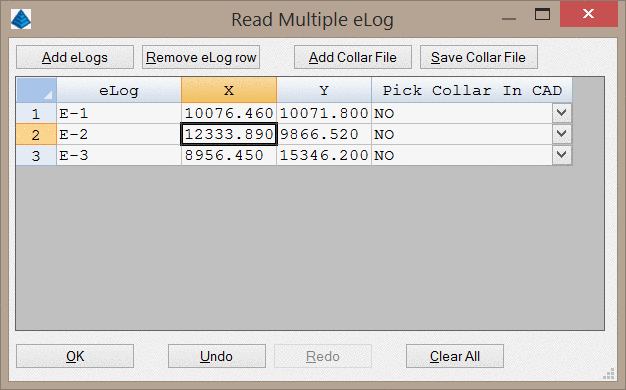
Add eLogs: This button allows you to
select .las files to add to the list.
Remove eLog row: This button will remove the currently
selected eLog file from the list.
Add Collar File: This button allows you to import the
coordinates of the eLogs from a text file. The format of this file
should simply list the eLog name, the X coordinate, and the Y
coordinate.
Save Collar File: This button allows you to save the current
collar coordinates to an external text file.
Pick Collar in CAD: This option allows you to ignore the
listed XY coordinates and allows you to instead pick the location
of the collar for each drillhole in the CAD window.
Keyboard Command: elog_import