This command generates drillholes in the drawing one at a time
with a series of command line prompts. If the drillhole data is
available in digital format, it is quicker to import the
information with the Drillhole Import
command. When the command is executed, the below dialog will
appear.
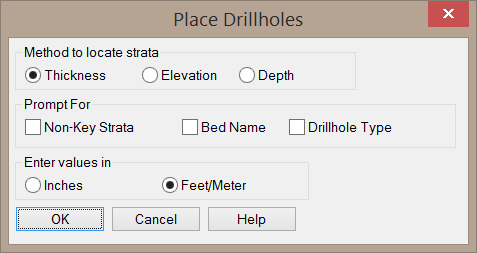
Non-Key Strata: When this option is disabled, you will be prompted to enter information only for key strata. In this scenario, you will be prompted to enter the thickness and bottom depth/elevation of the key strata, with non-key strata filling in the gaps between the key strata. The non-key strata will be named automatically. For example, a key strata named "Strata A" will be overlain by a non-key strata named "Strata A_OB". When this option is enabled, you will be prompted to enter information for both key and non-key strata, and you will be able to assign a specific name to the non-key layers.Enter Values in: This option sets the units of the length values being entered.
Bed Name: When this option is enabled, you will be prompted to enter a Bed Name for each strata. Bed names are used to group strata together.
Drillhole Type: When this option is enabled, you will be prompted to set a drillhole type. This controls appearance of the drillhole symbol, which can be configured in the Define Lookup Database command.
File Selection Dialog
Choose a drillhole configuration file.
Enter or Pick Drillhole x,y location (Enter to End):
5000,5000
Enter Drillhole surface elevation ('U' to Undo):
890.3
Enter Drillhole description ('Undo' to Undo): CH-11
This field is optional.
From here begins a loop to enter the strata in top to bottom
order.
Enter strata name (Enter to End, 'Undo' to Undo):
OV
Strata OV is a Non-Key strata. OV was found in the strata
definitions as a Non-Key strata.
Enter bottom elevation of OV ('U' to Undo): 883.7
Now enter the Non-Key attribute values for the attributes defined
by Define Drillhole.
Enter value for OV attribute ACID ('U' to Undo):
1
Enter value for OV attribute BASE ('U' to Undo):
2
Enter strata name (Enter to End, 'Undo' to Undo):
C
Strata C is undefined? Define now (<Yes>/No)?
No Defining strata C is optional.
Is C a Key or Non-Key strata (Key/<Non-Key>/Undo)?
Key All must be set as either Key or Non-Key.
Enter bottom elevation of C ('U' to Undo): 879.7
Now enter the Key attribute values.
Enter value for C attribute BTU ('U' to Undo):
10000
Enter strata name (Enter to End, 'Undo' to Undo): press
Enter if C is the last strata in the drillhole. Otherwise enter
the next strata name.
Enter or Pick Drillhole x,y location (Enter to End):
press Enter to exit Or specify another location for the next
drillhole.
Pulldown Menu Location: Drillhole
Keyboard Command: chplace