 Then there is an options
dialog.
Then there is an options
dialog.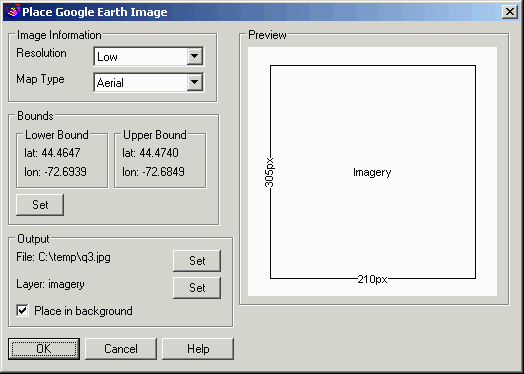
This command inserts a geo-referenced image into the drawing
using the Google Earth imagery server. In order to run this
command, the coordinate system for the drawing must be defined in
the Drawing Setup command. Also this command requires an internet
connection.
The command starts by prompting for the image file to create.
The Google Earth image will be saved to this file name and then
inserted into the drawing.
Next the program prompts to pick the area in the drawing for the
image. You can either screen pick two points to window the area for
the image, or use the Map option to graphically set the image area.
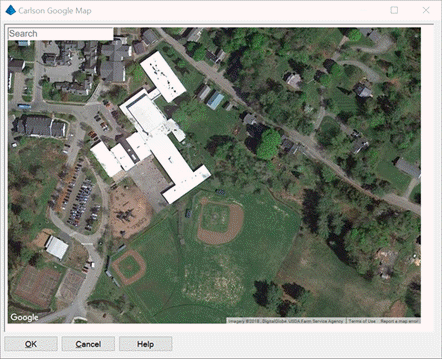
In the Map dialog, use the mouse wheel to zoom in/out and
click-n-drag the mouse to pan. You can also enter a place name or
address in the Search field to set the view.
Then there is an options
dialog.
Resolution: controls the size of the image file. The
Preview window shows the number of pixels for the currently
selected Resolution.
Map Type: selects the type of image to create.
Bounds: shows the currently selected area in decimal
lat/lon. Pick the Set button to pick a new area in the
drawing.
File: the image file to create.
Layer: sets the layer for the image in the drawing.
Place in background: sets the display order for the image to
back.
Select Output File Choose image file name to
create
Pick from Screen or use Map [<Screen>/Map]? press
Enter
Pick first corner of bounding box: Identify one corner of a
drawing window that should be used to set the Google Earth
display
Pick second corner of bounding box: Identify the opposite
corner of a drawing window that should be used to set the Google
Earth display
Place Google Earth Image dialog
Pulldown Menu Location: Images
Keyboard Command: google_image
Prerequisite: Coordinate projection system, Internet
connection