Edit Pit
Edit Pit allows you to review and edit the quantities and
attributes stored in each pit which are used for scheduling in the
Surface Equipment Timing and Pit Scheduler commands.
Storing Data in Pits
Quantities and attributes may be stored in the pits using the
Surface Mine Reserves, Assign Timing Grids, or Import Pit Timing
Data commands (explained below). These values are stored in the
pits as Extended Entity Data (EED), along with the pit name and the
mining direction. In the pits themselves, some pit data (key
tonnage, key thickness, and non-key thickness) may be stored as
discrete values or as grid files. The primary difference between
these methods is in how Surface Equipment Timing will use the
information for scheduling. When data is stored in the pit as a
discrete value, it is assumed that the pit is homogenous in regards
to that value. When data is stored as a grid file, the value can be
treated as variable across the pit. For example, if the OB Volume
is represented with a discrete value, it is assumed that the
overburden thickness is the same across the entire pit. When mining
through the pit, one side of the pit will be mined just as quickly
as the other side. If the OB Volume is represented with a grid,
however, the true thickness of the overburden will be taken into
account during scheduling. This will show how one side of the pit
may be mined more quickly/slowly than another side of the pit due
to a change in overburden thickness.
- The Surface Mine Reserves command provides an option to Use
Named Pit Polylines and to Store Results in Pits. These options
will store all relevant quantities and attributes in the pit on a
specific bench as discrete values. Surface Mine Reserves also has
an option to Output Thickness Grids. When this option is used, the
thickness grids will be stored in the pits in place of the
respective discrete values. If the pit needs to be divided into
multiple benches, the values for each bench may be calculated
simultaneously with the use of the Use Auto-Run option.
- The Assign Timing Grids command will prompt you for three grids
to assign to each bench: a non-key thickness grid, a key thickness
grid, and a key tons grid. The key tons grid should represent
tons/square foot or tonnes/square meter.
- The Import Pit Timing Data command will import pit information
from a .csv file.
For more information regarding these three commands, see the
section of the help manual corresponding to each command.
Edit Pit Dialog
When executing this command, you will be prompted to pick inside
a pit polyline. The selected pit will be hatched with a yellow fill
and the Edit Pit dialog will appear. If two pit polylines overlap
in the location you select, one pit polyline will be highlighted
and you will be prompted if the selection is correct. If the
program does not detect any named, directional pits with stored
quantities, the command will not execute.
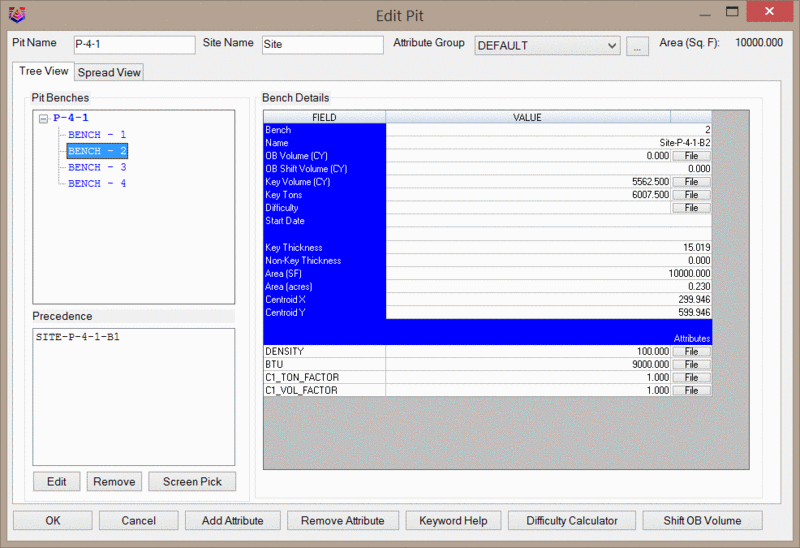
Tree View:
The below dialog shows the tree view for a typical pit. In this
view, all benches in the pit are listed in the Pit Benches tree
view on the left side of the dialog. The information relating to
the selected bench will be shown under Bench Details on the right
side of the dialog. Most of the values listed under Bench Details
may be edited by simply typing a value in the cell of interest or
by clicking the File/Edit button to the right of the cell.
Precedence rules for the selected bench are shown in the bottom
left corner of the dialog.
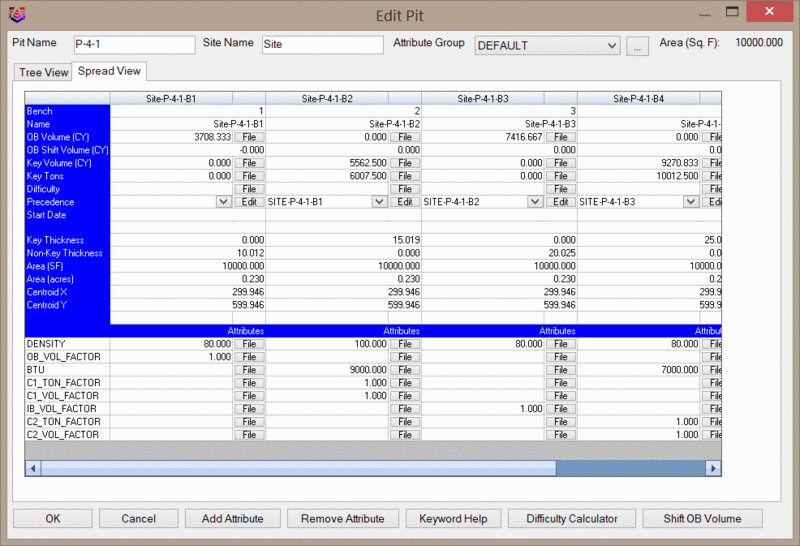
Spread View:
The below dialog dialog shows the spread view for a typical pit.
This view is simply a different way of viewing the pit information
shown in the tree view and may be accessed by clicking the Spread
View tab near the top of the dialog. In this view, benches are
displayed in a spreadsheet for easier side-by-side
comparison.
Pit Name and Site Name: These fields set the name of the
pit.
Attribute Group: This dropdown menu sets the attribute
group for the pit. Attribute groups may be used to assign attribute
values/grids to many pits at one time. New Attribute Groups may be
defined in the Timing Project Manager.
Bench: This field displays the bench number.
Name: This field displays the full bench name. This is a
concatenation of the Pit Name, the Bench Name, and the Bench Number
separated by hyphens.
OB Volume: This value sets the volume of non-key material
(overburden) in the bench. This value can also be represented by a
thickness grid of the non-key material.
OB Shift Volume: This value displays the volume of
non-key material that has been shifted into the current bench from
another bench. Non-key material may be shifted between benches with
the use of the Shift OB Volume button at the bottom of the
dialog.
Key Volume: This value sets the volume of key material in
the bench. This value can also be represented by a thickness grid
of the key material.
Key Tons: This value sets the tonnage of key material in
the bench. This value can also be represented by a grid of
tons/square foot or tonnes/square meter.
Difficulty: This value sets the difficulty factor
associated with the bench. The difficulty factor temporarily
modifies the equipment mining rate set in the Timing Project
Manager. The adjusted mining rate is the quotient of the original
mining rate and the difficulty factor. A difficulty factor of 1.0,
or if the difficulty factor is not specified, will maintain the
original mining rate. A difficulty factor of 2.0 will double the
amount of time required to mine the bench (original mining rate is
divided by 2.0). A difficulty factor of 0.5 will half the amount of
time required to mine the bench (original mining rate is divided by
0.5). To quickly calculate the difficulty factor, you may want to
use the Difficulty Calculator at the bottom of the dialog. The
difficulty factor may also be represented by a grid file.
Here it is important to note the difficulty value set in this
dialog may be overridden according to a 4-level hierarchy.
- The manual entry of the value or grid file set here is at the
bottom of the hierarchy.
- The second level is specifying the difficulty within an
Attribute Group in the Timing Project Manager. There, an attribute
named DIFF_BENCH* (where * is a bench number) may also be
represented by a discrete value or a grid file. When this
DIFF_BENCH* attribute is added to the attribute group, it will
actually create a new attribute in the pit itself called
DIFF.
- The DIFF attribute in the pit is the third level in the
hierarchy. This allows you to use a generic difficulty for the
entire attribute group, but still manually set the difficultly for
individual benches.
- The fourth and highest level in the hierarchy is layerized text
in the drawing. The text should be the difficulty factor (no
prefixes or suffixes) and should placed on a layer named
DIFF_BENCH* (where * is a bench number). For example, if the text
"1.2" on the DIFF_BENCH1 layer is placed inside a pit polyline, the
difficulty factor for the first bench in that pit will be set to
1.2. This difficulty factor will override all others.
Start Date: This field sets the earliest start date for
the pit. This can be used to prevent mining an area due to waiting
for permit approval, waiting to finalize the purchase of new land,
etc. Most of the time this field will be left blank, however.
Key Thickness: This value displays the average key
thickness of the bench.
Non-Key Thickness: This value displays the average
non-key thickness of the bench.
Area: These values display the area of the bench.
Centroid X and Centroid Y: These values display the
coordinates of the geometric center of the pit.
Other Attributes: The bottom of the Bench Details list
leaves spaces for a variety of other attributes. Most of these
attributes are used to define qualities of the bench. For example,
if a bench contains an attribute for Moisture, this attribute will
apply to the entire bench. If two strata are added to the same
bench, this Moisture attribute will relate to both strata. If you
are storing values in the pits using Surface Mine Reserves, the
weight-averaging of the attribute will be applied automatically
based on the volume and the density of the material. Here it is
important to note that the weight averaging of attributes will not
account for null values. For example, if Strata A has a Moisture
attribute of 0.3, but Strata B does not have a Moisture attribute
defined, then the combined Moisture content for the two stratum
will be 0.3. To properly weight attributes, it is necessary to
define an attribute value for each strata.
Some attributes may be shown with a _NK suffix. This suffix will
be applied to differentiate between key attributes and non-key
attributes. For example, if Strata A is key and has a Sulfur value
of 0.1 and Strata B is non-key and has a Sulfur value of 0.15,
these two Sulfur values will be handled separately. The Sulfur
value for Strata A will be stored as "Sulfur" with a value of 0.1
whereas the Sulfur value for Strata B will be stored as "Sulfur_NK"
with a value of 0.15.
Some attributes may be in the form of XXXX_VOL_FACTOR or
XXXX_TON_FACTOR where XXXX is a strata name. This is used to define
ratios of material when more than one key strata or more than one
non-key strata are added to the same bench. For example, if strata
A and B are both key strata, an attribute for B_TON_FACTOR will be
shown in the list. If this value is 0.4, then 40% of the key
tonnage in the bench comes from strata B. If the attribute
A_VOL_FACTOR is 0.56, then 56% of the key volume comes from strata
A.
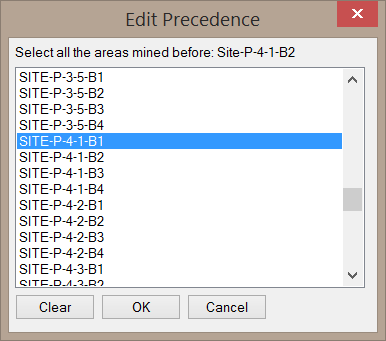
Precedence: This section of the dialog controls
precedence rules for scheduling. The precedence list is simply a
list of other benches that need to be mined before the current
bench can be mined. Basic top-down precedence rules will be
automatically entered to prevent mining a lower bench before the
upper bench has been mined.
Edit: This button will open a list of all other benches
found in the drawing, as shown below. Selecting benches of interest
and clicking OK will add the benches to the precedence list.
Multiple benches may be selected by clicking and dragging in the
list or by holding the CTRL key while clicking.
Remove: This button will remove the highlighted bench
from the precedence list.
Screen Pick: This button will allow you to add benches to
the precedence list by picking them in the drawing. As soon as you
click inside a pit polyline, the uppermost bench for that pit will
be added to the precedence list. Clicking in the pit polyline
multiple times will add lower benches.
Add Attribute: This button will add a new row to the
Attributes list.
Remove Attribute: This button will remove the currently
selected attribute from the Attribute list.
Keyword Help: This button will open the list of keyword
attributes, as shown below. These keyword attributes may also be
added to an Attribute Group in the Timing Project Manager. When an
attribute with the _BENCH* suffix (where * is a bench number) is
added to the Timing Project Manager, it will also appear in the
Edit Pit dialog. Manually editing the value in the Edit Pit dialog
will override the value set in the Attribute Group. Attributes that
are added to the Attribute Group that do no have the _BENCH*
suffix, however, will not appear in the Edit Pit dialog. Note that
some of these keywords are only intended for use with the
Underground Mining Module. For more information on the specifics of
each keyword, see the section of the help manual corresponding to
the Timing Project Manager.
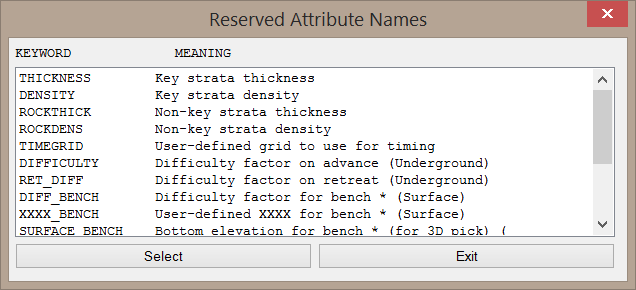
Double clicking one of the keywords in the above dialog will add
it to the Attributes list on a new row.
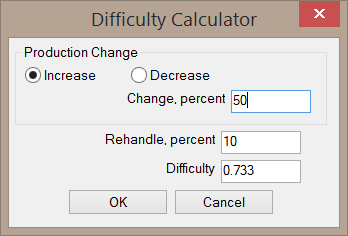
Difficulty Calculator: This button will open the
difficulty calculator as shown below. This dialog will calculate
the difficulty factor based on an increase/decrease in the mining
rate and a percentage of rehandle. For example, if the mining rate
is expected to increase by 50% and 10% of the material will need to
be rehandled, the calculated difficulty factor will be
0.733.
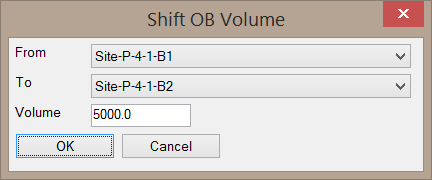
Shift OB Volume: This button will open the Shift OB
Volume dialog as shown below. This will move non-key volume from
one bench to another. This dialog will not allow you to move more
material than what exists in the source bench.
Pulldown Menu Location: Surface Mining Module >
Boundary
Keyboard Command: editpit
Related Commands: Surface Mine Reserves, Timing Project
Manager, Surface Equipment Timing