Layout Manager
The Layout Manager is a docked dialog that displays the contents
of a Layout Set. Layout Sets (.set files) contain information on
layouts that come from a single or multiple drawings. Once you
build a layout set, the Layout Manager facilitates printing via
AutoCAD's PUBLISH functionality. The
Layout Manager contains two sections. A Treeview, which displays
the items of the Layout Set. Items are the root node, which is the
topmost node representing the Layout Set. Subsets, which act as
folders and can contain Layouts and additional Subsets.
The
Layout Manager contains two sections. A Treeview, which displays
the items of the Layout Set. Items are the root node, which is the
topmost node representing the Layout Set. Subsets, which act as
folders and can contain Layouts and additional Subsets.
The bottom section contains a grid view, which will display
built-in and custom properties of the selected Layout Set, Subset
or Layout item. The first column shows the property name, and the
second column displays its value. Some properties are read-only and
are calculated by the Layout Manager.
New: Use the New button to
create a new empty Layout Set. You can also specify an existing
layout set to use as a Template. If a Template is specified, only
the Subsets (folders) structure will be copied to your new Layout
Set. This is convenient is you have a standardized Subset structure
to use for all Layout Sets.
Open: Use the Open button
to open an existing Layout Set. Only one Layout Set is allowed open
per session. If a Layout Set is currently open in the Layout
Manager, you will be prompted to save any changes if necessary.
Save: Use the Save button
to save your current Layout Set file. Layout Sets are saved as .set
files.
Save As: Use the Save As
button to save a copy of an existing Layout Set file with a new
name.
Print: Use the Print button
print all checked layouts using AutoCAD's Publish functionality.
All Subsets and Layouts in the Layout Manager contain a checkbox.
If the Subset or Layout is checked, it will be included when the
print command is run. When a user checks a Subset, all the child
items of that Subset are checked. Similarly, when a Subset is
unchecked, all the child items of that Subset are unchecked.
Insert Table: Use the
Insert Table button to insert a Table of Contents. This feature
allows you to draw a Table containing all the layouts of the Layout
Set, including their file name, drawing name, page number,
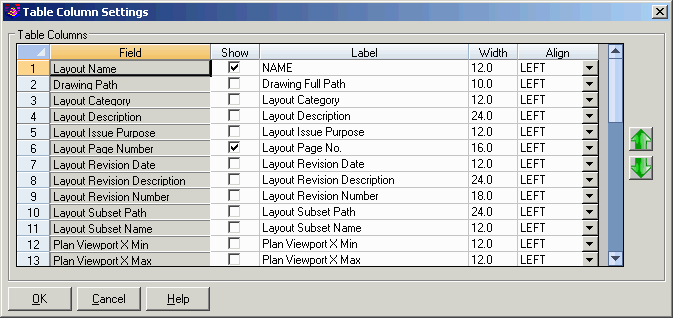
etc. Use the Set Table Columns button to define
which columns are to be displayed in the Layout Set table. Toggle
the Use Table Entity to insert the table as a block, or leave it
unchecked to draw each row as an individual block.
Use the Set Table Columns button to define
which columns are to be displayed in the Layout Set table. Toggle
the Use Table Entity to insert the table as a block, or leave it
unchecked to draw each row as an individual block.
You can edit the Label column, which will be displayed as the
column header in your table. The Width and Text Alignment can also
be set for each column.
Exit: Use the Exit button
to exit and close the Layout Manager.
Add Subset: Use the Add
Subset button to create a new Subset folder under the selected
Layout Manger item.
Add Layout: Use the Add
Layout button to add a Layout to the current Layout Set file in the
selected Subset or root of the Layout Set. Layouts may be selected
from the current drawing, or from another drawing on your computer
or network.
Move Up: Use the Save As
button to move the selected Layout (or Subset and child Layouts)
above the previous sibling item.
Move Down: Use the Save As
button to move the selected Layout (or Subset and child Layouts)
below the next sibling Subset or Layout.
Move In: Use the Move In
button to move the selected Layout (or Subset and child Layouts)
under the next sibling Subset.
Move Out: Use the Move Out
button to move the selected Layout (or Subset and child Layouts)
above the selected parent Subset.
Remove Item: Use the Remove
Item button to remove the selected Layout (or Subset and child
Layouts).
Custom Properties: Use the
Custom Properties button to Add, Edit or Remove custom properties
to a Layout, Subset or Layout Set.
Select the appropriate tab to add a custom property. Then use the
Add, Edit or Remover buttons to edit properties for the selected
item type.
Pulldown Menu Location: File > Plot
Keyboard Command: layoutmgr
Prerequisite: None