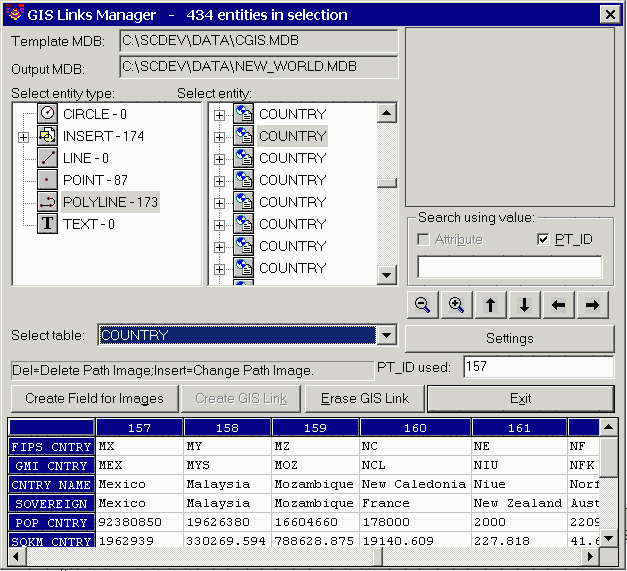
This command displays the GIS links for the selected entities and includes functionality of the Input-Edit GIS Data, Create Links and Erase Links commands. The command starts by prompting you to select the entities to process. Then the program displays a dialog with a list of all the selected entity types (POINT, LINE, etc.).
To review and edit GIS data, highlight an entity type and the program will then list all the entities for that type. If a table is attached to the entity, the table name is displayed. Otherwise the entity reports "NO TABLE". The current table is shown in a spreadsheet editor at the bottom of the dialog. When you highlight an entity from the list, the linked record in the table is shown in the first column of the spreadsheet. Also the drawing is zoomed to the entity and a highlight box is drawn around the entity. You can use the arrow and magnify glass buttons to pan and zoom the display. The arrow, page up and page down keys also pan and zoom the display.
To add GIS data, highlight an entity from the list to process that has NO TABLE. Then select a table from the table pulldown list. The available tables for this list come from the Template MDB database shown in the top of the dialog. The spreadsheet then shows a record in the first column. Fill in the values and then pick the Create GIS Link button.
To erase a GIS link, highlight an entity from the list and pick the Erase GIS Link button.
The Create Field for Images button will add a field to the current table for image files. To add an image file, highlight the image field in the spreadsheet and press the Insert (Ins) key.
Under the Settings button you can set filters for the GIS links
to process based on layer names, colors, polyline type and link
status. You can also set the zoom factors for the screen
display.
Select objects: Select the entities, with linked GIS information, to process.
Pulldown Menu Location: GIS
Data
Keyboard Command: link_manager
Prerequisite: Entities with linked GIS information