Quick Traverse
This feature allows you to utilize the keyboard and the mouse to
perform a traverse using points and data found in the drawing and
the coordinate file. There is no raw data entry associated with
Quick Traverse. The Quick Traverse feature has no ability to
adjust the resulting traverse. If you wish to adjust coordinates,
you could create a raw data file using the CGEditor - on the CGTrav
menu - then use the Reduce Traverse feature, also on the CGTrav
menu.
NOTE: If you wish to check the closure of a plat from bearing and
distance data, use the CGEditor to create a map check file, then
use the Reduce Map Check File feature on the CGTrav menu.
Prompts
During the process of entering
data for the Quick Traverse feature you will see the
prompt:
[aZimuth/Bearing/Deflection/Side shot/cUrve/Closure/horiz.
distaNces]
At this prompt you may:
Change the type of angular input between Horizontal Angle, Azimuth
and Bearing modes at any time.
Change how distances are specified as either slope distance and
vertical angle or horizontal distance and vertical distance.
Turn the vertical angle input on
or off.
Traverse around tangent and
non-tangent curves.
Switch from Traverse to Side shot
mode.
Traverse mode:
automatically occupy the foresight point.
Side shot mode: continue to
occupy the current instrument point until you change to
Traverse mode: and thus
occupy another point.
Note: There are several settings found in the C&G Options
dialog box that should be set or checked prior using the Quick
Traverse feature:
The default values for the initial traverse input modes are set in
the Traverse Options.
If you wish to calculate or enter
elevations, check the Elevations : ON checkbox and choose
Enter Elev. Or Calculate Elev. as desired in the Global Options
tab. If you are calculating elevations, make sure the Vertical
Angles ON checkbox is checked on the Traverse Options tab.
Quick Traverse
Example
In this example the mode is set to traverse and elevations are on
and are to be calculated.
After choosing Quick Traverse from the CGTrav menu you will be
asked to enter the following information:
Instrument point: for the
example enter 1 (assuming that the currently open coordinate file
has a point in it with a point ID of 1).
Backsight point: for the
example enter 2.
[aZimuth/Bearing/Deflection/Side shot/cUrve/Closure/slope
distaNces.]
Enter horizontal angle <0.0000>:
Since elevations are on and set to
calculate so you will be prompted for the following:
If you selected H.I. as Plus-Up on the Traverse Options tab, the
coordinates and elevation of the instrument point will be read from
the file and you will be prompted for the instrument height
(H.I).
If no elevation is found, you will be prompted to enter the ground
elevation at the instrument point and then the H.I.
If you selected H.I. as Elevation in the Traverse Options dialog
box, you will be asked to enter the actual elevation of the
instrument scope.
Backsight Point: If you are
turning angles or deflection angles instead you will be prompted
for the backsight point.
Rod Height: With Calculate
Elevations on you are prompted to enter the prism height.
You will be prompted for the horizontal angle (or deflection
angle)
If you need to change the prism
height <esc> and you will be prompted for a new
prism height, if you <esc> again you will be prompted for a
new instrument point.
Angle data entry
Instrument point:
1
Back site: 2
{aZimuth/Bearing/Deflection/Side
shot/cUrve/Closure/slope distaNce.] S
Enter horizontal angle
<0.0000>:
When you are entering Quick
Traverse data you have the options to change the angular input
method. To change the angular input mode, enter the
upper case letter seen in the prompt for the method of entry you
want to change to and press <Enter>. The prompt should
then change to reflect your choice.
Note: You need not use the shift and type a capital letter to
choose a command line option. For example, to change to Side shot
mode you can type either s or S.
The method that is currently set will not be shown as an option in
the command line prompts. For example, if you type s and
<Enter> for Side shot mode, the prompt will change to include
Traverse and Side shot will no longer be available since you have
chosen it as the current mode.
Traversing a curve
The Traverse routine allows you to traverse both reverse and
compound curves.
Note: You will not be allowed to traverse around a curve if
calculate elevation is selected.
If you type U and
<Enter> for cUrve, the following dialog box
appears: U
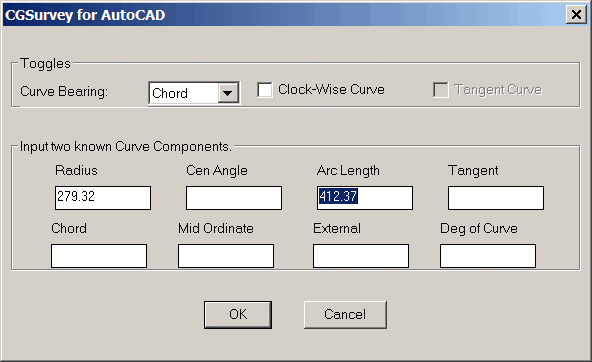 Enter
any two of the curve components.
Enter
any two of the curve components.
Identify the curve bearing as
Chord if the angle, deflection, bearing or azimuth about to be
entered is to the PT.
Identify the curve bearing as
Radius if the angle, deflection, bearing or azimuth about to be
entered is to the radius point.
Click the Clockwise box if the curve is clockwise. If this box is
not checked, the curve is considered to be counterclockwise.
If there is a previous traverse leg, check the Tangent Curve
checkbox if the curve is tangent to the previous leg. If this
checkbox is not checked, the curve is assumed to be
non-tangent.
When you have entered the required
data: click the OK button.
The input multiplication factor is applied to the curve data you
enter (radius, arc length, chord, etc.).
At the next prompt, if the
curve is a non-tangent curve, enter the angle, deflection, bearing
or azimuth from either the PC to the PT or the PC to the radius
point (depending on whether you set Curve Bearing to Chord or
Radius). If the curve is tangent to the previous traverse
line you will not be asked for the angle and distance.
The curve data will be calculated and shown at the command
line:
Bearing and distance from the PC point to the radius point.
Bearing and distance from the radius point to the PT point.
Bearing and distance from the PC point to the PT point.
Other curve
information.
The radius and PT points will be stored in coordinate file using
the STORING POINT prompt.
Closure
At the prompt:
{aZimuth/Bearing/Deflection/Side shot/cUrve/Closure/slope
distaNce.]
Enter horizontal angle
<0.0000>:
Type C and <Enter> to view closure information for the
traverse to the current foresight.
Slope/Horizontal Distance Data Entry
If you have selected Slope Dist/Vert. Angle in the Traverse Options
tab or switched to slope distances by typing N and <Enter> at
the command line, enter the slope distance. Otherwise, enter
the horizontal distance.
Note: The following steps are required only if Vertical Angles ON
is checked on the Traverse Options tab or if Calculate Elev. was
selected on the Global Settings tab.
For slope distance - vertical
angle:
Enter the vertical angle.
Depending on the settings in the Traverse Options tab enter one of
the following:
Zenith (zero up)
Nadir (zero down)
Transit (zero level)
Transit vertical angles can be full circle (0 - 360), or positive
for up and negative for down.
For horizontal distance - vertical
distance:
Enter the vertical distance.
Pulldown Menu Location:
CGTrav
Keyboard Command: QTR,
CG_QTRAV
Prerequisite: Open
Coordinate File