Underground Timing
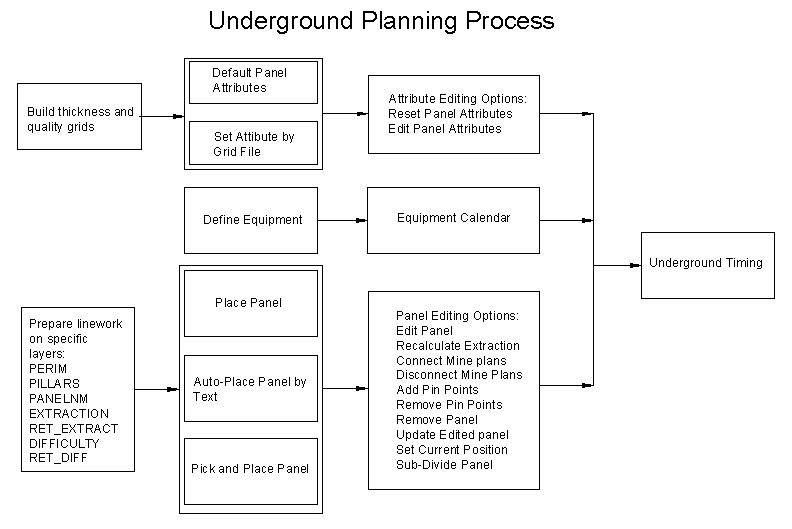
The diagram above shows the general steps associated with the
creation of a mine plan with the Underground Timing routine.
Prerequisites include:
- Creating thickness, density, and quality grids, and/or average
values for the total coal and rock to be mined.
- Define the productivity rates of the equipment and operating
schedule for each section of equipment.
- The drawing linework has to be prepared on specific
layers.
- Panels can be placed using one of, or a combination of, three
placing routines: Place Panel, Auto_Place Panel by Text, and/or
Pick and Place Panel.
- Several adjustments to the mine plan can be by Adding Pin
Points, Recalculating Extraction, Connecting Mine plans, and
Editing panels.
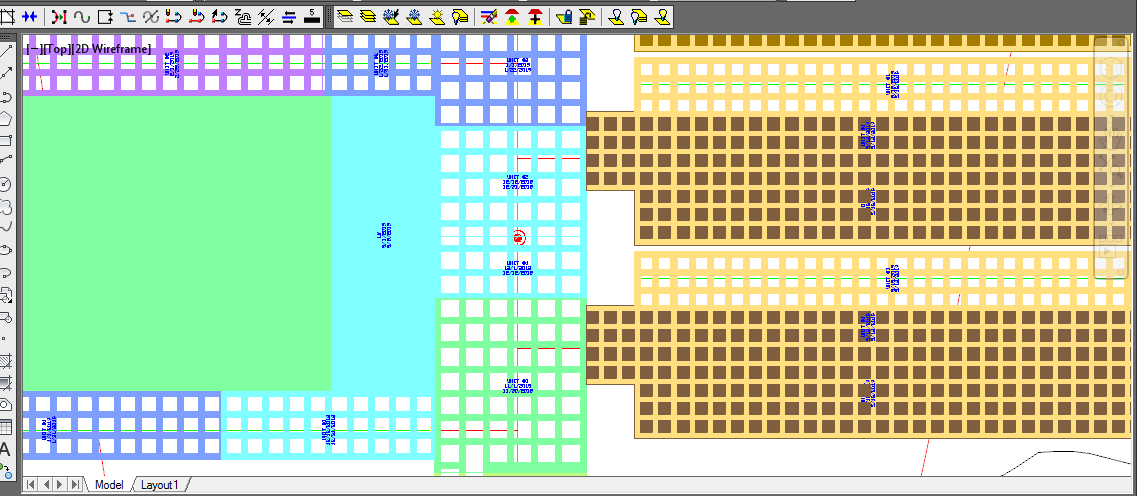
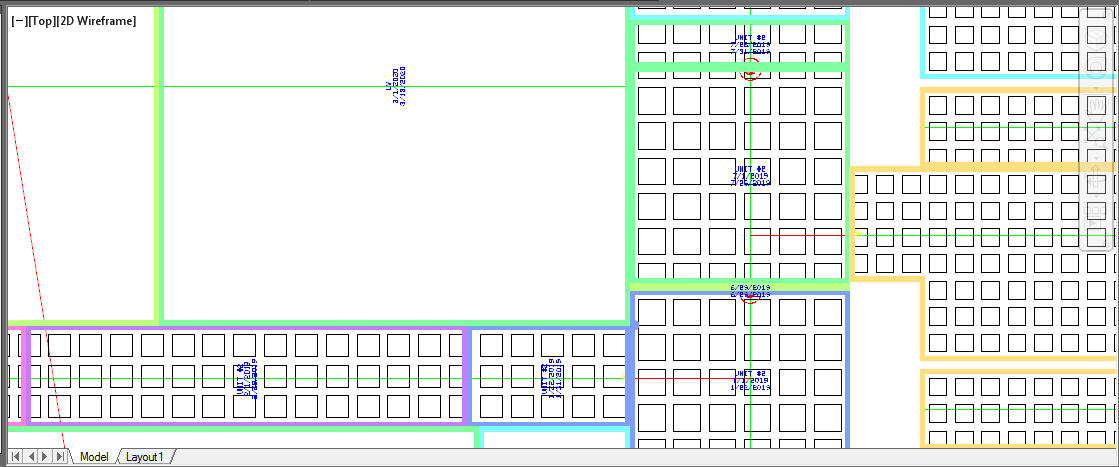
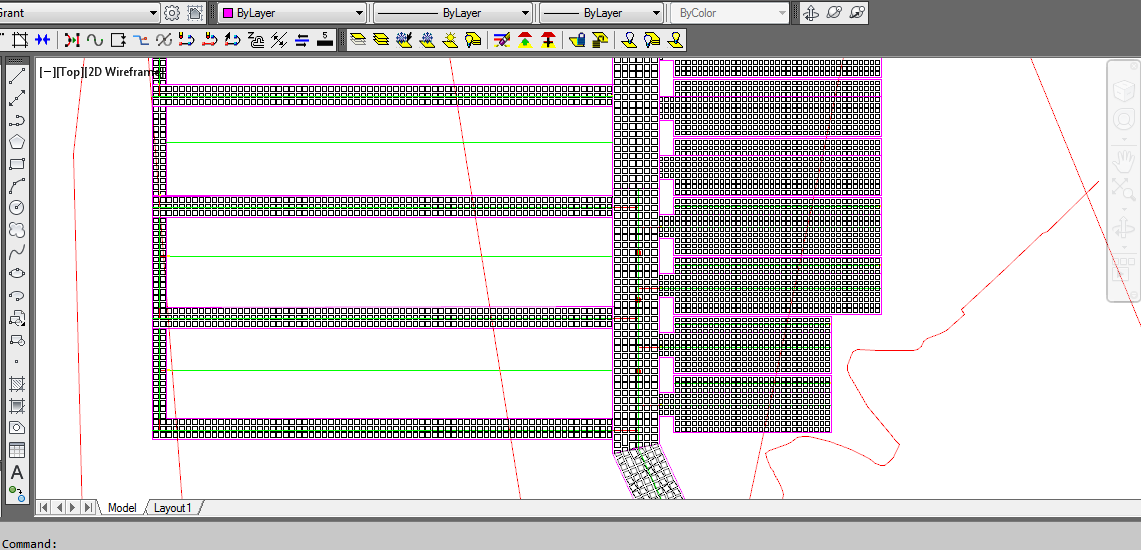 The
drawing above shows a simple mineplan layout of longwall and
continuous miner panels. The panel perimeters are drawn on
the PERIM layer, and the pillars are on the PILLARS layer.
The panels in this example were placed using Pick and
Place.
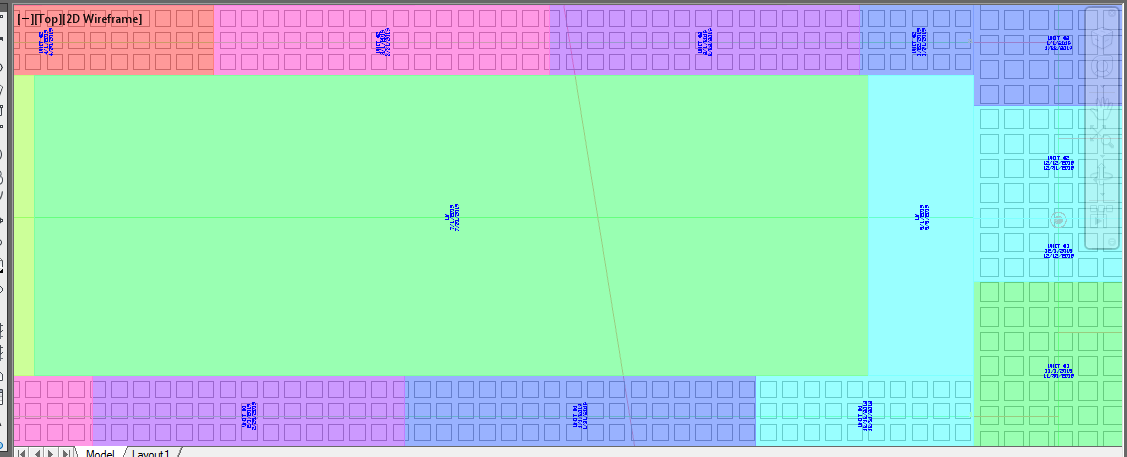
The
drawing above shows a simple mineplan layout of longwall and
continuous miner panels. The panel perimeters are drawn on
the PERIM layer, and the pillars are on the PILLARS layer.
The panels in this example were placed using Pick and
Place.
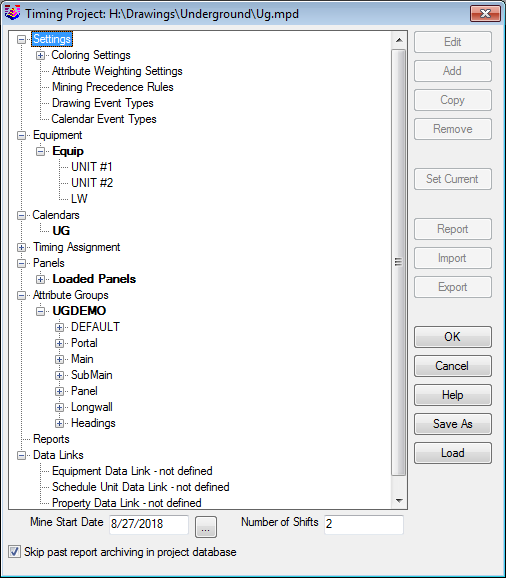 The Mining Project dialog box above
shows some of the key files used in the mine timing. Options
on the right side become active depending on the items selected on
the left side.
The Mining Project dialog box above
shows some of the key files used in the mine timing. Options
on the right side become active depending on the items selected on
the left side.
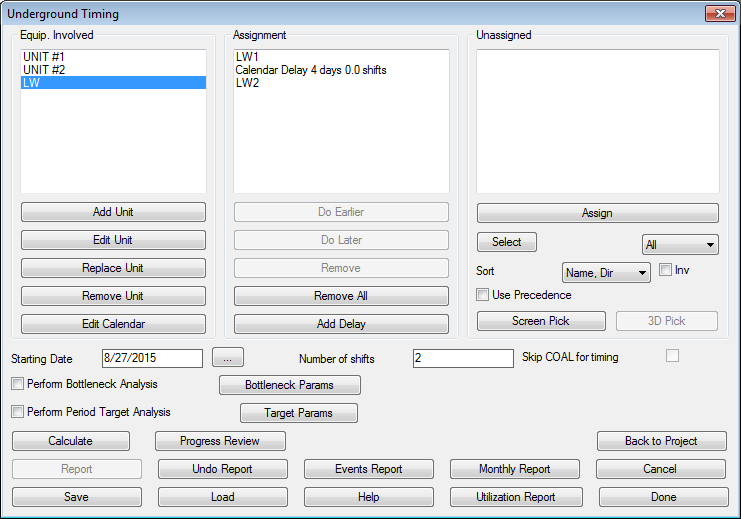 The underground timing scheduling
dialog box provides options to assign panels to be mined to the
equipment, insert delays between panels, input the plan start date,
number of shifts/day, and undo the current report. Disregard the
bottleneck options for underground mining. The underground
timing routine calculates the time needed to complete the
assignment, calculates coal quantities and qualities, draws results
period by period, and produces a production report. In the order to
calculate timing, every panel needs to be assigned to equipment.
The left list box lists the available equipment. Use Add
button to create a new equipment or edit to change the definition
of the defined one. This list is stored within the mine plan and is
different for every plan. The Edit button calls the same
dialog as the Define Equipment function.
The underground timing scheduling
dialog box provides options to assign panels to be mined to the
equipment, insert delays between panels, input the plan start date,
number of shifts/day, and undo the current report. Disregard the
bottleneck options for underground mining. The underground
timing routine calculates the time needed to complete the
assignment, calculates coal quantities and qualities, draws results
period by period, and produces a production report. In the order to
calculate timing, every panel needs to be assigned to equipment.
The left list box lists the available equipment. Use Add
button to create a new equipment or edit to change the definition
of the defined one. This list is stored within the mine plan and is
different for every plan. The Edit button calls the same
dialog as the Define Equipment function.
The middle list box shows panels currently assigned to the crew
highlighted in the left list box (if any). To assign a panel to the
equipment, first click on the equipment name, then on the panel
name in the right listbox and at last on the Assign button.
Panels are mined in the same order as they appear in the list. To
complete mining of all assigned panels successfully the order
should not be controversial (i.e. NMAINS <1:2> can not appear
before NMAINS <B:1>). To change sequence of mining click on
the desired panel name and use Do Earlier or Do Later
buttons to change the order. The Remove button removes the
highlighted panel from the list of the panels assigned to the
current crew and moves it to the right list box. Use Add
Delay button to add delay (for moving of equipment, maintenance
or other reason) after highlighted panel. After all panels for
first crew has been added click the next crew and repeat until all
the panels needed are added.
The Use Precedence option will apply the settings defined in the
Mining Precedence Rules under the Settings of the Timing Project
Manager.
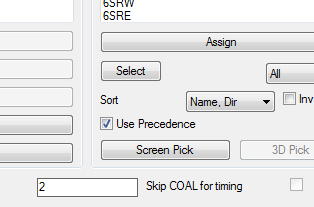
Screen Pick will allow for selecting the panels graphically on
the screen. Each panel is hatched with solid fill to give instant
feedback that the panel has been assigned. If pin points are in the
panel, it will only hatch up to the next pin point, allowing the
panel to be assigned in order as separate entities. 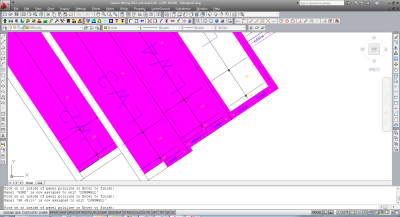 When the
assignment is completed click the Calculate button. Check
the timing report produced and make sure that all assigned panels
have been developed. If the process terminates earlier, the rest of
the plan was inaccessible for some sequencing reason. Modify the
assignment if needed and click Calculate again. During
retreat mining it is possible that a sub-panel will be completed
later that the panel itself. If this conflict occurs the
calculation algorithm will try to offset start date of the panel
itself to get timeout sufficient to resolve the problem. In the
case when a problem could not be resolved an alert box with
corresponding message will appear.
When the
assignment is completed click the Calculate button. Check
the timing report produced and make sure that all assigned panels
have been developed. If the process terminates earlier, the rest of
the plan was inaccessible for some sequencing reason. Modify the
assignment if needed and click Calculate again. During
retreat mining it is possible that a sub-panel will be completed
later that the panel itself. If this conflict occurs the
calculation algorithm will try to offset start date of the panel
itself to get timeout sufficient to resolve the problem. In the
case when a problem could not be resolved an alert box with
corresponding message will appear.
The time needed to develop a panel is offset by the Extraction
Ratio and Difficulty Factor defined in the Edit Panel Dialog, and
thickness and density of coal and rock defined by the Edit Panel
Attributes function. The presence of qualities in the production
report depends on the list of panel attributes and their values
defined by the Edit Panel Attributes function.
In cases when the mine plan includes retreat (second) mining,
the system will make sure that when the parent panel is mined on
retreat, the mining (advance or retreat) in all child panels is
completed. If not it tries to offset the starting date of retreat
in the parent panel until the timing conflict is resolved.
Sometimes it is impossible to do so and program reports the problem
to user for manual resolution.
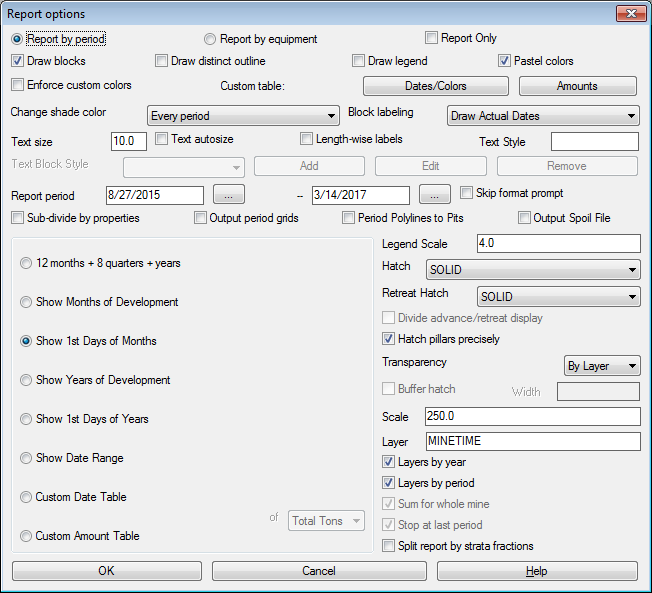
Report Options Details of each function are
below.
- Report by period: This option is used draw the
development progress period by period and to obtain quantities and
qualities report.
- Report by equipment: This method uses different colors
to distinguish pieces of equipment not periods.
- Report only: This option will skip any drawing of
entities and just generates a detailed report. It usually runs much
faster for quick iterations.
- Draw Blocks: Determines if the hatching and blocks are
drawn.
- Draw Distinct Outline: Draws a perimeter polyline around
each period.
- Draw Legend: Draws a legend of the hatch and
colors.
- Pastel Colors: Enables the use of a larger number of
colors for drawing timing blocks, and are lighter in color for
plotting.
- Enforce Custom Colors: This allows the use of any period
sizing, in combination with the Custom Date Table defined colors,
hatches and layers for each period. Dates/Colors must be set to use
this option.
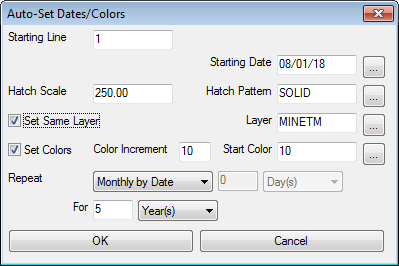
- Dates/Colors: The colors/dates table shown defines
color/layer/label combination for a specific date range. The Auto
Set function may be used to fill out the table for repeating period
lengths starting at a particular line and to create a different
schedule later.
- Amounts: When using the Custom Amounts option, the
amounts are defined here. They can have custom period names, or if
left blank it will automatically increment the periods.
- Change Shade Color: Controls rotation of color depending
on the period drawn, every period, year, or 5 years for the hatch
color.
- Block Labeling: There are options for No Labels, Actual
Dates, Period Names (short one word names), Custom Names (from
Custom Amounts and Dates/Colors tables) and Custom Text Block. The
Block is defined in the row below, Text Block Style.
- Text Size: Sets the size of the date text in the
blocks.
- Text autosize: changes the size of the text to fit in
the period blocks.
- Length-wise labels: Rotates the period labels
horizontally.
- Text Style: Sets the period labels text style.
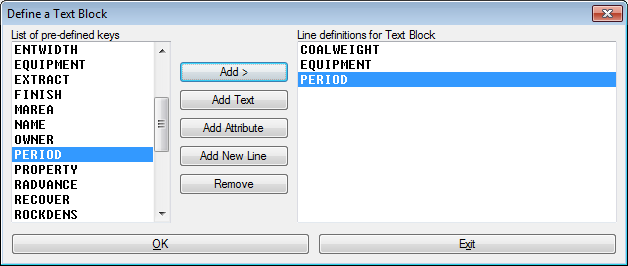
- Text Block Style: This defines any custom labels for
drawing in the period blocks. The blocks can be named and saved.
Fields to label appear on the left side, and are moved to the right
for drawing. Buttons for Add, Edit and Remove the block are
here.
- Report Period: Sets the length of the period. If the
Show Date Range is on, that will be the entire length of one
period.
- Skip format prompt: Skips over the Report Formatter, and
brings up the Display Text report, with the settings that were
previously defined.
- Sub-divide by properties: Controls whether system uses
property lines and does calculations on per property basis per
period.
- Output period grids: For Surface Timing, it writes mine
advance grids to a GSQ file.
- Period Polylines to Pits: Creates named pit boundaries
for each period. These can be used for other reserve
commands.
- Output Spoil File: For Surface Timing, it creates a SPO
file that is used for timing the backfill dumps.
Periods
- 12 months + 8 quarters + years: Display monthly
development for one year, followed by quarterly periods for next 2
years and then yearly periods;
- Months of Development: increments from the
starting date and continues from that date each month.
- 1st Days of Months: increments from the 1st of every
month, even if the start date is not on the 1st. If not, then the
first month will be a partial month, and it resets to the first
after the first period.
- Years of Development:increments from the starting date
and continues from that date each year.
- 1st Days of Years: increments from the 1st of every
year, even if the start date is not on January 1st. If not, then
the first year will be a partial year, and it resets to January 1st
after the first period.
- Show Date Range: Displays a single period as specified
in the Report Period.
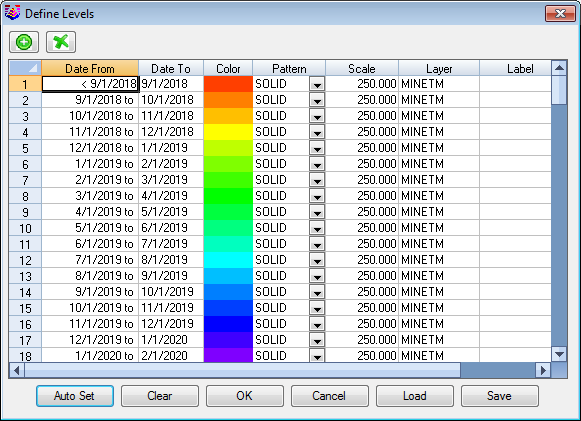
- Custom Date Table: Completely user-defined sequence of
periods, with customized dates, colors, layers and hatches.
- Custom Amount Table: When using the Custom Amounts, the
amounts are set here for amounts/period. The option Sum for whole
mine controls whenever equal quality should be mine from whole mine
or from the single panel.
-----------------------
- Legend Scale: controls the size of the legend.
- Hatch: sets the hatch pattern for the mining
advance.
- Retreat Hatch: sets the hatch pattern for the mining
retreat. It will either be split left and right of the centerline,
or hatch just the pillars.
- Divide advance/retreat display: Draws the advance
coloring to the right of centerline and retreat hatching on the
left.
- Hatch pillars precisely: Hatches just the entries on the
advance, leaving the pillars open. Then if there is retreat mining,
the pillars are hatched separately as they are retreat mined.
- Transparency: When using the SOLID hatch, this setting
controls the transparency of the hatch. The range is from 10%-90%.
This allows for viewing the entities behind the hatch, and for
plotting.
- Buffer Hatch/Width: Another option for representing the
period blocks is with a buffer hatch. The width determines the
offset from the perimeter. It appears as shown here.
- Scale: Sizes the hatch pattern size.
- Layer: Sets the layer for the blocks and perimeters for
the advance. The layer name for the retreat mining is prefixed with
"RT-" to the advance layer name.
- Layers by year: Sets each year to a new layer for better
layer management and filtering.
- Layers by period: Assigns each period hatch and
perimeter to its own layer.
- Sum for whole mine: When using Custom Amounts, this
determines whether the amount is a total for a whole mine or just
for each panel individually.
- Stop at last period: When using the Custom Amounts, the
timing will stop at the last defined period with an amount.
Otherwise it will continue to the end of the panels, repeating the
last entered amount.
- Split report by strata fractions: If several named seams
make up the KEY, this option will
If the development progress is not satisfactory and the
scheduling needs to be adjusted, use Undo Report button in Timing
dialog to remove drawn report entities. After the dialog is
completed, the mining development is shown step by step and then
the production report is generated. The report format may be
modified to suite the particular need and preferred format saved
for further use. See HELP for complete description of Report
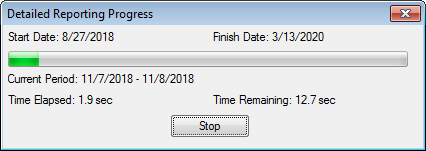
Formatting dialog. There is a progress window displaying the time
elapsed and the time remaining for large schedules that require a
lot of time.
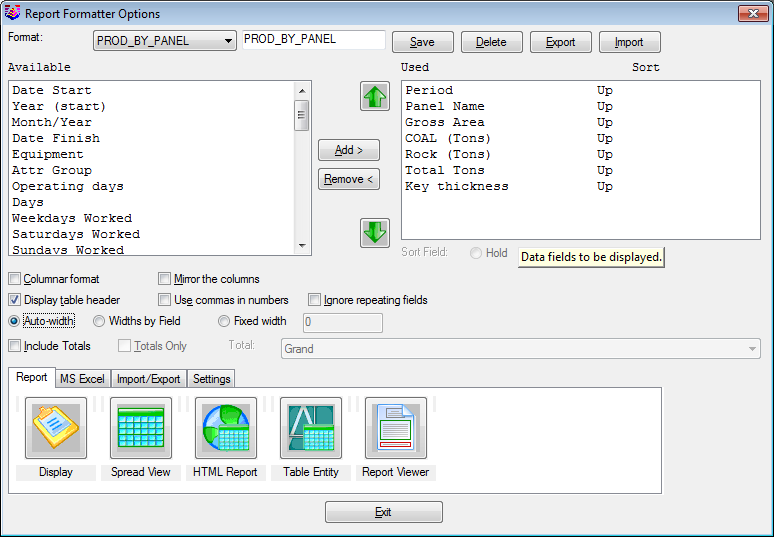 The Report
Formatter has several output options:
The Report
Formatter has several output options:
- Report - This outputs to an ASCII text file viewer
and an Ascii text file can be saved or inserted directly into
the drawing. Other reports are Spreadsheet, HTML, Tables and a
viewer.
- MS Excel - Exports the report directly to an MS Excel
spreadsheet with many settings for cell formats and
placement.
- Import/Export - Has several options to move data in and
out of your reports, and you can export to an MS Access mdb file as
well as others.
- Settings - Options here for editing attributes and
attribute options.
Report
The Report tab
outputs ASCII text reports as shown below: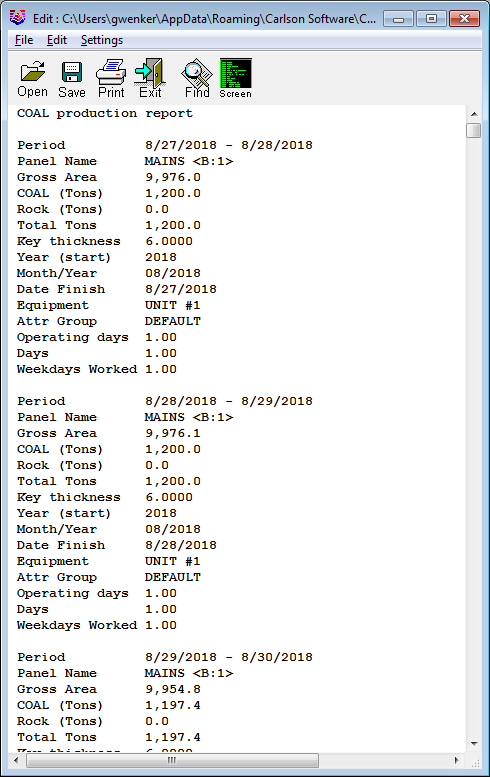 The above
report is an example of an Ascii text report in Non-columnar
format.
The above
report is an example of an Ascii text report in Non-columnar
format. The above
report is an example of a columnar Ascii text report.
The above
report is an example of a columnar Ascii text report. The report
above is an example of an Ascii text report in spreadview.
The report
above is an example of an Ascii text report in spreadview.
 The User
Attributes button under Settings leads to a dialog where custom
attributes can be created.
The User
Attributes button under Settings leads to a dialog where custom
attributes can be created.
 The
Attribute options opens with a list of the attributes above,
providing display and formatting options below.
The
Attribute options opens with a list of the attributes above,
providing display and formatting options below.
MS Excel
 When
the MS Excel tab is open reports can be exported directly to new or
existing spreadsheets, beginning on any specified sheet, row and
column. There are also options to include totals and text
header information in the file. When the options have been
specified click on the Export to
Excel button. The spreadsheet below was exported using
this option.
When
the MS Excel tab is open reports can be exported directly to new or
existing spreadsheets, beginning on any specified sheet, row and
column. There are also options to include totals and text
header information in the file. When the options have been
specified click on the Export to
Excel button. The spreadsheet below was exported using
this option.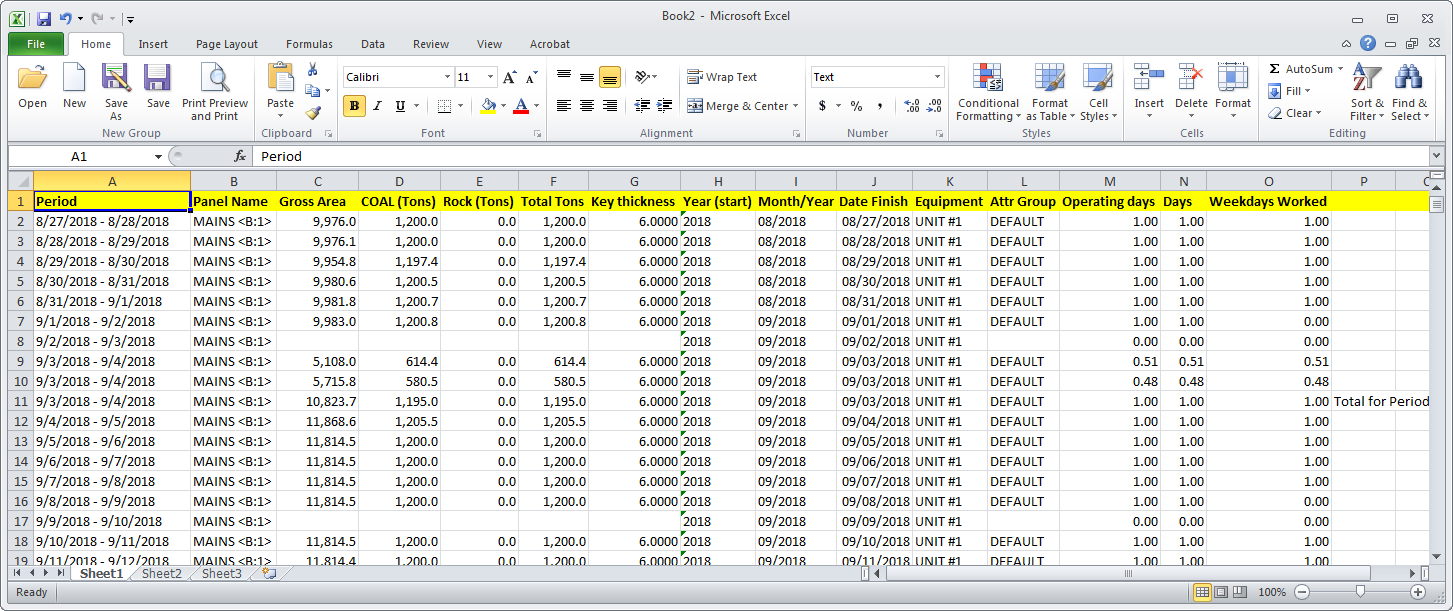 Import/Export Options
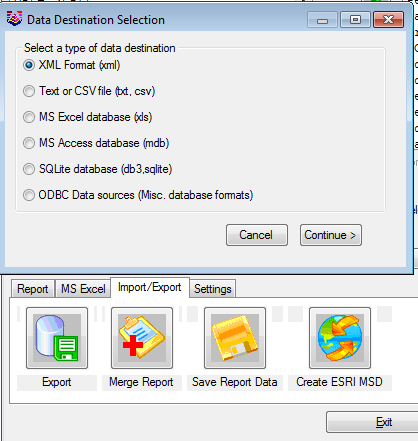
At the Export button
under Import/Export tab
there are 6 options under Export.
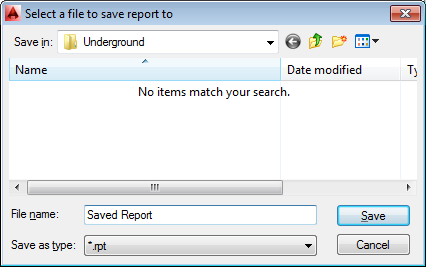 RPT format reports can be merged together, as shown
above. The RPT reports are the reports that can be loaded and
viewed even after the underground timing routine is closed, and
accessed at a later time.
RPT format reports can be merged together, as shown
above. The RPT reports are the reports that can be loaded and
viewed even after the underground timing routine is closed, and
accessed at a later time.
Prompts
Select any part of mine plan: Pick any centerline in
the mine plan
Underground Timing Dialog
Pull-Down Menu Location: Underground
Keyboard Command: schedule_mine