|
| Format choice box |
This command is for entering and calculating level data. It has
a spreadsheet editor for entering the level measurements, and the
level calculations are updated as the data is entered. There is
also a processing and reporting feature.
Carlson Software supports two level file formats:
LEV Files: The .LEV file is
the old format. You can still edit and process files in this
format. The LEV format only supports differential levels, single
and three-wire. The LEV file has 5 record types:
1) SR - Start Record. Contains the starting
benchmark measurement.
2) TP - Turning point record, contains the
backsight and foresight to the turning point.
3) LV - Side Shot (or level) record. Contains
the foresight measurement to the point.
4) ER - End Record, contains the measurement to
the ending benchmark.
5) Note/Comment - starts with two dashes
TLV Files: The TLV file
format can contain Differential and/or Trig-Level data. This is
Carlson's new format and is supported by SurvCE (Carlson data
collection program). The TLV file has the following record
types:
1) H1 - First header record contains project
information
2) H2 - Second header record contains date,
time, temperature and pressure information
3) BM - Benchmark record, contains the point
number, elevation and description of the benchmark.
4) LS - Rod height, only used with TRIG-LEVEL
data.
5) BS- Backsight measurement. This record
contains the backsight point number and measurement:
a)
Differential data: VD and HD - Vertical Difference (rod reading)
and Horizontal Distance
b) Trig
data: SD/ZE - Slope Distance and Zenith Angle
6) FS - Foresight measurement. This record
contains the foresight point number and measurement.
a)
Differential data: VD and HD - Vertical Difference (rod reading)
and Horizontal Distance
b) Trig
data: SD/ZE - Slope Distance and Zenith Angle
7) Note/Comment - starts with two dashes
This routine runs the *.TLV / *.LEV file editor and file report
functions.
LEV File
Editor:
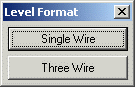
If you are creating a new .LEV file,
you must choose either single-wire or three-wire for your level
format data entry preference.
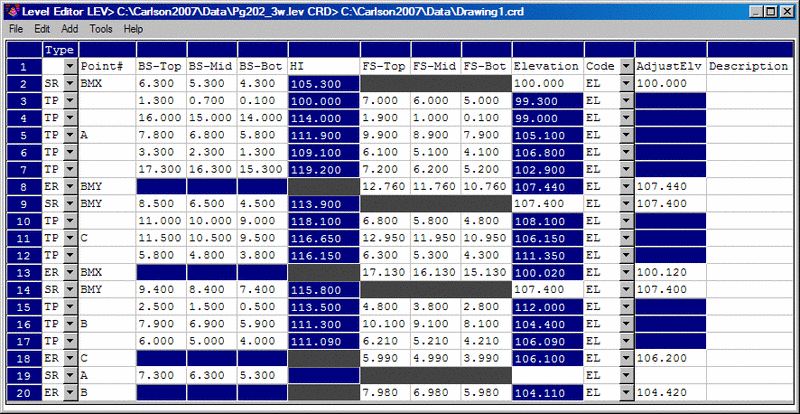
Three Wire leveling, or precise leveling, is a process of direct
leveling wherein three cross hairs, or threads, are read and
recorded rather than the single horizontal cross hair. Note below,
in the sample three-wire editor graphic, the additional columns
representing top and bottom readings.
The commands starts by asking you, with a dialog box, to select an existing level file (.LEV) to process or to select a name for a new level file. The below examples are using existing files. Once this choice is made the small, Level Format dialog appears.
|
|
| Format choice box |
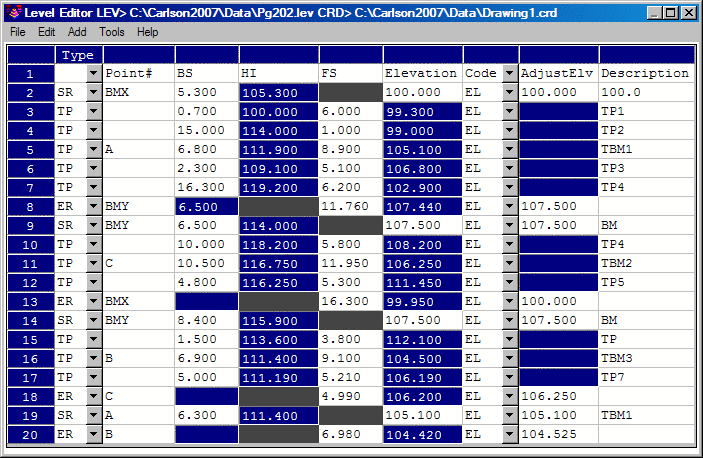
Regardless of whether you choose
Single or Three Wire, the Level Editor appears in its own window.
Below we see the editor displaying the contents of two existing
files of level information. One is single wire and the other is
three wire. The pulldown menus are the same for both, as described
below in detail.
In the spreadsheet, the background
color of the cells indicate the data type. White cells are for
user-specified values. Blue cells are program calculated values.
Black cells are data fields that aren't used by the level record
for that row.
|
|
|
Level File Editor - sample Single Wire data |
|
|
| Level File Editor - sample Three Wire data |
|
|
File->Settings |
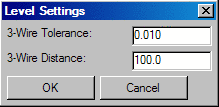
File: Standard File routines - Open,
Save, Save As, Settings, Print and Exit. Settings brings up a
dialog where you can adjust the 3-wire tolerance and distance
values. Open will allow you to open up another existing .LEV
file.
File->Import: This routine imports Carlson .LEV format,
Leica level data in .GSI or .XML format, TDS .RAW format, Topcon or
Trimble .DAT format into the level editor.
File->Settings: This function has a setting for whether
to use the Report Formatter for the Print function. The Report
Formatter allows for customized reports and output to Excel.
Without the Report Formatter, the Print function creates an
automatic report.
Edit: Cut, Copy, Paste and Go To. Go To will take you to the
row of your choosing.
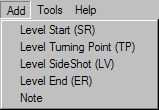
Add: These options provide
the standard level run routines. Details on each and a graphic of
the pulldown follow.
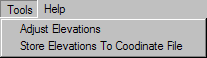
Tools: This pulldown is for
adjusting and storing elevations.
The Add and Tools pulldowns at the top
of the editor provide the following features:
|
| Level Editor - Add pulldown menu |
Level Start (SR): Starts
the level run, usually with a know starting elevation or
benchmark.
Level Turning Point (TP):
Turning point procedure for leveling.
Level Side Shot (LV): For
entering leveling side shots.
Level End (ER): Enter your
value.
Note: You can add a note,
or comments, into the editor as you move through the level run.
|
| Level Editor - Tools pulldown menu |
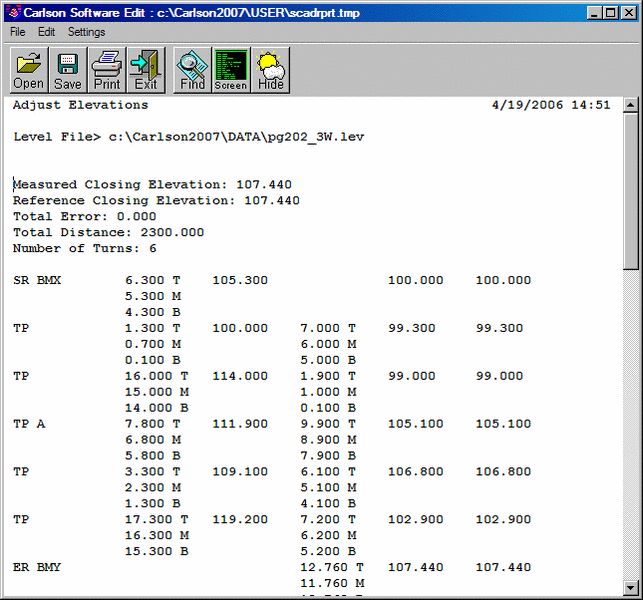
Adjust Elevations: This
function will do a simple adjustment of your level data and place
the adjusted elevations in the Adjusted Elevation column. If you
are running 3 wire level loop the corrections will be inversely
proportionate to the distance between the measurements. If you are
running a single wire level loop, the corrections will be averaged
by the number of turns.
Store Elevations to Coordinate
File: It is important that the point numbers in the level
file match the point numbers in the coordinate file. If you have an
active coordinate file passed to the level editor, this option will
be available to you. The elevations calculated in the level file
will be stored in the active coordinate file by matching point
numbers. The point must exist in the coordinate file before an
elevation will be stored. After the elevations have been stored, a
report will show which points were stored and which ones were not.
If adjusted elevations have been calculated, they will be stored.
If not, the unadjusted elevations will be stored.
|
| Selecting Print (editor File menu) provided this Level File Report sample |
Editor Columns:
Type: These are small pulldown menus with two-letter level
procedure choices. The two letters are abbreviations as indicated
in the next dialog. These steps may be made with the Add pulldown
or with this method. The options are SR, TP, ER, LV and DS. DS
stands for description shot.
Point # - Point number of
measurement.
BS - Backsight rod reading
HI - Calculated height of instrument
FS - Foresight rod reading
Elevation - Elevation of point
Code: The code is used by
SurvNet for network least-squares processing of networked level
loops. The code can be either EL or FE where EL is for calculated
elevations and FE is for fixed elevations. FE should only be
assigned to a START or END record (where you can enter the value
for the adjusted elevation). If FE is assigned to an intermediate
record it is ignored. Here is how the FE records are used. Say you
run from one benchmark to another (point 1 to point 10). Point 1
and point 10 are the START and END records of the first loop and
both are FE records. Then you start another loop at point 5
(halfway between 1 and 10). This is not a benchmark and can be
adjusted so it should be assigned an EL code. Point 5 is the START
record for the second loop. You run from point 5 to point 20 which
is a benchmark. Point 20 is the END record and is assigned an FE
code. When SurvNET processes the file, it will hold points 1, 10
and 20, allowing all others to be adjusted, including point 5 (even
though it is a START record).
Adjusted Elevation -
Adjusted elevation of point
Description - description of point
TLV File
Editor:
TLV files can contain trig-level and/or differential level data.
The editor will allow both type records in the same file.
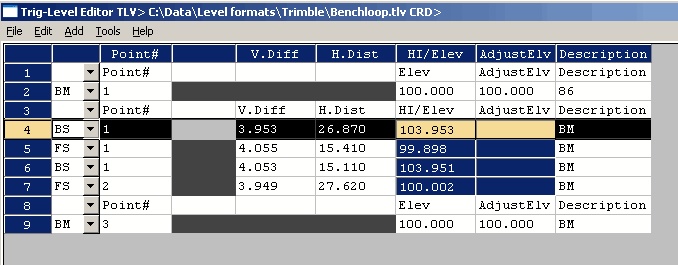
Below is a sample Trig-Level TLV file: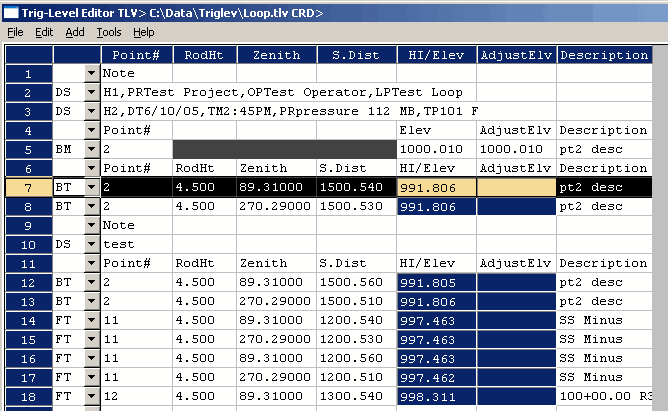 Below is a sample Differential-Level
TLV file:
Below is a sample Differential-Level
TLV file:
 Menu Options:
Pulldown Menu Location: Survey
Keyboard Command: diglevel
Prerequisite: .LEV (level) file to process