Edit Area Table Properties
This command allows the user to edit the properties of an area
table.
Prompts
Select an area table to modify:
pick an area
table
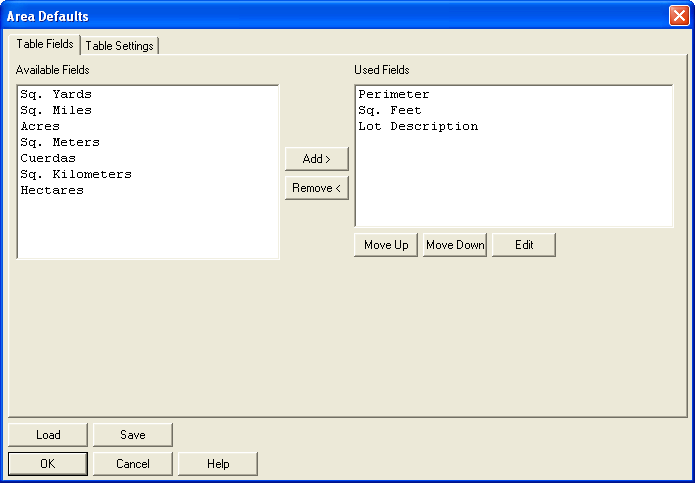
After picking an area table the Area Defaults dialog will be
displayed. Here you can change the settings of the selected table.
The changes will be reflected once the user selects the OK
button. The Table Fields tab contains the Available
Fields and Used Fields listboxes which are used to control which of
the possible ten area fields will be used in the area table. You
use the Add and Remove buttons to control which fields will be
included in the table. You can also add to the Used Fields list by
double-clicking on items in the Available Fields list. The area
label will include the values in the order as specified in the Used
Fields listbox. To change the order you use the Move Up and Move
Down buttons.
Field Settings Dialog: To
control the appearance of the fields in the table, use the Edit
button to edit the highlighted item in the Used Fields list, or
double click on a field in the same list. This will call up the
Field Settings Dialog. Column Title: This will be the
tile name used for the field's column in the area table.
Text Style: This allows you to set a text style for the area
labels. You can enter the name manually or use the Select Style
button to call up a dialog which presents a list of known text
styles.
Text Size: This value is multiplied by the horizontal scale
to obtain the actual text size.
Text Layer: This allows you to assign a layer for the area
text. You can enter the name manually or use the Select Layer
button to call up a dialog which presents a list of known
layers.
Text Color: This allows you
to assign a color for the area text. Use the Select Color button to
call up the standard color picker dialog. To use the default for
the Text Layer, select ByLayer.
Prefix and Suffix: Although
most area labeling uses the suffix, as in 1.25 Acres or 3.515
Hectares. But for those who prefer a prefix, as in Ac: 1.25, this
routine can create that area labeling style automatically.
Justification: Use this to
control whether the label field is left, centered or right
justified.
+/-: This allows you
to display + or - in the Prefix or Suffix of the area labels, or
choose None.
Precision: Choose precision level for the currently selected
field.
Column Width/Auto: The
default behavior is that the column width is automatically set for
best fit. The user can override this value by unchecking the Auto
checkbox and setting the column with in text size units.
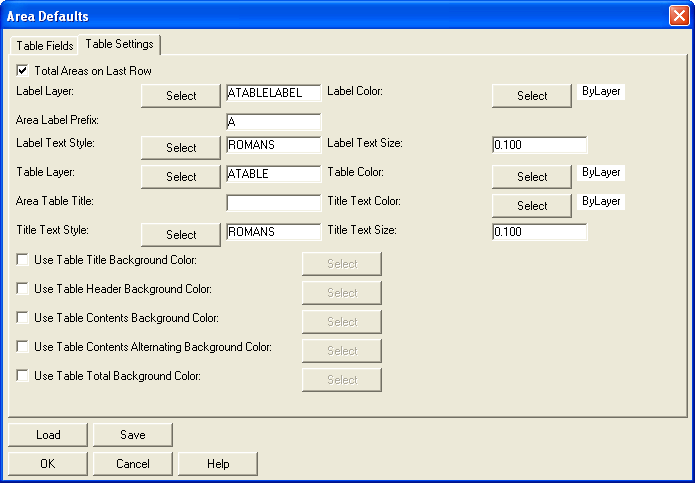
The Table Settings tab
brings up the Table Settings panel shown below. Total Area on Last Row: Select
this to have a total row placed at the bottom of the table which
will contain the sum of all relevant table fields.
Label Layer: Use this to
control the layer that the area table reference will be placed in.
Use the Select button to
pick from a list of all known layers.
Label Color: Use this to
control the color of the area table reference. Use the Select button to pick from a color
picker dialog. Select ByLayer to use the default color of the label
layer.
Area Label Prefix:
Use this to control the prefix of the area table references. Add a
space after the prefix to have the prefix and the reference number
separated by a space if desired.
Label Text Style: Use this
to set the text style of the area table reference. Use the
Select button to pick from
a list of all known text styles.
Table Layer: This allows
the user to set the layer that the table will be placed in. Use the
Select button to pick from
a list of all known layers.
Table Color: This allow the
user to set the color of the grid lines of the table. Use the
Select button to pick from
a color picker dialog. Select ByLayer to use the default color of
the table layer.
Area Table Title: To add a
title row as the first row of the area table, enter a table title
here.
Title Text Color: This
allow the user to set the color of the table title. Use the
Select button to pick from
a color picker dialog. Select ByLayer to use the default color of
the table layer.
Title Text Style: Use this
to set the text style of the table title. Use the Select button to pick from a list of
all known text styles.
Title Text Size: Use this
to control the size of the table title text.
Background Colors: The area
table is broken into 5 zones in respect to background color. Each
zone can have its own unique background color. The zones are Title,
Header, Contents1, Contents2 and Total. To set a background color
for each zone, first the respective "Use Table...Background Color"
box must be checked. This enables the Select button, which is used to pick
the respective background color from a color picker dialog. For the
Contents zone all contents rows can either have the same background
color, or by setting up an "Alternating Background Color", rows
will have alternating colors.
Load/Save: These buttons
save and recall all the Area Default settings to a .ARS settings
file.
Tip: Keep in mind that
changes made here only apply to the selected table. If properties
are changed within the Configure command, the changes apply to all
new work sessions as well
Pulldown Menu Location: Area/Layout> Area Tables>
Edit Properties
Keyboard Command: atabedit
Prerequisite: An area table