 Spread
View:
Spread
View:Edit Pit allows the user to review and edit the quantities and
attributes such as sulfur and BTU stored in each pit. Surface
Equipment Timing and Pit Scheduler takes this information and
schedules through the pits. This information is placed into pits
using commands such as Surface Mine Reserves, Import Timing Data,
or Assign Timing Grids. The quantity/quality information in a pit
is one of three categories of Extended Entity Data (EED) that can
be stored in pits. there is no limit to the amount of data stored
here, as it is stored in the Dictionary. The other two are pit name
and direction of mining. Edit Pit requires that the user pick
inside each pit to review pit data. The pit is shaded yellow for a
visual verification of which pit is edited. The command will not
proceed if there are not any named, directional pits in the drawing
with quantities stored. The program will detect this automatically
when the Edit Pit command is selected.
The following values can be edited for a bench: Pit Name, Site
Name, OB Volume, Key Volume, Key Tons, Difficulty, Attr. Group,
Start Date, Delay, Mineable, Precedence and Attributes. Other
values are calculated from these values and pit dimensions. There
are two views that can be used to view/edit information about a pit
which can be accessed using Tree View and Spread View tabs.
Tree View:
Following
dialog shows the tree view for a typical pit. Pit and Site names
are shown on the top of the dialog. All benches in the pit are
listed in Pit Benches tree view and the information of currently
selected bench is shown in Bench Details spread where these can be
edited. A separate list box below Pit Benches shows the Precedence
for current bench. The Edit and Screen Pick buttons can be used to
edit the precedence.
Spread
View:Following dialog shows the spread view
for a typical pit. All the benches in selected pit are listed as
column headers and associated data are shown below in the spread
sheet. Bench precedence is listed in a dropdown list which can be
edited using edit button for that bench.
 Names
and Bench: The Site Name and Pit Name are defined here at the
top of the dialog. The Bench Number is displayed. Any of these
items may be edited here to save in the pit.
Names
and Bench: The Site Name and Pit Name are defined here at the
top of the dialog. The Bench Number is displayed. Any of these
items may be edited here to save in the pit.Grids versus Values: There are two methods of storing
quantity data in the pits for Surface Equipment Timing. It can
either be stored as a value (CY or CM for Volume and Tons or Metric
Tons for the Key Tons) or each can be assigned with a grid file.
When grids are stored in the pits, the format changes slightly. The
OB and Key Volume grids are actually thickness grids of the strata
in the bench. The Key Tons grid will be a Tons per Square Foot or
Meter. These values or grids are assigned to the pits by 3 methods.
The first method is using the Surface Mine Reserves. The option to
Store Results in Pits will add the values to the three windows
described above. The option to Output Thickness Grids, if checked,
will create and store the three grids explained above in the pits.
All three grid names will be prompted for at the end of the Surface
Mine Reserves routine. This must be performed for each bench
needing to be assigned to the pits. The second method to add these
quantities to the pits is Import Timing Data. This command will
import the Values from a CSV file made with a spreadsheet. These
values will be added to the pit as shown in the graphic above,
where a value is in all three boxes. The third option, Import
Timing Grids, will import the 3 grids mentioned above directly into
the pits. All 3 grids will be prompted for. The two Volume grids
should be a thickness grid, and the Key Tons grid will be
tons/area. This grid can be calculated with the Grid File Utilities
(GFU) using thickness and density grids. Now the question arises,
why are there two options? Values are used generally for Equipment
Timing when the pits or blocks are smaller. Carlson will schedule
through the pit at a constant rate until the volume and tons are
mined. This is not desired if the pits are very long, or the
thickness of the seams varies a lot. That is when the Grid method
is preferred. Carlson will schedule through the pit based on the
thickness of the grids. If the OB is thinner, it will schedule
through the pit faster, and if the OB thickens, the equipment will
slow down in that section of the pit. This gives a more accurate
representation of the actual mine plan schedule.
 Define
Pit Attributes versus the Entries in Edit Pit: There is
a hierarchy for the use of pit information. In general, like it is
for Underground Mining application, the entries in the Default Pit
Attributes dialog are surpassed by Pit Attributes specified in Edit
Pit routine. However the use of this feature is discouraged since
attributes defined this way are stored as a completely separate set
of attributes and therefore further changes in the Default Pit
Attributes will have no effect on that particular pit. The pit
attributes are listed at the end of the Bench Details.
Define
Pit Attributes versus the Entries in Edit Pit: There is
a hierarchy for the use of pit information. In general, like it is
for Underground Mining application, the entries in the Default Pit
Attributes dialog are surpassed by Pit Attributes specified in Edit
Pit routine. However the use of this feature is discouraged since
attributes defined this way are stored as a completely separate set
of attributes and therefore further changes in the Default Pit
Attributes will have no effect on that particular pit. The pit
attributes are listed at the end of the Bench Details.Consider first the qualities. Surface Equipment Timing will honor quality attributes with a name in the form XXXX_BENCH*, where XXXX is a quality name (does not have to be 4 character long) and * is a bench number the quality should be used for. When Carlson runs a calculation for the bench, it evaluates all qualities for that bench and the report puts XXXX part of the attribute name into the report. This way the same quality calculated from different grids for different benches gets reported as a single quality attribute in the report.
Consider next the overburden and key strata quantities. If one
or more of these fields are empty then Surface Equipment Timing
will try to find pit attributes to use instead. These are defined
in Default Pit Attributes also.
ROCKTHICK for OB Volume (C.Y.) as an average non-key thickness value or overburden thickness grid file;
THICKNESS for Key Volume (C.Y.) as an average non-key thickness value or key thickness grid file;
DENSITY for Key Tons as a key strata density or a density grid
file.
Following dialog shows the reserved names for attributes, this
can be activated using Keyword Help button.
 Difficulty Factor: The Difficulty
Factor will slow down or speed up mining across a pit. A factor of
1.1 means that mining will be slower than the rates set in Define
Equipment. A factor of 0.9 means that mining will be faster
(precisely 1.0/0.9 or 1.1111 times faster). The difficulty factor
used will be 1 if nothing is entered here. If one or two pits
present a problem to surface mining (for example, they are near a
highway and require time-consuming buffering for environmental
reasons), then Edit Pit offers a handy means of applying the higher
Difficulty Factor. The user might choose to enter 1.2 or 1.3
directly, to slow those pits down 20 or 30 percent.
Difficulty Factor: The Difficulty
Factor will slow down or speed up mining across a pit. A factor of
1.1 means that mining will be slower than the rates set in Define
Equipment. A factor of 0.9 means that mining will be faster
(precisely 1.0/0.9 or 1.1111 times faster). The difficulty factor
used will be 1 if nothing is entered here. If one or two pits
present a problem to surface mining (for example, they are near a
highway and require time-consuming buffering for environmental
reasons), then Edit Pit offers a handy means of applying the higher
Difficulty Factor. The user might choose to enter 1.2 or 1.3
directly, to slow those pits down 20 or 30 percent.If the mining speed is influenced by constantly changing difficulty, the user might resort to sketching out contours to represent the difficulty factor using the command "Digitize Contours". The contours might range from 0.8 to 1.2, in 0.1 intervals. From these contours, a grid file could be generated representing the difficulty. If this grid file is assigned to the attribute DIFF_BENCH* (where * is bench number) within Define Pit Attributes, then this grid value (varying across a given pit) will be applied to all mining and will override any value within Edit Pit.
There is a 3-level hierarchy to the Difficulty Factor. In addition to the entry within Edit Pit and the overriding entry within Define Pit Attributes, there is a higher, overarching concept of layerized DIFF_BENCH* text. If text is found within the pit in the layer DIFF_BENCH* (where * is a bench number), then the real number value of this text (e.g. 0.95) will absolutely control the difficulty used in mining across the pit. As an example, if the text "1.2" appears inside a pit, in layer DIFF_BENCH1, then for first bench the value 1.2 will override the 1.0 that appears in Edit Pit and will also override any grid or value associated with the word DIFF_BENCH1 found in Define Pit Attributes. The layerized text rules.
Multiple Benches: Surface Equipment Timing is bench based timing. It will consider either the tons of key strata in determining the pace of mining or it will consider the volume of overburden and interburden to be removed. If, in reality, different equipment will mine different strata, then accurate timing requires that the mine be divided into benches. These benches are displayed here, in Edit Pit with the Next and Previous buttons. Each bench will have its own quantities and tons assigned, as well as any optional attributes. Precedence will be automatically set so as not to under-mine bench 2 before 1. This two-equipment or bench scenario requires that we have two benches with distinct volumes. This result is obtained by appropriate use of Surface Mine Reserves. To choose different strata for each bench, choose "Selected Strata" under "Which strata to include", and then specify which strata go to Bench 1 and which strata to Bench 2. This requires two separate runs of the Surface Mine Reserves command . The first run would specify the strata in Bench 1 and the second run would specify the strata in Bench 2 (no duplicates!). In short, the key to "benching" are the options "Selected" and "Bench #" within the Surface Mine Reserves dialog box. Benches can also be set with either of the other two import routines, Import Timing Data and Assign Timing Grids.
Precedence: Note that the concept of "precedence" comes into play here automatically. The lower bench 2 cannot be mined until the upper bench 1 has been mined. This "upper bench" precedence is automatically assigned by the program. The user has the option to enter a precedence for any given pit by selecting Edit beneath Precedence. The precedence can also be set just by choosing Screen Pick and picking inside a pit to be mined before. If there are more than one bench, the more times it is picked, the subsequent benches are also set to precede in mining.
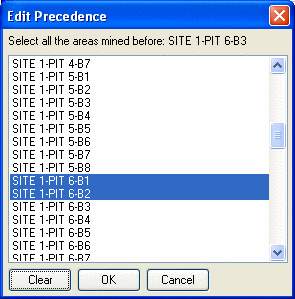 When
"Edit Precedence" is selected, the program displays all pits and
benches available. The convention is to put the bench number after
the pit name, such as B1 and B2. Edit Pit can also be used to
control the order of mining. For example, by using the higher bench
on the current and next two pits in the forward direction for
precedence for the lower bench 2, the effect would be to always
keep the upper bench equipment two full pits in advance of lower
bench equipment for a staggered approach.
When
"Edit Precedence" is selected, the program displays all pits and
benches available. The convention is to put the bench number after
the pit name, such as B1 and B2. Edit Pit can also be used to
control the order of mining. For example, by using the higher bench
on the current and next two pits in the forward direction for
precedence for the lower bench 2, the effect would be to always
keep the upper bench equipment two full pits in advance of lower
bench equipment for a staggered approach.Starting Date: The starting date can be safely left blank within Edit Pit. However, it may be that equipment scheduling may be subject to permit approval, land purchase, legal consideration, new equipment coming on line, all of which may determine a specific data before a pit could be mined at the earliest. If such a condition applies, a pit starting date can be entered for any given pit. If the equipment reaches that pit prior to the starting date, it will stop and wait until the date arrives before proceeding.
Pulldown Menu Location: Boundary in Surface Mining
Keyboard Command: editpit
Related Commands: Surface Mine Reserves, Define Pit
Attributes, Mine Project Definition File