
The Draw Standard Item command activates the
Standards Draw palette. This palette is
essentially the same as the Standards Draw Manager
palette except that it does not have the Standards management
commands available in the right-click shortcut menu.
The first time you launch the Draw Standard Item
command in a drawing session, a dialog box will prompt you to
"Select Drawing Standards Data
Source".
The Standards Data Source can be loaded by specifying a Universal
Data Link file (.udl) or a Standards Database file (.sdb). Carlson
includes two Standards Database files (.sdb) with the installation:
the Carlson_NCS_SurveyCivil.sdb which is
a fully populated database based on the US National CAD
Standard and empty.sdb which is
a functional, but empty, database with which to start a new
Standard Database. Updates and additions to the .sdb files provided
by Carlson Software will be posted to this website:
www.carlsonsw.com/cadstandards.html.
After specifying the data source, the Draw Standard
Item command is automatically issued. If you wish to Draw
a Standard Item in your drawing at this time, you can specify the
Standard Item to be drawn either by typing its QuickKey in at the
Command: Line or by selecting a similar Standard Item currently
existing in the drawing.
If you do not know the QuickKey of the Standard Item you wish to
draw and do not have a similar Item in the drawing, press the
Enter key to finish the command and return to the
Command: prompt. You can now access the Standards
Draw palette by hovering over the Draw Standard
Item icon on the Draw Item
toolbar.
By default, the Standards Draw palette
automatically hides within the Draw Standard Item
icon. Hovering over this icon will display the palette. Once
displayed, the palette may be dragged to a new location and
re-sized. Since the palette is fully transparent, it can be
"parked" in the drawing area and not interfere with other drafting
tasks. The palette is also "transparent" with regards to command
execution in that other commands are able to run while the palette
remains open and available for use.
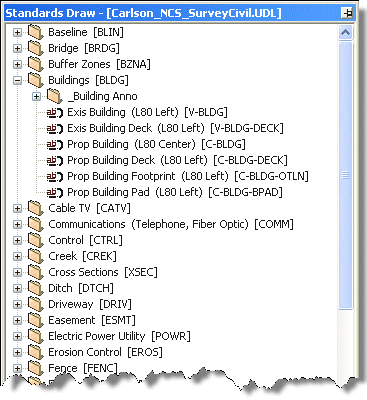
Items in the Standards Draw palette are organized
into Folders and given commonly referred-to, descriptive names.
Defining these Items and other management tasks are done through
the Items
Standards Manager.
A Standard Item can include any one or a combination of 3 types of
entities: Symbols, Linework and Annotation (with or without a
Leader). Next to each Item in the palette is an icon graphic that
indicates the type of entities defined for that Standard
Item.
This icon,  is shown for a Standard Symbol Item.
This icon,  is shown for a Standard Linework Item.
This icon,  is shown for a Standard
Annotation Item.
is shown for a Standard
Annotation Item.
You may also see one of these icons representing a combination of
entity types: 


Start Point: Using the left-mouse button, select the location for the first Symbol component. This point will also be the first endpoint of the Linework for this Item. If you do not wish to have a Symbol inserted at this point and only wish to draw the associated Linework, hold the ALT key when specifying the Start Point to proceed on to the next Endpoint.
Rotation Angle: If you have placed a Symbol, specify its Rotation Angle. If you have set the Symbol Rotation option to "Fixed", you will not be prompted for this Rotation Angle.
If you Insert a Symbol having non-Constant attribute values, you will be prompted through a dialog box to define the attribute values: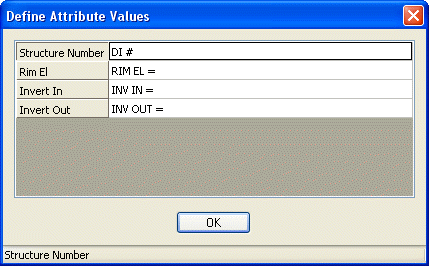
Halfwidth/Width/CLose/LEngth/Open/Undo/Arc Endpoint of line: Select the next Endpoint of the line segment or specify one of the other Polyline command options before picking the Endpoint. If you do not want to draw a Linework segment at this time, press Enter to skip this step and continue on to place Annotation.
Rotation Angle: Specify the Rotation Angle for the next Symbol. Again, depending on the Symbol Rotation options you have set, you may or may not receive this prompt.
The prompts will continue to alternate between "Rotation Angle" and "Endpoint of Line" until you have reached the end of your Linework. When you have specified your final Endpoint and the Rotation Angle of your final Symbol, right-click to continue on to place Annotation.Displacement/Identify or
<\P>key in alternative text: This is the prompt for your first Annotation entity. The
Item's Label is used for default Text content. To override the
default Text, simply type in the alternative Text at the Command:
Line. If you need a 2nd line of Text, use "\P" to designate the 2nd
line of text. For instance, entering "TWO STORY\PWOOD FRAME" would
result in the following Text string in the drawing: Also, left-clicking on any
other Text entity will update your current Text value to match the
Text that was selected. And, holding the ALT key
while left-clicking on any other Text entity will add the value of
that Text entity as a 2nd line of Text to your current Text
value.
Also, left-clicking on any
other Text entity will update your current Text value to match the
Text that was selected. And, holding the ALT key
while left-clicking on any other Text entity will add the value of
that Text entity as a 2nd line of Text to your current Text
value.
Once you have finished entering the Text, press
Enter to finish Text entry. Left-click in the
drawing to place the Text.
Rotation angle/Identify or <\P>key in alternative text <0.0000>: Type in a Rotation Angle for the text or left-click to specify the desired angle.
Leader Start Point: Left-click to specify the location of the arrowhead part of the Leader. If you do not want a Leader, you can right-click to skip the Leader and proceed on to place the next Text entity.
Next Leader Point: Left-click to specify the next Endpoint of the Leader. You will continue being prompted for "Next Leader Point:" until you right-click or Enter to finish drawing the Leader.
After you have finished drawing the first Annotation entity (with or without a Leader), you will continue to be prompted to place additional Annotation and Leaders. Right-click or press Enter to finish the command.Pulldown Menu
Location(s): Draw >
Draw To Standard
Keyboard
Command: drawitem
Prerequisite:
Populated Standards Database file
(.sdb)