Manual Storage
This feature allows you to store points in a coordinate file by
typing in the values for the point ID, code, northing, easting,
elevation and/or description. You also have the option of
using the mouse to pick the location coordinates on the screen.
When you choose the Manual Storage menu item:
If a coordinate file is not currently open, you will be prompted to
open one.
Next, the following dialog box will appear: 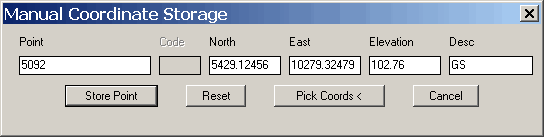 Point
Point
When the dialog box first appears, the point ID (Point) field defaults to the next
available point ID as set on the General tab of the C&G Options
dialog box. If you enter an existing point number in the point
field and click on one of the other fields, the values associated
with that point number will be retrieved from the current
coordinate file and placed in the other fields. You may edit them
if you wish.
Note: If you enter an
existing point ID and alter any of the other fields associated with
that point then save the point, NO
POINT OVERWRITE WARNING WILL BE GIVEN!
North, East and
Elevation
There are three different ways to enter coordinate values:
1. You can type in the coordinate values and elevation in the
appropriate edit boxes.
2. You can duplicate a points values by entering a ‘+’ sign and a
point ID (example: +25) in the North field. When you click on
another field, the coordinate values for the specified point will
be automatically entered in the North, East and Elevation
fields.
3. Or you can press the Pick Coords button. When you do this
the dialog box disappears and you are prompted to pick a point on
the screen. Once you have picked the desired point on the
screen, the dialog box reappears with the coordinates of the
selected point entered in the North and East fields.
Note: If you pick a C&G
point, the coordinate values will be read from the coordinate
file.
Note: The elevation field
is only activated if Elevation is ON.
Code and Description
Enter the desired description in the description edit box.
Enter the point code in the edit box. The point code field is
a 4 digit alpha or numeric code only used by C&G. When
present it can be used as a sorting tool in addition to the
description table.
As an example: say that the
description table number 25 is defined as ‘Sanitary Manhole’.
In addition to using 25 from the description table you also have
used the code ‘AB’ for As-Built and ‘DS’ for design. Now you
can build a selection set of all the description 25’s, excluding
all of the ‘AB’ codes and the selection set will contain only those
points that are Design Sanitary Manholes.
Note: If descriptions are
ON and Get Description From
Table is checked, then if you enter an integer code in
either the Code or Description field, that number will be used to
lookup a description in the current description table. If a
matching number is found it will be used for the code and the
associated description will be used for the point’s
description. If there is no matching number found in the
description table all fields will remain as entered.
Buttons
Store Point: When all the
fields are entered, press the Store Point button to store the point
in the coordinate file. If Auto Point Plot ON is checked on the
Graphics tab in the C&G Options dialog, the point will be
plotted as well.
Reset: This button clears
all the fields in the dialog box and sets the point number to the
next available point number.
Pick Coords <: click
this button to use the mouse cursor to pick the point's coordinates
on the screen.
Cancel: Press this button
when done.
Prompts
Pick coordinates for point
'<point ID>': use the mouse cursor to pick the
coordinates for the point.
Pulldown Menu Location:
CG-Survey > Mngmt
Keyboard Command:
cg_man_coord_store
Prerequiste:
Coordinate file