AUTO CREATE POINTS
The purpose of this feature is to create points in the current
coordinate file and draw the associated point symbols using
coordinate values extracted from existing drawing entities.
These drawing entities may or may not have been created with
CGSurvey. The user can automatically place C&G point
symbols at the vertices, radius points, insertion points, etc. of
selected lines, arcs, points, polylines, and point blocks.
The coordinates of the newly created points are then saved in the
currently open coordinate file.
Note: Unless point symbols
are picked, the coordinates that are stored will be the coordinates
of the CAD entity. In the case of point symbols, the point ID
will be read and used to look up the proper coordinates in the
current coordinate file.
After picking the Auto Create Points menu item, the Auto Create
Points dialog box will appear: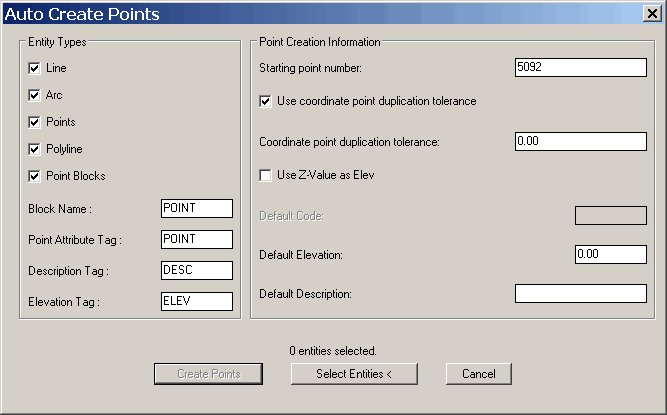
Entity Types section
Select the entity types for which you wish to create C&G
points. You can check any combination of the available entity
types.
When you click the Select Entities button, specifying only certain
entities allows you to window a large area but only have points
created for the specified types of entities. You may also
select individual entities or several groups of entities.
After selecting the entities, click the Create Points button to
create the points and save them to the current coordinate file.
Point Blocks
If you wish to have coordinates created for point blocks (or
inserts) and you want the point ID, description and elevation to be
set from information contained in the block, the block must have attributes that can be used
to obtain these values. When you choose Point Blocks, the
following edit boxes in the dialog are activated and must be filled
out:
Block Name: Specify the
name of the blocks you wish to have points created for.
Point Attribute Tag: For
the block entities chosen, specify the tag name for the attribute
of the block contains the point ID. If no point ID attribute
is found then the next
sequential point ID will be used.
Description Tag: For the
block entities chosen, specify which attribute of the block
contains the description. If descriptions are ON and no
description attribute is found then the default description will be
used.
Elevation Tag: For the
block entities chosen, specify which attribute of the block
contains the elevation.
If elevations are ON and no elevation attribute is found: if the
Use Z-Value as Elev is
checked, then the Z value of the block insertion point will be used
for the elevation of the newly created point; otherwise the
specified default elevation will be used.
Point Creation Information section
Starting point number:
Use this to specify the starting point number. Specifying
anything other than the next available point in the coordinate file
as the starting point makes it possible that one or more existing
points could be overwritten. However, whenever a situation
arises that a point in the coordinate file may be overwritten, a
dialog box will appear warning you of this and allowing you to
decide whether to proceed with the overwrite or not.
Use coordinate point duplication
factor:
If this box is checkbox Coordinate point duplication tolerance edit
box is activated and you must enter a tolerance for determining
coordinate point duplication. This is used to test if a new
point that is about to be created is the same as a point already in
the coordinate file. If the new point coordinates are within
this tolerance the new point will not be created.
Use Z-Value as Elev
Select this box if the entities you select may have a Z value and
you want that value used as the point’s elevation.
Default Code
If point codes are turned ON, then this value is used as the
default Code for all newly created points.
Default Elevation
If elevations are turned ON, then this value is used as the default
Elevation for all newly created points.
Default Description
If descriptions are turned ON, then this value is used as the
default Description for all newly created points.
Buttons
Select Entities <
Press this button to begin selecting the entities for which you
wish to create coordinate points. The dialog box will disappear and
you will be asked to use the normal entity selection methods to
choose the entities to be used for point creation. Just press Enter
at the Select Entities prompt when you are done. You will
then be returned to the Auto
Create Points dialog.
Create Points
After the entities have been selected, press this button to create
coordinate points using the entities. Any existing C&G
lines, arcs or polylines will be ignored since they already have
points associated with them. Non-C&G lines, arcs and
polylines will be converted to C&G lines, arcs and
polylines.
Prompts
Fill in the dialog box as
required (see above explanation).
Select Entities: use the
normal entity selection methods to select the entities to use for
creating points.
Pulldown Menu Location:
CG-Survey > Mngmt
Keyboard Command:
cg_acp
Prerequiste:
Coordinate file.