Export Coordinates To ASCII File
This menu item allows you to export coordinate files to an ACSII
(American Standard Code for Information Interchange) file format.
ASCII files are a simple text format and can be read by almost all
word processors and text editors.
Prompts
To export coordinates to an
ASCII file, follow these steps: > CGFile > Coordinate
File > Export Coordinates to ASCII File

If a coordinate file is not currently open, the Open Coordinate
File dialogue box will appear., select the file.
 You will be prompted at the command line to
select the points you wish to export:
You will be prompted at the command line to
select the points you wish to export:
Add points from
coordinate file. (Enter When Done) (All/Block/Code/Desc/Elev/
Pt-group/Limits/Radius/Select):
After choosing the set or sets of points you wish to export, press
until the following dialogue box appears.
Enter a new file name or select an existing ASCII file and click
the Save button. Next, select an ASCII file format (see the ASCII
File Formats section of this chapter for an explanation of each
format):
 Select the OK button to export your
coordinate points.
Select the OK button to export your
coordinate points.
ASCII FILE CONVERSION
FORMATS
NOTE: In the following formats the point code can be placed in the
first two characters of the description field, followed by a
semicolon. The description will follow the semicolon. You can
export and import ASCII files in the following formats:
STANDARD (Point #, North, East, Elevation,”Desc”)
2,5054.76393,9777.75761,103.70000,”gs”
3,5098.69743,9783.82411,105.20000,”gs”
4,5158.78043,9773.74111,105.67000,”gs”
5,5205.11493,9777.40661,106.25000,”gs”
CLM (PNT Point # Easting Northing)
PNT 2 9777.75761 5054.76393
PNT 3 9783.82411 5098.69743
PNT 4 9773.74111 5158.78043
PNT 5 9777.40661 5205.11493
Autocogo (Point # Easting Northing Elevation Desc)
2 9777.75761 5054.76393 103.70000 gs
3 9783.82411 5098.69743 105.20000 gs
4 9773.74111 5158.78043 105.67000 gs
5 9777.40661 5205.11493 106.25000 gs
MTI (Point #, Easting, Northing, Elevation,”Desc”)
2,9777.75761,5054.76393,103.70000,”gs”
3,9783.82411,5098.69743,105.20000,”gs”
4,9773.74111,5158.78043,105.67000,”gs”
5,9777.40661,5205.11493,106.25000,”gs”
Standard (without description quotes) (Point #, North, East,
Elevation, Desc)
2,5054.76393,9777.75761,103.70000,gs
3,5098.69743,9783.82411,105.20000,gs
4,5158.78043,9773.74111,105.67000,gs
5,5205.11493,9777.40661,106.25000,gs
Abacus/MTI (Point #, Northing, Easting, Elevation)
2,5054.76393,9777.75761,103.70000,”12;gs”
3,5098.69743,9783.82411,105.20000,”12;gs”
4,5158.78043,9773.74111,105.67000,”12;gs”
5,5205.11493,9777.40661,106.25000,”12;gs”
Surv-A-Soft (Code Northing Easting: Desc/Elevation”)
6 0 “VER 2”
-1 0.00000 0.00000 “ ”
2 5054.76393 9777.75761 “103.70000”
2 5098.69743 9783.82411 “105.20000”
2 5158.78043 9773.74111 “105.67000”
2 5205.11493 9777.40661 “106.25000”
2 5253.39243 9779.12911 “110.47000”
The Surv-A-Soft file structure is as follows:
The first line of the file is a header line with the following
information:
The total number of points is placed in the code field.
Zero (0) is placed in the northing field.
“VER 2”, etc. is placed in the easting field.
After the header line each line specifies a coordinate point. The
line number minus one is the point number. The code field has three
possible values:
Value Explanation
-1 no coordinate point
2 elevation (in description field)
1 description (in the description field)
Since .CRD and .CGC files can have both an elevation and
description, when converting them to an ASCII Surv-A-Soft file one
of the following will occur depending on the elevation value:
If the point has an elevation it will be placed in the description
field. If there is no elevation, the description will be placed in
the description field.
Star*Net (Point # Northing Easting Elevation Desc)
2 5054.76393 9777.75761 103.70000, gs
3 5098.69743 9783.82411 105.20000, gs
4 5158.78043 9773.74111 105.67000, gs
5 5205.11493 9777.40661 106.25000, gs
USER DEFINED
Upon selecting User Defined format, the following dialog box will
appear:
 As the name implies you can
create a format specific to your conversion needs.
As the name implies you can
create a format specific to your conversion needs.
Using an Existing User Defined Format To select an existing User
Defined format, do the following: Press the Read File button.
Select an existing user defined format from the dialog. The fields
in the dialog box will automatically be updated. Select OK to
accept the format.
Creating a User Defined
Format: There are 5 basic pieces of information that can be
defined in a user defined format. Point number Northing (required)
Easting (required) Elevation Description (Code can also be part of
the description field) There are two types of user defined formats
“ Character Separated Fields Character Separated Fields means that
each field of information is separated by a character, often times
a comma, but any ASCII character can be used. Fixed length Fields
Fixed length fields means that you define the number characters for
each field item. The fields can be in any order
Field
Order
Point Number 4
North
3 (required)
East
2 (required)
Elevation
1
Description
5
NOTE: Coordinate values will be rounded based on the setting in the
Rounding Options dialog box.
If the point number field is not assigned a value, the line number
will be the point number. Select the Field Type (Character
Separated or Fixed Length) and follow the appropriate instructions
below:
Character Separated User
Define Export File
>Go to CGFile >Select Coordinate files >Select Export to
ASCII At the command line you will be prompted to select
points:
Add points from coordinate file. (Enter when Done)
(All/Block/Code/Desc/Elev/ Pt-group/Limits/Radius/Select):
After selecting the point set or sets to export press
return
 Select or name the file to store the
converted points.
Select or name the file to store the
converted points.
 Set the conversion format
to “User Defined Format” The following dialog box allows you to
define the attributes of the points being converted.
Set the conversion format
to “User Defined Format” The following dialog box allows you to
define the attributes of the points being converted.
 For this example Character
Separated Fields has been chosen as the Field Type.
For this example Character
Separated Fields has been chosen as the Field Type.
Points…….…. —> 1
North……….. —> 2
East…………. —> 3
Elevation….. —> 4
Description —> 5
So the line data will be: Point # , North, East, Elevation,
Description
Empty Field Values: It’s
necessary to distinguish between a field that has no value and a
field that has “0” as a value. In coastal areas “0” is a valued
elevation and in some cases “0” could actually be a coordinate
value. By defining empty field values with a value that cannot be
miss-understood for a valid value, a conversion process will not
produce invalid data.
Character Values:
1st & 2nd Field Separators, these are the ASCII characters that
define the fields within a line.
1st & 2nd Line Terminator; these are the ASCII characters that
define separate lines
Description Markers; An ASCII character that surrounds the
description such as quotation marks.
Code Separator; Allows you to designate the ASCII character that
separates the Code information from the Description information. In
the example above the Character values are set as follows:
1st Field Separator: 44 (which is a comma)
2nd Field Separator: -1 (none used)
1st Line Terminator: 13 (carriage return)
2nd line Terminator: 10 (line feed)
Description Marker: -1 (none used) Code Separator: -1 (none
used)
This example would read as follows:
1,5000.0000,10000.0000,954.63,MH
The following is a list of all of the ASCII codes and the
respective values.
 2nd Field
Separator: You may however define two separators. For
example, you can use a carriage return and line feed if you wish to
have each field on its own line: 1 <CR>
<LF>
(Point number)
2nd Field
Separator: You may however define two separators. For
example, you can use a carriage return and line feed if you wish to
have each field on its own line: 1 <CR>
<LF>
(Point number)
1000.000 <CR> <LF> (Northing)
1000.000 <CR> <LF> (Easting)
954.56 <CR> <LF>
(Elevation)
MH <CR>
<CF>
(Description)
NOTE: Do not use a character as a separator if it appears in any of
the fields. For example, if your record looks like this:
1 1000.000 1000.000 954.56 MH <CR><LF>
Then the period (.) character cannot be used as a separator because
it is used in the northing, easting and elevation fields. Pressing
the View ASCII Codes button will show you the 256 valid characters
that can be used in an ASCII file. The table shows each character,
with its integer value to the left of it.
NOTE: Character number 26 cannot be used as a field separate
because it marks the End of File (EOF).
Fixed Length Field User Define
Export File:
>Go to CGFile >Select Coordinate files
>Select Export to ASCII Select points. (Enter When Done)
(All/Block/Code/Desc/Elev/ Pt-group/Limits/Radius/Select):
At the command line you will be prompted to Select Points After
selecting the point set or sets to export press return Select or
name the file to store the converted points.
Set the conversion format to “User Defined Format”
The dialog box below allows you to define the attributes of the
points being converted.
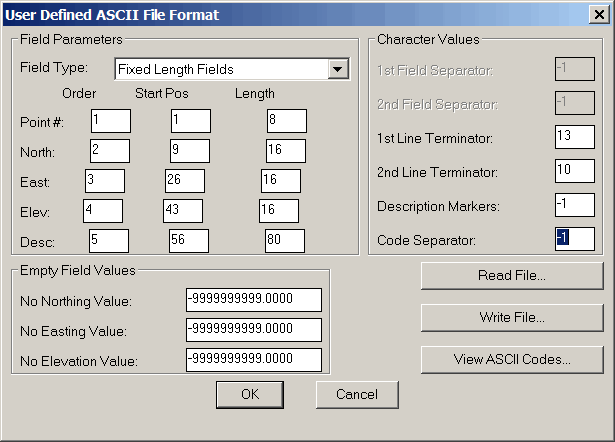
For this example Fixed Length Fields has been chosen. In this case
the order is set at:
Points…….…. —> 1
North……….. —> 2
East………….—> 3
Elevation….. —> 4
Description —> 5
So the line data will be:
Point # -
North-East-Elevation-Description But unlike Character Separated
Fields, the information sets will be defined by their placement on
the text line, rather than a separating character.
Empty Field Values: It
is necessary to distinguish between a field that has no value and a
field that has “0” as a value. In many cases around coast lines “0”
is a contour elevation and in some cases “0” could actually be a
coordinate value. By defining empty field values with a value that
cannot be miss-understood for a valid value, any conversion process
will not produce questionable data.
Character Values: 1st
& 2nd Field Separators, do not apply, separators are defined by
spacing.
1st & 2nd Line Terminator; do not apply, separators are defined
by spacing.
Description Markers; An ASCII character that surrounds the
description such as quotation marks.
Code Separator; Allows you to designate the ASCII character that
separates the Code information from the Description information. In
the example above the Character values are set as follows:
1st Field Separator: Do not apply
2nd Field Separator: Do not apply
1st Line Terminator: 13 (carriage return)
2nd line Terminator: 10 (line feed)
Description Marker: -1 (none used)
Code Separator: -1 (none used)
This example would read as follows:
1 5000.0000 10000.0000 954.63 MH <CR>
<LF>
The first 8 spaces are the reserved for the point number The next
16 are reserved for the northing The next 16 are reserved for the
easting The next 16 are reserved for the elevation The next 20 are
reserved for the description Then a (carriage return) and a (line
feed)
The following is a list of all of
the ASCII codes and the respective values.
NOTE: Do not use a character as a separator if it appears in any of
the fields.
Description Markers: If
you have a description field, you may wish to use a Description
Marker. This is a character that surrounds the description. For
example, a description surrounded by quotes:
23,1056.789,2345.769,982.345,"MH" <CR> <LF>
If you are not using a description marker, enter -1 in the
Description Marker box
Code Separator: If you
have a description field, and want the first characters of the
description field to be a C&G point code, you can enter the
decimal value of the character that separates the point code from
the description. This allows you to transfer both the point code
and the description to an ASCII file. For example, using a
semicolon as a code separator: 23,1056.789,2345.769,982.345,“MH;
Inv Elev -9.23" <CR><LF>
If you are not using a code separator, enter -1 in the Code
Separator box.
No Northing Value and No
Easting Value
If the ASCII file does not have a point number field, the No
Northing and No Easting values are mandatory. The record number
will be used as the point number. This means that skipped point
numbers will be filled with false northing, easting and elevation
values.
Here is an example of a file with a record that has no point number
field (assume you entered -999999 in the No Northing, No Easting
and No Elevation boxes):
1056.789,2345.769,982.345,MH<CR><LF>{Point 1}
-999999, -999999, -999999, <CR><LF> {No Point 2}
2356.679,2455.645,992.678,MH<CR><LF>{Point 3}
2786.799,5645.789,984.234,MH<CR><LF>{Point 4}
No Elevation Value You must
place a value in this box. When converting a C&G point to an
ASCII point, this value will be placed in the elevation field of
the ASCII point if a C&G point with ”No Elevation” is
encountered. When converting an ASCII point to a C&G point, if
“No Elevation” is encountered in the ASCII point then “No
Elevation” will be placed in the elevation field of the C&G
Point.
Pulldown Menu Location:
CG-Survey > File > Coordinate Files
Keyboard Command: EXC,
CG_EXPORT_COORDS
Prerequiste: None