This command creates a template transition file (.TPT file) that can
be used for the commands Locate Template Points and Process
Road Design. The template transition is associated with a typical
template (.TPL) file. The template transition file defines changes in
grade distances or slopes for a specific template ID through a
specified range of stations. Lane widths, for example, can be made to
expand and contract. You can only modify existing template
grades. Template Transition does not allow curbs, medians, subgrades or
cut/fill treatment to be modified. Also new template elements cannot be
added and existing elements cannot be removed. For this reason,
lanes of road that "emerge" and slope distinctly from standard road
lanes would need to be entered as small (0.001 in width) segments in
the original template, available for expansion using Template
Transition. Template Transition offers one of 3 ways to change
template widths
and slopes. Another way involves use of Template Point Profile
and
Template Point Centerline, where a particular template ID can be
directed to follow a specific profile and centerline of its own.
The third method is template-to-template transitions using
Input-Edit Template Series, where distinct templates transition one to
another. All three methods require that template IDs "pre-exist"
in order to be expanded, or to follow profiles and centerlines, or to
transition between template files. So the technique of making
very short phantom segments for emerging and disappearing "lanes" or
roads with distinct grades is universal. If special slopes are
not involved, lanes can expand and contract without creation of phantom
segments in the original template. Only clever use of Input-Edit
Template Series, where templates with no curbs could "end" and
templates with curbs can begin at specified stations, can effectively
make "new" features like curbs and medians materialize.
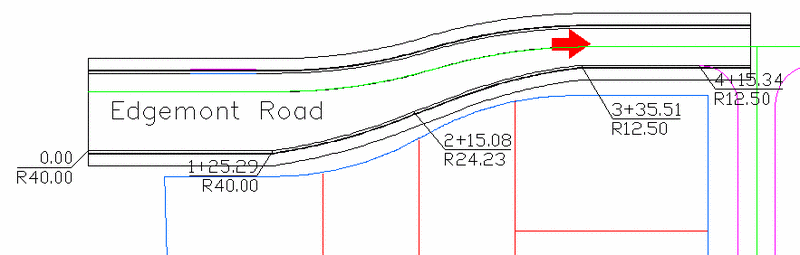
Reviewing the below plan view, when you are given stations and
offsets that define a template position like edge-of-pavement (above),
you can use Template Transition effectively.
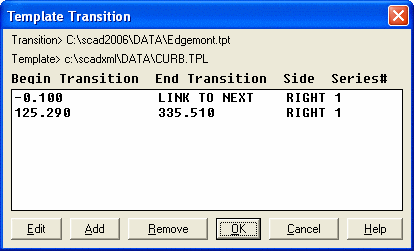
The first Template Transition dialog shows a list of the
transitions, covering the above right-lane variable width. To add a
transition, click the Add button. This brings up the second Template
Transition dialog which shows the transition template for the second
segment. The middle sections list the template grades that can be
changed. To modify a grade, highlight the grade and click the Edit
button.
The Begin Transition Station is where the normal template begins to
transition to the modified template. The Begin Full Template Station is
where the modified
template is used entirely. The End Full Template Station is where the
template
starts to transition back to normal. The End Transition Station is
where
the template has returned to normal. This method is designed for
elements like passing lanes which expand from normal then contract back
to
normal. But you can also use this method for roads that start off
or
end expanded or altered. For example, to start off the road at a
40'
edge-of-pavement dimension, it is necessary to transition up from 12.5'
(normal
dimension). If you need to have 40' at station 0, then enter
station
-0.01 as the "Begin Transition Station", and enter station 0 as the
"Begin
Full Template Station". Select the EP grade in the dialog, and
change
it to 40'. Then click "Link to next transition". The Link to Next
Transition
option joins the current transition to the next transition without
returning
to the normal template. This takes you to the second dialog,
shown
above. You sustain the 40' width from Begin Transition Station
125.29
and transition at station 215.08 to a 24.23' dimension. Then
quickly
end the transition at station 215.081 for the "End Full Template
Station".
Finally, transition back to normal 12.5' by entering 335.51 for
"End
Transition Station".
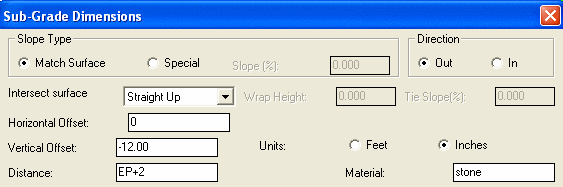
There is another "trick" to using Template Transition with templates
that include subgrades. The subgrades will not automatically
extend and follow
the expanded grade IDs such as EP for "edge-of-pavement", unless the
subgrades
are defined in terms of the IDs themselves within Design Template.
Subgrades
that expand "at slope" to intersect a curb, for example, can expand
naturally
as the curb position moves outward on the right side. But
subgrades
that go "straight up" at back of curb at offset 14.5' in this example
will
stay at 14.5', unless defined as shown below by referencing the "EP ID:
Cut and Fill slopes can
also
be transitioned by picking the Cut and Fill buttons. Ditch and Berm
grades
can also be modified here.

Transitions can also be applied to the left, right or both sides. This allows you to have separate overlapping transitions for the left and right sides.
Template Transition to Edit/Create Choose New to create a
transition file or
Edit to modify a transition file
Template File to Edit: Specify a transition file
Template Transition dialog
Pulldown Menu Location: Roads
Keyboard Command: tpltrans
Prerequisite: A template .TPT file
File Name: \lsp\tplmake.arx