
This command creates Carlson points along a centerline either at
picked points, point numbers, entered individual station and offset or
at station interval with offset, in all cases using the elevations
calculated from the template design files. The first offset
prompt is for the location
of the point. The second offset prompt is for what elevation to
use. For staking template points (e.g. edge of pavement) you usually
enter
the same offset for the position and for the elevation. But if
you
are staking back of curb, which might be at offset 14.5, you might
enter
16.5 for the position (to stake 2' back of curb) and 14.5 for the
vertical
elevation (to use the elevation of back of curb itself). The
points
are stored in a coordinate (.CRD) file. The station and offset of the
point
is stored in the point descriptions. If the points method is used and
existing
Carlson points are selected by number, range or "point group", then
new
points at the same position are created with interpolated elevations
and
new descriptions. The command starts with the dialog shown below.
The required design files include the template file, the profile which
defines
the vertical alignment, the centerline file which contains the
horizontal
alignment and the coordinate file for storing the resulting points. All
these design files must be created before running this command. To
specify
a design file, pick on the type of file button. The optional
files
include an existing section file for calculating the cut and fill
slopes,
a rock section file for special cut slopes in rock, a template
transition
file and a super elevation file. For example, if an existing section is
specified, template points can be calculated further from the
centerline,
all the way from the shoulder out to the "catch" or tie point in cut
and
fill.
If you choose the Station/Offset method, you can specify whether to
create points at a station interval. Otherwise the program
prompts for each station at which to create points. If the
Station/Offset method is used, you
will be prompted whether to calculate points on the left, right or both
sides
of the centerline and whether to offset the calculated elevation by a
delta
Z amount. If you choose the Points method, you can pick points on
the
screen (using snaps on entities if desired) or you can specify point
numbers
individually, by selection set, by range or by point group. You can
also
select whether to calculate elevations from the template surface or
from
a subgrade and you can add a description prefix to all descriptions.
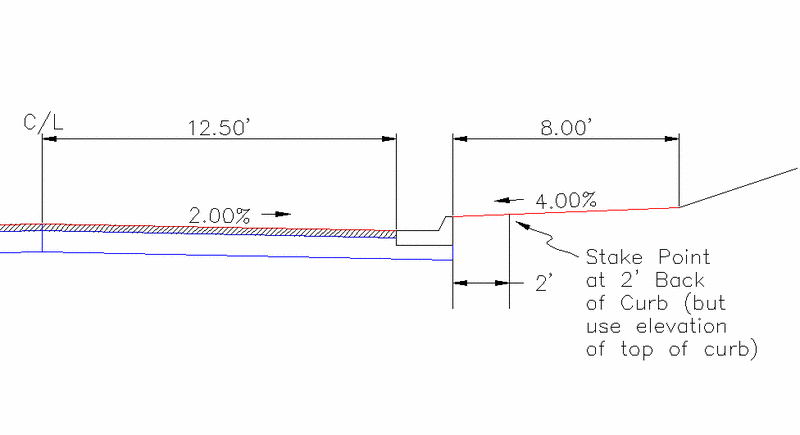
A classic application of this routine would be for road staking such as
setting
back of curb points. Many survey companies prefer to stakeout
roads
by pre-calculated point numbers rather than calculating from road
design
files in the field to stakeout road offsets. So if the goal was,
for
example, to stake 2 feet behind the back of curb, but use the elevation
of
the top of curb, and the shoulder rose at 4% behind the curb, then the
vertical
difference to the top of curb would be -2*0.04=-0.08. The program
will
calculate this automatically by the method of asking for the distinct
offset
to use for the elevation. Obviously, if you want to stake to the
exact
surface elevation at the offset specified, then enter the same offset
for
both position and elevation. The prompting for this back of curb
example
is shown below.
Template Points
dialog: Specify the required files and optional files.
Additional Options dialog: Choose Station/Offset or Points
method,
as shown below:

Offset for X,Y position: 16.5 In this case,
this
is the pavement width (12.5) plus curb width (2) plus back-of-curb
offset
(2). The northing and easting for the points will be calculated
with
this offset.
Offset for elevation <16.5>: 14.5 The
elevations for the points will be calculated at this offset (back of
curb in this example).
Apply offset to left, right or both sides
(Left/Right/<Both>)? press Enter Note that if
you want to have the points number
sequentially on the left side and sequentially on the right, then do L
for
left first and R for right second. If you answer "Both" then the
numbering
will go sequentially left to right on each station (see below).
Offset to process (Enter to End): press Enter Or, enter
an offset to calculate another X,Y position, or the same
X,Y
position but on a different side of the road if doing L and R
distinctly.

Pulldown Menu Location: Roads
Keyboard Command: tpltrans
Prerequisite: A template file, profile file and centerline file
File Name: \lsp\eworks.arx