
This command labels the elevations of a profile along the bottom
horizontal axis at a user-specified interval. It requires an existing
grid and profile. The profile can be read from either a .PRO file or
from a profile polyline on the grid. This polyline must be drawn in the
direction of the grid. There are more labeling options when using the
screen polyline method.
In the dialog,
you can set the layer name, style, size and decimal places for the
labels.
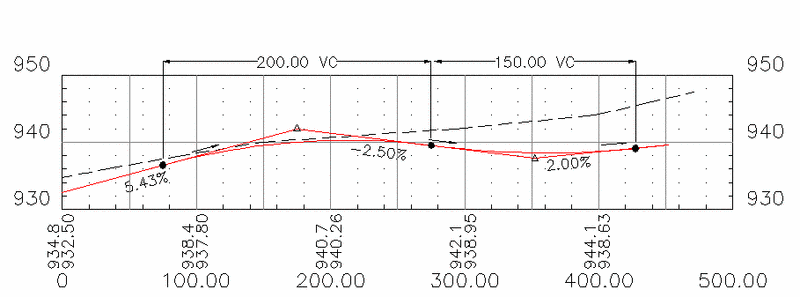
Two profiles can be labeled at once to handle existing and final
profiles
in one step (see graphic). When labeling two profiles with the "File"
method (recalling a profile), use the "L" justification for the first
set
of horizontal axis elevations, and use the "R" justification for the
second
set. One convention is to label the existing profile to one decimal
place and the final profile to two decimal places. When labeling only
one profile, use the center justification. When using two profiles from
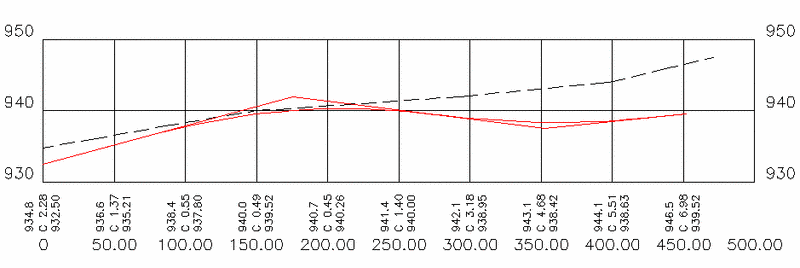
the "Screen" selection method, there is an
option to also label the elevation difference between the profiles. The
Label Between Elevations option chooses between labeling the values in
the order
of existing elevation, cut/fill and final elevation or in the order of
existing
elevation, final elevation then cut/fill. The Skip Elevation Labels
option
will label only the cut/fill and not the elevations.
Read Profile from a File or from the Screen
(File/<Screen>): press Enter
Plot Elevations on Horiz Axis dialog
Make sure the grid starting station and elevation match the grid that
you're
working on.
Pick the existing grade (Enter for none): pick a profile
polyline on the grid
Pick the final grade (Enter for none): press Enter
Alignment of text (<Left>/Center/Right)? C This
prompt occurs only in the "File" selection method.
Pick Lower Left Grid Corner: pick the corner (endpoint
snap is on)
Pulldown Menu Location: Profiles > Label Horizontal Axis
Keyboard Command: horelev
Prerequisite: Profile grid with a profile polyline
File Name: \lsp\horelev.lsp