
Carlson Point Clouds processes laser scan data to generate models,
breaklines and points. Within the Point Cloud module, all of the
workings within the Project is
controlled by the Project Manager. This needs to be loaded in order to
proceed further with the Point Cloud options. You start off by viewing
the Project dialog box, as shown here.
In the Point Cloud Project Manager Control Points Settings,
Global
settings for Control Points are set here.

Either Right Click or Double Click on Control Points. This will open
the Control Points dialog box.

Now click on the  Control Points Settings Icon.

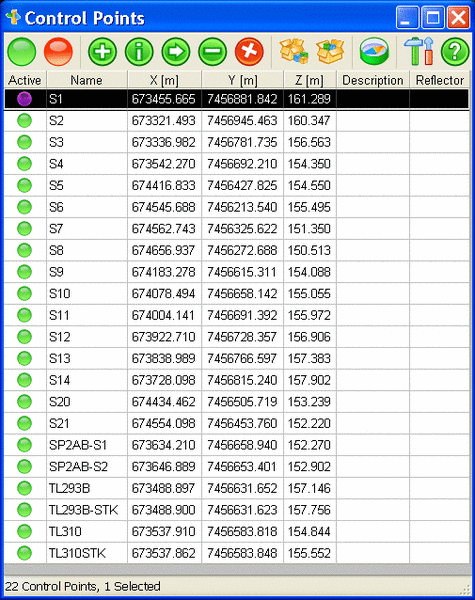
In the Point Cloud Project Manager in order to stitch all the Point
Clouds together, one of the options is to load Control Points which
need to be matched with the Scanned Targets.
Either Right Click or Double Click on Control Points. This will open
the Control Points dialog box.
Now click on the  Import Control Points Icon.
Select the text file from the necessary sub-directory.
Import Control Points Icon.
Select the text file from the necessary sub-directory.
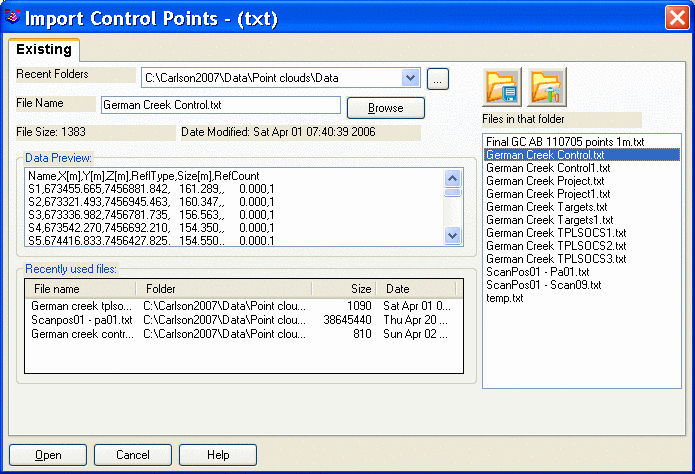
These files are normally in a Comma Delimited format, but can be in
a Comma, Space, Semicolon, Tab and other. If you have the header line
in, this can be used to identify the fields in the next screen.

In this screen all the title heading blocks will be blank when it
first opens up. Left click on the heading, this will open up a drop
down box, select the option which fits the column.
You will also see that the Header information was imported, this is not
a problem. Left click on the top Green button, this will change colour
to Red, indicating that line has been deactivated and will not be
imported.

The last screen will allow you additional options, which may be
useful to the user.
In the Point Cloud Project Manager in order to view and work with
the Point Clouds, you need to create a New Scan Position
Right Click on Point Cloud and select New Scan Position. This will
create a Scan Position 01 directory tree. Here you will be
importing Control Points, Clouds, Target Scans etc.
In the Point Cloud Project Manager > Target Points Settings,
Global
settings for Target Points are set here.
Either Right Click or Double Click on Target Points. This will open
the Target Points dialog box.

Now click on the  Control Points Settings Icon.

In the Point Cloud Project Manager > Target Points Import, you
assign the scanned targets co-ordinates which come from the scanner
co-ordinates. This is used for the Registration process, which converts
all the scanner co-ordinates from that scan to your Global co-ordinates.
Either Right Click or Double Click on Target Points. This will open
the Target Points Import dialog box.

Select the file with the scanned Target Points. These files are normally in a Comma Delimited format, but can be in a Comma, Space, Semicolon, Tab and other. If you have the header line in, this can be used to identify the fields in the next screen

In this screen all the title heading blocks will be blank when it
first opens up. Left click on the heading, this will open up a drop
down box, select the option which fits the column.
You will also see that the Header information was imported, this is not
a problem. Left click on the top Green button, this will change colour
to Red, indicating that line has been deactivated and will not be
imported.

The last screen will allow you additional options, which may be
useful to the user.
No Prompts:
In the Point Cloud Project Manager Settings, certain Global Project
settings are set here. Select the Settings option by either a Double
Click or a Right Click
> View to open the Settings dialog box.

Under 123 > Units and Ranges, you can set various settings, default settings are normally acceptable. The main setting that will be changed is Units > Distance which will either be Feet or Metres.

In ABC > Naming Conventions, you can change the naming
convention to suit your liking. It is better to leave the default
settings as they are.
Prompts
Settings options: two
different settings dialog boxes
Pulldown Menu Location: Point Clouds > Project Manager
Keyboard Command: pc_project_manager
Prerequisite: Open Project
File Name: \lsp\PointCloud16.arx